# Houdini 介绍
在现今的 Web 开发中,JavaScript 几乎占据所有版面,除了控制页面逻辑与操作 DOM 对象以外,连 CSS 都直接写在 JavaScript 里面了,就算浏览器都还沒有实现的特性,总会有人做出对应的 Polyfill,让开发者快速的将新 Feature 应用到 Production 环境中,更別提我们还有 Babel 等工具帮忙转译。
而 CSS 就不同了,除了制定 CSS 标准规范所需的时间外,各家浏览器的版本、实战进度差异更是旷日持久,顶多利用 PostCSS、Sass 等工具来帮我们转译出浏览器能接受的 CSS。开发者们能操作的就是通过 JS 去控制 DOM 与 CSSOM 来影响页面的变化,但是对于接下來的 Layout、Paint 与 Composite 就几乎沒有控制权了。
为了解決上述问题,为了让 CSS 的魔力不再被浏览器把持,Houdini (opens new window) 就诞生了!( Houdini 是美国伟大的魔术师,擅长逃脱术,很适合想将 CSS 从浏览器中解放的概念)。
CSS Houdini (opens new window) 是一组 API,它们使开发人员可以直接访问 CSS 对象模型(CSSOM (opens new window)),使开发人员可以编写浏览器可以解析为 CSS 的代码,从而创建新的 CSS 功能,而无需等待它们在浏览器中本地实现。
# Houdini APIs
Houdini APIs (opens new window) 有以下几种:
CSS Parser API
CSS Properties and Values API
CSS Typed OM
CSS Layout API
CSS Painting API
Worklet
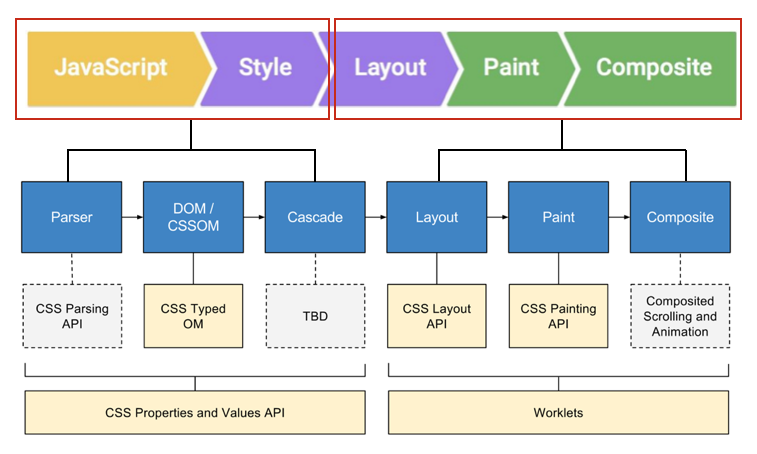
下图显示出 Houdini 试图在浏览器渲染网页的过程中提供哪些 API 给开发者使用:
其中灰色部分就是只在规划阶段,而黃色部份就是已经写入规范正在推行中。
# Worklet 实战
Worklet (opens new window) 的概念和 Web Workers (opens new window) 类似,它们允许你引入脚本文件并执行特定的 JS 代码,这样的 JS 代码要满足两个条件:
可以在渲染流程中调用;
和主线程独立。
Worklet 脚本严格控制了开发者所能执行的操作类型,这就保证了性能。
Worklet 的特点就是轻量以及生命周期较短。
CSS.paintWorklet.addModule('xxx.js')
CSS.layoutWorklet.addModule('xxx.js')

// xxx.js
registerPaint('xxx', class {
  static get inputProperties() {}
  static get inputArguments() {}
  paint(ctx, geom, properties) {}
})
2
3
4
5
6
7
8
9
# 绘制圆环
下面是 Worklet 的一个小实战,它会在浏览器中画一个圆环。
<!DOCTYPE html>
<html lang="en">
  <head>
    <meta charset="UTF-8" />
    <meta name="viewport" content="width=device-width, initial-scale=1.0" />
    <title>CSS Houdini</title>
    <style>
      .el {
        --elUnit: 500px;
        --arcColor: #8266ff;
        height: var(--elUnit);
        width: var(--elUnit);
        background: paint(background-canvas);
        --background--canvas: (ctx, geom) => {
            ctx.strokeStyle = `var(--arcColor)`;
            ctx.lineWidth = 4;
            ctx.beginPath();
            ctx.arc(200, 200, 50, 0, 2 * Math.PI);
            ctx.stroke();
            ctx.closePath();
        };
      }
    </style>
  </head>
  <body>
    <div class="el"></div>
    <script>
      CSS.paintWorklet.addModule('./arc.js');
    </script>
  </body>
</html>
2
3
4
5
6
7
8
9
10
11
12
13
14
15
16
17
18
19
20
21
22
23
24
25
26
27
28
29
30
31
// arc.js
registerPaint(
  'background-canvas',
  class {
    static get inputProperties() {
      return ['--background--canvas'];
    }
    paint(ctx, geom, properties) {
      eval(properties.get('--background--canvas').toString())(ctx, geom);
    }
  }
);
2
3
4
5
6
7
8
9
10
11
12
想要查看效果的话,就需要有一个本地服务器,这里我们可以使用 http-server (opens new window) 来起一个本地服务器,然后在浏览器中访问即可。
# 绘制星空
下面是另一个实战,它会在浏览器中显示一个星空。
<!DOCTYPE html>
<html lang="en">
  <head>
    <meta charset="UTF-8" />
    <meta name="viewport" content="width=device-width, initial-scale=1.0" />
    <title>CSS Houdini 绘制星空</title>
    <style>
      body {
        margin: 0;
        color: #fff;
        font-size: 24px;
        background: #000;
      }
      body::before {
        content: '';
        position: absolute;
        left: 0;
        top: 0;
        width: 100%;
        height: 100%;
        --star-density: 0.8;
        --star-opacity: 1;
        background-image: paint(yd-sky);
        animation: shine 1s linear alternate infinite;
      }
      @keyframes shine {
        from {
          --star-opacity: 1;
        }
        to {
          --star-opacity: 0.4;
        }
      }
    </style>
  </head>
  <body>
    <script>
      if (!CSS in window || !CSS.paintWorklet) {
        console.log('不支持 paintWorklet');
      } else {
        CSS.paintWorklet.addModule('./sky.js');
      }
    </script>
  </body>
</html>
2
3
4
5
6
7
8
9
10
11
12
13
14
15
16
17
18
19
20
21
22
23
24
25
26
27
28
29
30
31
32
33
34
35
36
37
38
39
40
41
42
43
44
45
// sky.js
class StarSky {
  constructor() {}
  static get inputProperties() {
    return ['--star-density', '--star-opacity'];
  }
  paint(ctx, geom, properties) {
    const xMax = geom.width;
    const yMax = geom.height;
    console.log(xMax, yMax);
    ctx.fillRect(0, 0, xMax, yMax);
    let starDensity = properties.get('--star-density').toString() || 1;
    let starOpacity = properties.get('--star-opacity').toString() || 1;
    const stars = Math.round((xMax + yMax) * starDensity);
    for (let i = 0; i <= stars; i++) {
      const x = Math.floor(Math.random() * xMax + 1);
      const y = Math.floor(Math.random() * yMax + 1);
      const size = Math.floor(Math.random() * 2 + 1);
      const opacityOne = Math.floor(Math.random() * 9 + 1);
      const opacityTwo = Math.floor(Math.random() * 9 + 1);
      const opacity = +('.' + (opacityOne + opacityTwo)) * starOpacity;
      const hue = Math.floor(Math.random() * 360 + 1);
      ctx.fillStyle = `hsla(${hue},30%,80%,${opacity})`;
      ctx.fillRect(x, y, size, size);
    }
  }
}
registerPaint('yd-sky', StarSky);
2
3
4
5
6
7
8
9
10
11
12
13
14
15
16
17
18
19
20
21
22
23
24
25
26
27
28
