# Redux 简介
Redux (opens new window) = Reducer + Flux (opens new window)
Redux 并不是 React 专用的,我们可以在任何一个 JS 项目中安装并使用它。
# Redux 的工作流程

# Redux 的三个基本原则
单一事实来源。Redux 全局只有一个 store,里面包含了唯一的状态对象树;
状态只读。这就是在强调状态的不可变性,只有通过派发 action 的方式才能触发 reducer,返回一个包含变更的新状态;
状态变更不应有副作用。在 store 中使用的 reducer,都必须是不会产生副作用的纯函数。
# Redux 何时用
当我们为项目引入了 Redux 后,并不意味着就与 useState 说再见了。它们可以共存,而且可以配合得很好。
一般情况下可以这样分工:
全局状态倾向于放到 Redux store 里;
局部状态倾向于放到 React state 里;
业务状态倾向于放到 Redux store 里;
交互状态倾向于放到 React state 里;
必要时,可以把外部状态同步到 Redux store 里。
业务状态是指与业务直接相关的状态,这些状态理论上剥离 UI 也可以使用,比如在单元测试中、Node.js 环境中等等。
交互状态(也称作 UI 状态),是与用户交互相关的状态,主要控制着用户与应用的交互过程,用于提升用户体验。
# Redux 核心 API
createStore
store.dispatch()
store.getState()
store.subscribe()
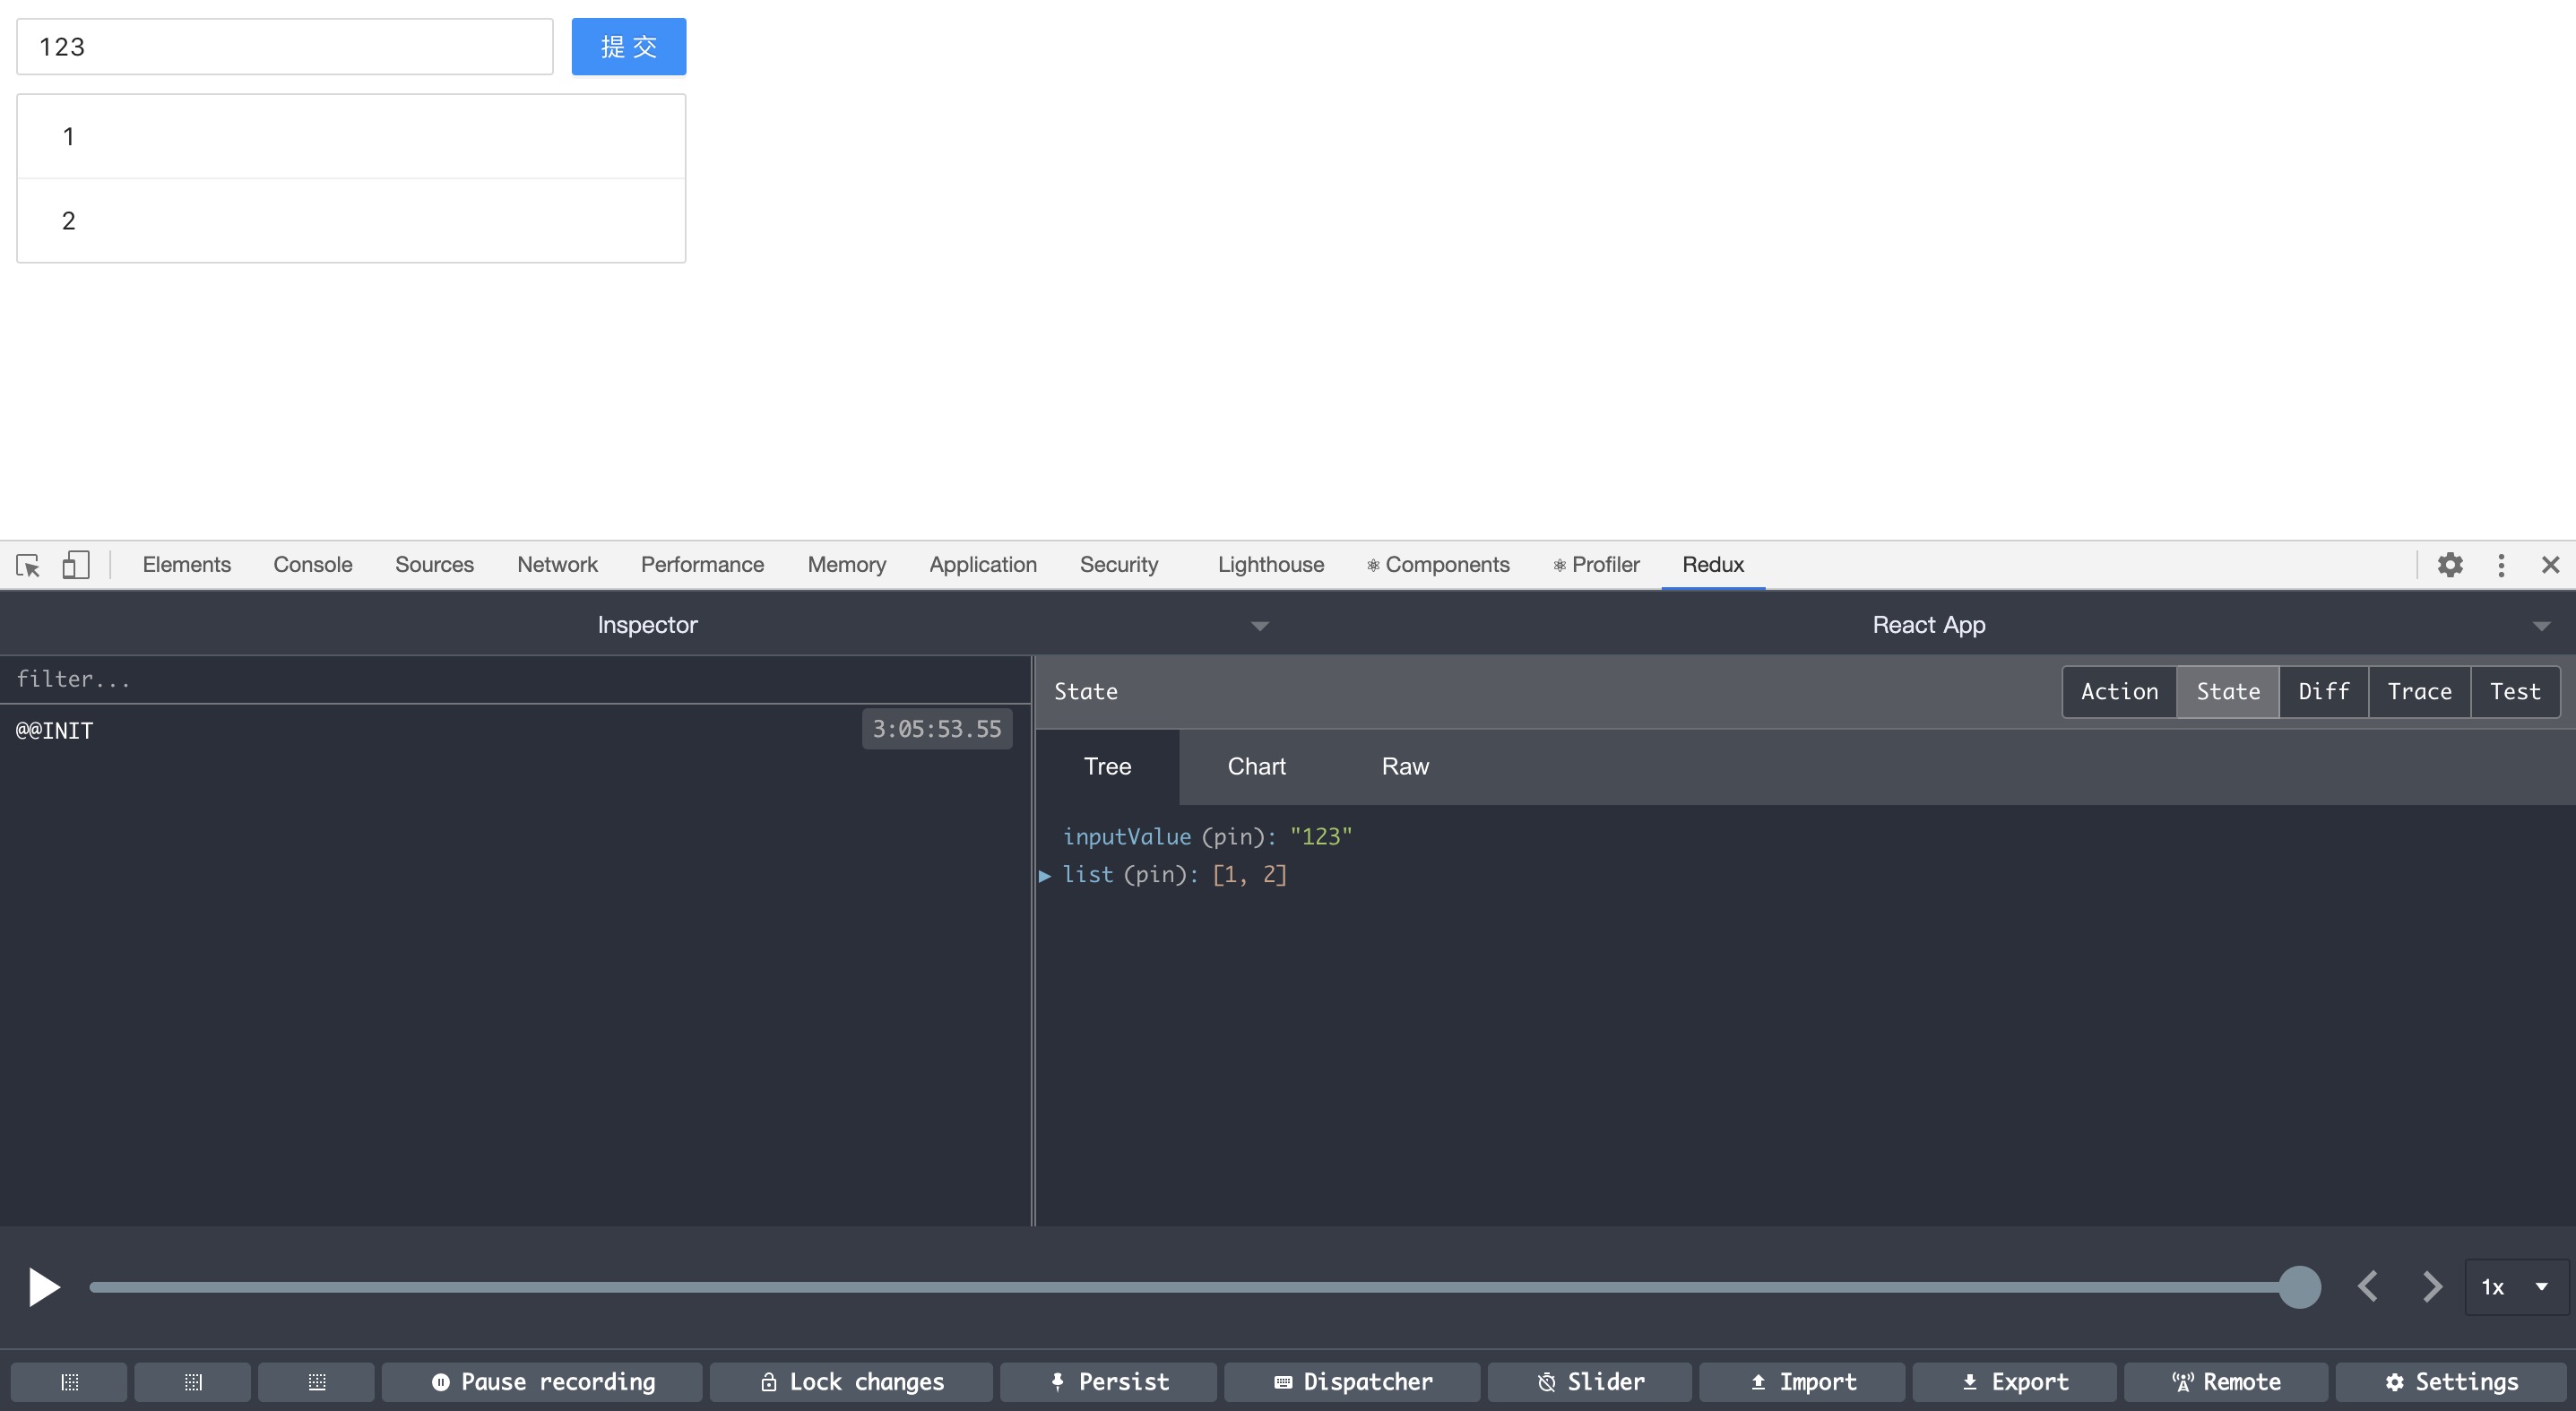
# Redux DevTools
这个浏览器扩展可以用来跟踪调试 state 和 action 包含的数据,还提供了一个很酷的时间旅行功能。
可以在 Chorme 网上应用商店里搜索添加这个插件帮助调试 Redux。
默认是不显示插件面板的,如下。点击 the instructions (opens new window) 就会跳转到插件的使用文档。
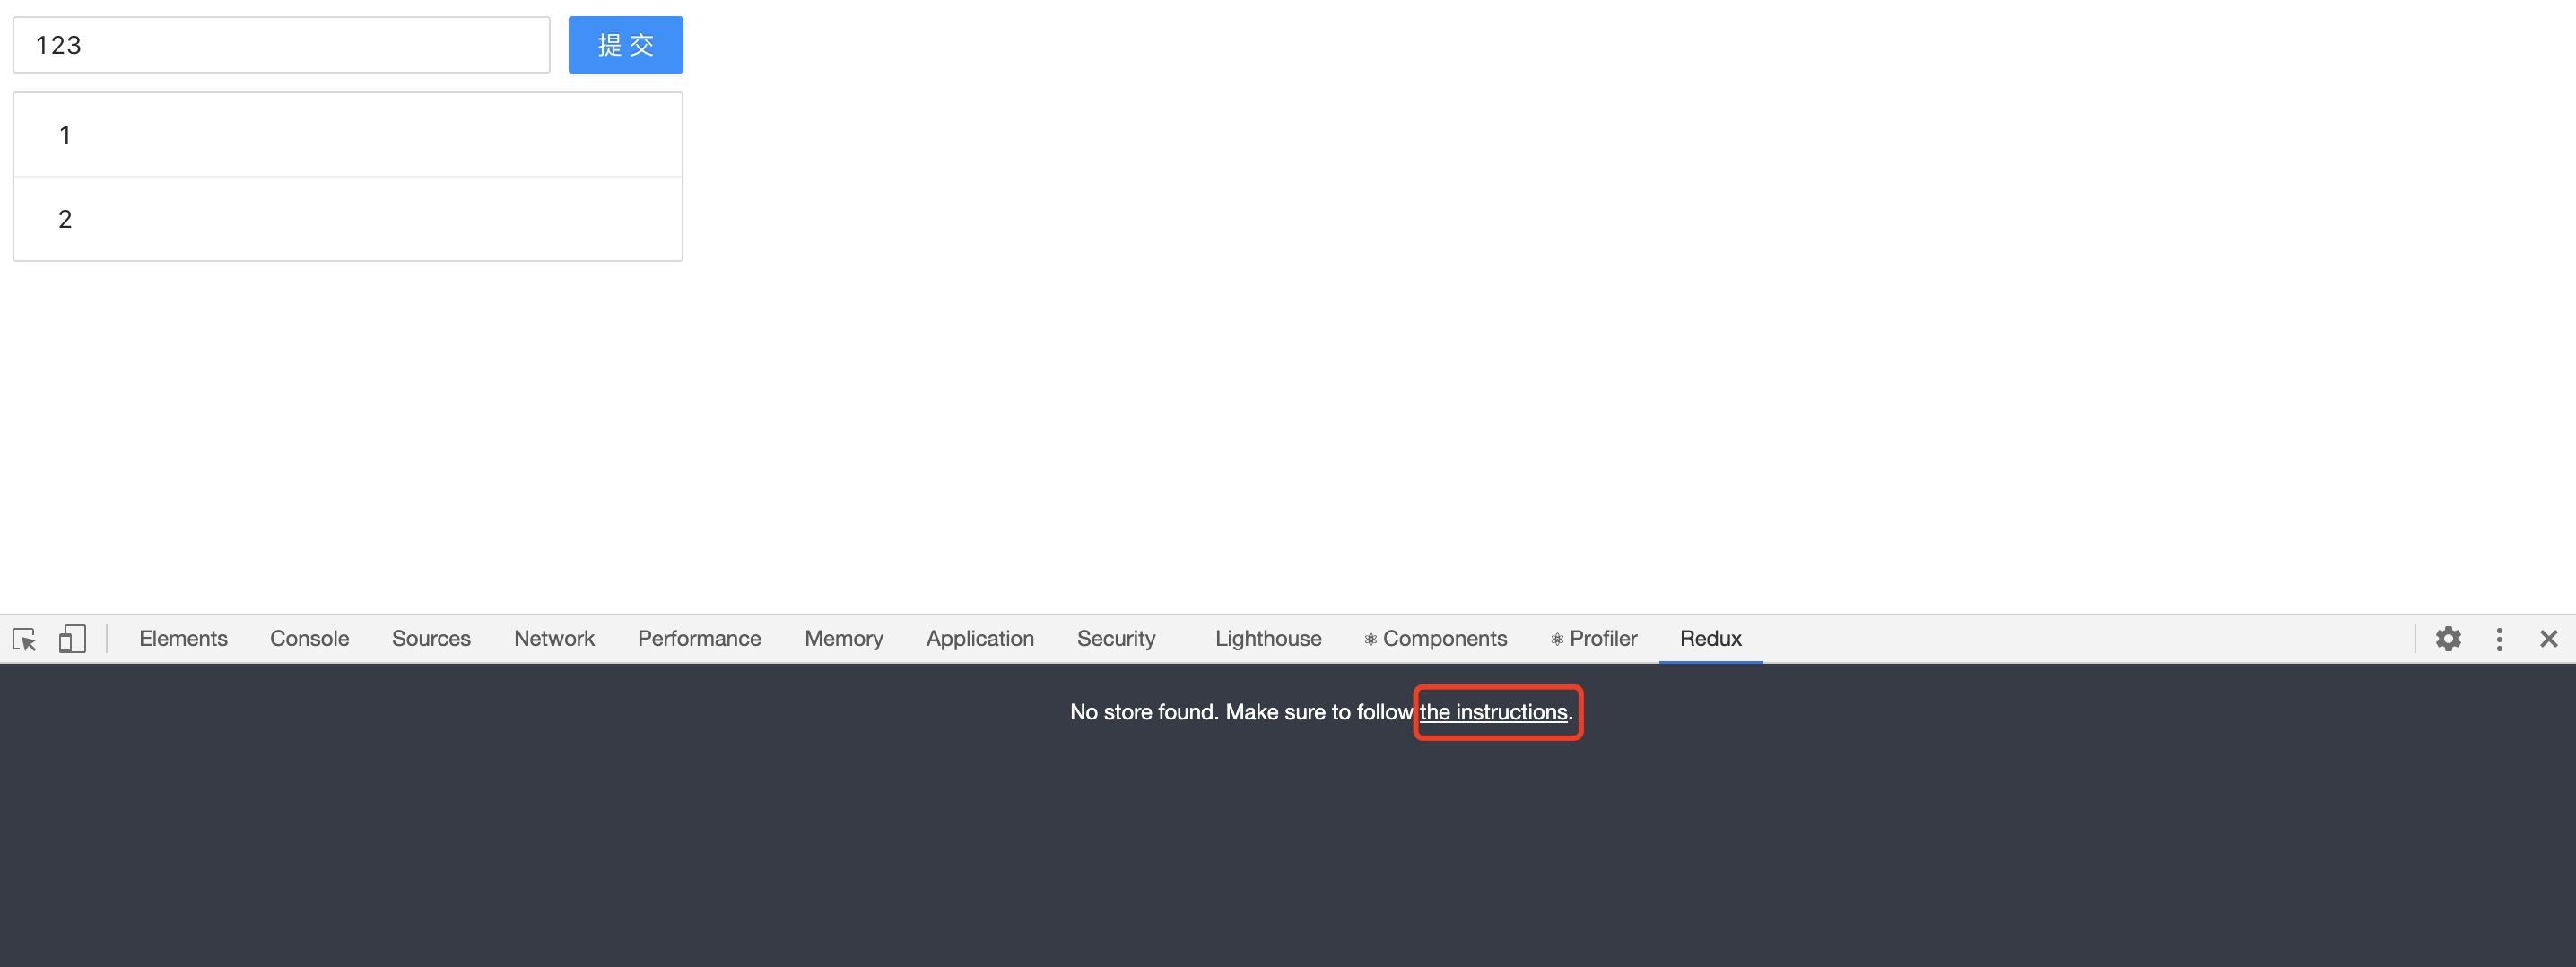
我们需要在代码中创建 store 的时候传入第二个参数,才会在浏览器中显示插件面板。
const store = createStore(
  reducer,
  window.__REDUX_DEVTOOLS_EXTENSION__ && window.__REDUX_DEVTOOLS_EXTENSION__()
);
2
3
4
# Redux 中间件
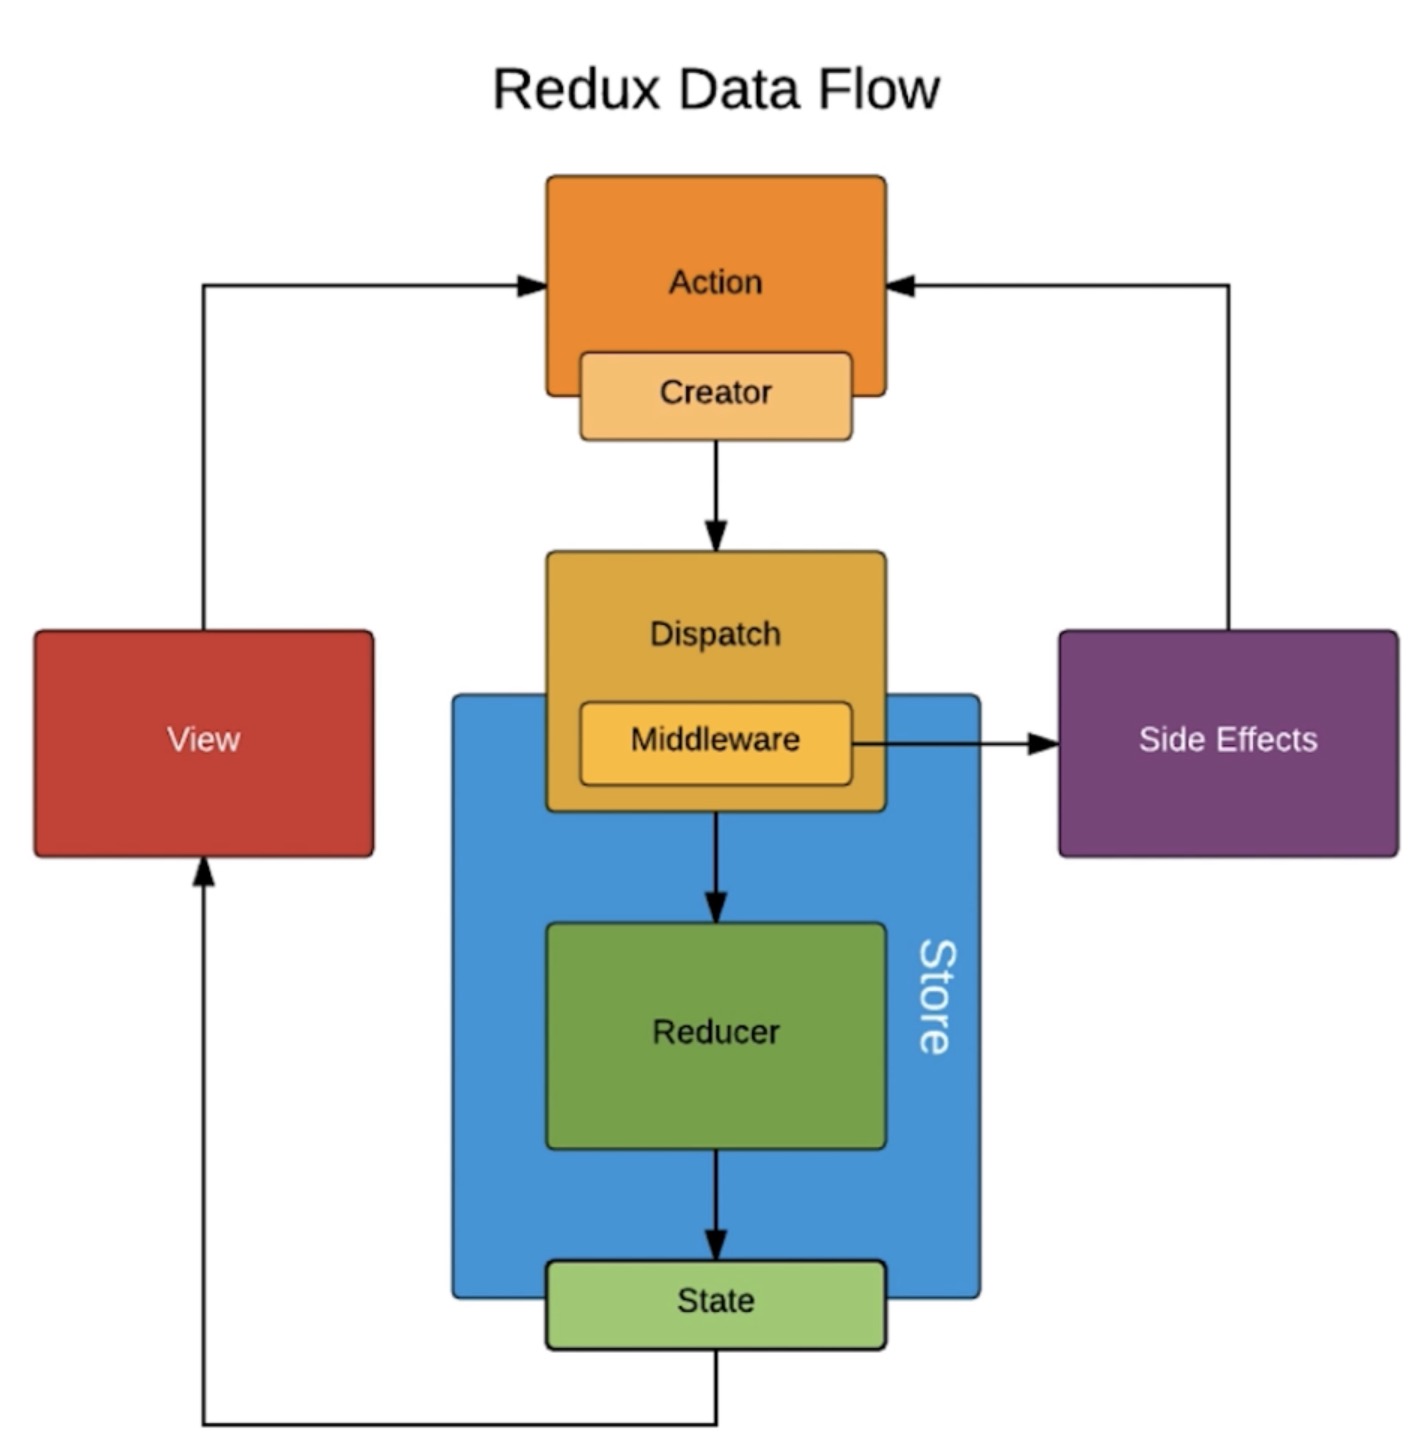
Redux 中间件可以让我们提供一个拦截器在 reducer 处理 action 之前被调用。在这个拦截器中,我们可以自由处理获得的 action。无论是把这个 action 直接传递到 reducer,或者构建新的 action 发送到 reducer,都是可以的。
Redux 常见的中间件有 redux-thunk (opens new window)、redux-saga (opens new window)。
# redux-thunk
1. 和 redux-devtools 一起使用
redux-devtools (opens new window) 其实也是 Redux 的一个中间件,所以可以和 redux-thunk 一起使用。
/*
 * /store/index.js
 */
import { createStore, applyMiddleware, compose } from "redux";
import thunk from "redux-thunk";
import reducer from "./reducer";

const composeEnhancers = window.__REDUX_DEVTOOLS_EXTENSION_COMPOSE__
  ? window.__REDUX_DEVTOOLS_EXTENSION_COMPOSE__({})
  : compose;
const enhancer = composeEnhancers(applyMiddleware(thunk));

// 创建 store 的时候把 reducer 传给它
const store = createStore(reducer, enhancer);

export default store;
2
3
4
5
6
7
8
9
10
11
12
13
14
15
16
2. redux-thunk 的用法
redux-thunk (opens new window) 如果发现接受到的 action 是一个函数,那么就不会传递给 Reducer,而是执行这个函数,并把 dispatch 作为参数传给这个函数,从而在这个函数中我们可以自由决定何时,如何发送 Action。
import { createStore, applyMiddleware } from 'redux'
import thunkMiddleware from 'redux-thunk'
import rootReducer from './reducer'

const composedEnhancer = applyMiddleware(thunkMiddleware)
// 在创建 Redux Store 时指定了 redux-thunk 这个中间件
const store = createStore(rootReducer, composedEnhancer)
2
3
4
5
6
7
function fetchData() {
  return dispatch => {
    dispatch({ type: 'FETCH_DATA_BEGIN' })
    fetch('./url').then(res => {
      dispatch({ type: 'FETCH_DATA_SUCCESS', data: res})
    }).catch(err => {
      dispatch({ type: 'FETCH_DATA_FAILURE', error: err})
    })
  }
}
2
3
4
5
6
7
8
9
10
import fetchData from './fetchData'

function dataList() {
  const dispatch = useDispatch()
  // dispatch 了一个函数由 redux-thunk 中间件去执行
  dispatch(fetchData())
}
2
3
4
5
6
7
通过这种方式,我们就实现了异步请求逻辑的重用。这一套结合 redux-thunk 中间件的机制,就称之为异步 Action。
因此,异步 Action 并不是一个具体的概念,而可以把它看作是 Redux 的一个使用模式。它通过组合使用同步 Action,在没有引入新概念的同时,用一致的方式提供了处理异步逻辑的方案。
# redux-saga
redux-saga (opens new window) 是 Redux 的另一个常用中间件,它会把异步请求统一放到 sagas.js 文件中进行管理。sagas.js 文件返回的是一个 generator 函数。
1. 和 redux-devtools 一起使用
引入方法跟 redux-thunk 类似,不过需要先建好一个 sagas.js 文件,并在创建 store 之后使用它。
/*
 * /store/index.js
 */

import { createStore, applyMiddleware, compose } from "redux";
import createSagaMiddleware from "redux-saga";
import todoSagas from "./sagas";
import reducer from "./reducer";

const sagaMiddleware = createSagaMiddleware();

const composeEnhancers = window.__REDUX_DEVTOOLS_EXTENSION_COMPOSE__
  ? window.__REDUX_DEVTOOLS_EXTENSION_COMPOSE__({})
  : compose;
const enhancer = composeEnhancers(applyMiddleware(sagaMiddleware));

// 创建 store 的时候把 reducer 传给它
const store = createStore(reducer, enhancer);

sagaMiddleware.run(todoSagas);

export default store;
2
3
4
5
6
7
8
9
10
11
12
13
14
15
16
17
18
19
20
21
22
/*
 * /store/sagas.js
 */

// 返回一个 generator 函数
function* todoSagas() {}

export default todoSagas;
2
3
4
5
6
7
8
2. redux-saga 的用法
redux-saga 有很多 api,所以,它的使用也要比 redux-thunk 复杂的多。
之前 action 只能被 reducer 接收,使用了 redux-saga 之后,action 也能在 sagas.js 文件中被接收到。
/*
 * TodoList.js
 */

import { getInitList } from '../../store/actionCreators';

componentDidMount() {
	const action = getInitList();
	store.dispatch(action);
}
2
3
4
5
6
7
8
9
10
/*
 * /store/actionCreators.js
 */

import { GET_INIT_LIST } from './actionTypes';

export const getInitList = () => ({
  type: GET_INIT_LIST
})
2
3
4
5
6
7
8
9
/*
 * /store/actionTypes.js
 */

export const GET_INIT_LIST = 'get_init_list';
2
3
4
5
/*
 * /store/sagas.js
 */

import { put, takeEvery } from "redux-saga/effects";
import { GET_INIT_LIST } from "./actionTypes.js";
import { initListAction } from "./actionCreators";
import axios from "axios";

function* getInitList() {
  // generator 函数要捕获错误时,需要用 try ... catch
  try {
    const res = yield axios.get("/api/todolist");
    const action = initListAction(res.data.data);
    yield put(action);
  } catch {
    console.log("请求失败");
  }
}

function* todoSagas() {
  yield takeEvery(GET_INIT_LIST, getInitList);
}

export default todoSagas;
2
3
4
5
6
7
8
9
10
11
12
13
14
15
16
17
18
19
20
21
22
23
24
25
# React Redux
我们在 React 中使用 Redux,一般会借助 Redux 官方的 React 连接器 React Redux (opens new window)。
这个库把 Redux 的 store 放到了 context 里,但并没有借助 React 的 context 更新机制来响应 store 内部的更新。在早期版本中,React Redux 提供的高阶组件订阅 store 变化,当有变化时调用组件的 forceUpdate() 方法。
而在新版(v8.0)中,高阶组件使用了 React 的新 Hooks API:useSyncExternalStore (opens new window),用这个 Hook 返回的 props 来更新被修饰的组件。
# Provider
Provider 的作用就是把 store 提供给了它所包含的所有组件,使得它们都可以使用。
import { Provider } from "react-redux";
import store from './store';

const App = (
  // Provider 把 store 提供给了它所包含的所有组件,它们都可以使用
  <Provider store={store}>
    <TodoList />
  </Provider>
)

ReactDOM.render(
  App,
  document.getElementById("root"),
  () => {
    console.log("Render successful!");
  }
);
2
3
4
5
6
7
8
9
10
11
12
13
14
15
16
17
# connect
connect 方法是让组件和 store 做连接。
// connect 方法是让 TodoList 和 store 做连接
// TodoList 是一个 UI 组件,当 connect 将它和 store 连接起来之后,返回的结果是一个容器组件
export default connect(mapStateToProps, mapDispatchToProps)(TodoList);
2
3
# mapStateToProps
mapStateToProps 的作用是将 store 里的数据映射到组件的 props,返回一个对象。
// 将 store 里的数据映射到组件的 props
const mapStateToProps = (state) => {
  return {
    inputValue: state.inputValue
  }
}
2
3
4
5
6
# mapDispatchToProps
mapDispatchToProps 的作用是把 store.dispatch 方法挂载到组件的 props 上,也是返回一个对象。
// 把 store.dispatch 方法挂载到组件的 props 上
const mapDispatchToProps = (dispatch) => {
  return {
    handleInputChange(e) {
      const action = {
        type: 'change_input_value',
        value: e.target.value
      }
      dispatch(action);
    }
  }
}
2
3
4
5
6
7
8
9
10
11
12
# Redux Toolkit
Redux Toolkit (opens new window) 是 Redux 官方推出的一套更易于使用的封装库 Redux Toolkit,用来简化 Redux 开发。
降低了配置 Redux store 的复杂度;
减少了 Redux 所需的样板代码;
内置了 Redux 必备的扩展库。
Redux Toolkit 新引入了一个概念 slice,即切片。切片是一组相关的 state 默认值、action、reducer 的集合。
首先用 Redux Toolkit 的 createSlice 创建 slice,然后从这个 slice 中拿到生成的 actionCreator 和 reducer,用 configureStore 消费这个 reducer 创建 store。接下来的步骤就与前面 Redux 的例子类似了,有一点区别是这边用于派发的 action 都是调用 actionCreator 创建的。
此外,还有一点需要注意的,Redux Toolkit 的 reducer 中默认启用了 Immer,因此我们可以直接用熟悉的 JS API 来修改状态,框架会帮我们加入 state 的不可变性。
import { createSlice, configureStore } from '@reduxjs/toolkit';

const cardListSlice = createSlice({
  name: 'cardList',
  initialState: [],
  reducers: {
    addCard(state, action) {
      state.unshift(action.payload.newCard);
    },
    removeCard(state, action) {
      const index = state.findIndex(card => card.title === action.payload.title);
      if (index !== -1) {
        state.splice(index, 1);
      }
    }
  }
});
export const { addCard, removeCard } = cardListSlice.actions;

const store = configureStore({
  reducer: cardListSlice.reducer
});
store.subscribe(() => console.log(store.getState()));

store.dispatch(addCard({ newCard: { title: '开发任务-1' } })); // [{ title: '开发任务-1' }]
store.dispatch(addCard({ newCard: { title: '测试任务-2' } })); // [{ title: '测试任务-2' } { title: '开发任务-1' }]
store.dispatch(removeCard({ title: '开发任务-1' })); // [{ title: '测试任务-2' }]
2
3
4
5
6
7
8
9
10
11
12
13
14
15
16
17
18
19
20
21
22
23
24
25
26
27
# Redux 小实战
下面是使用 antd 和 Redux 实现的 todolist 功能。完整代码如下:
# TodoList.js
/*
 * TodoList.js
 */

import React, { Component } from;
import "antd/dist/antd.css";
import { Input, Button, List } from "antd";
import store from "../../store";
// import { CHANGE_INPUT_VALUE, ADD_TODO_ITEM, DELETE_TODO_ITEM } from '../../store/actionTypes';
import {
  getInputChangeAction,
  getAddItemAction,
  getDeleteItemAction,
} from "../../store/actionCreators";

class TodoList extends Component {
  constructor(props) {
    super(props);
    this.state = store.getState(); // 获取 store 里的数据
    // console.log(store.getState());
    this.handleInputChange = this.handleInputChange.bind(this);
    this.handleStoreChange = this.handleStoreChange.bind(this);
    this.handleBtnClick = this.handleBtnClick.bind(this);
    store.subscribe(this.handleStoreChange); // 订阅,当 store 发生变化的时候,就会执行里面的函数
  }

  render() {
    return (
      <div style={{ marginTop: "10px", marginLeft: "10px" }}>
        <div>
          <Input
            value={this.state.inputValue}
            placeholder="todo info"
            style={{ width: "300px", marginRight: "10px" }}
            onChange={this.handleInputChange}
          />
          <Button type="primary" onClick={this.handleBtnClick}>
            提交
          </Button>
          <List
            style={{ marginTop: "10px", width: "374px" }}
            bordered
            dataSource={this.state.list}
            renderItem={(item, index) => (
              <List.Item>
                <span>{item}</span>
                <Button
                  type="primary"
                  danger
                  onClick={this.handleDelete.bind(this, index)}
                >
                  删除
                </Button>
              </List.Item>
            )}
          />
        </div>
      </div>
    );
  }

  handleInputChange(e) {
    // const action = {
    // 	type: CHANGE_INPUT_VALUE,
    // 	value: e.target.value
    // }
    const action = getInputChangeAction(e.target.value);
    store.dispatch(action);
  }

  handleStoreChange() {
    // console.log('store change');
    this.setState(store.getState());
  }

  handleBtnClick() {
    // const action = {
    // 	type: ADD_TODO_ITEM
    // }
    const action = getAddItemAction();
    store.dispatch(action);
  }

  handleDelete(idx) {
    // const action = {
    // 	type: DELETE_TODO_ITEM,
    // 	index: idx
    // }
    const action = getDeleteItemAction(idx);
    store.dispatch(action);
  }
}

export default TodoList;
2
3
4
5
6
7
8
9
10
11
12
13
14
15
16
17
18
19
20
21
22
23
24
25
26
27
28
29
30
31
32
33
34
35
36
37
38
39
40
41
42
43
44
45
46
47
48
49
50
51
52
53
54
55
56
57
58
59
60
61
62
63
64
65
66
67
68
69
70
71
72
73
74
75
76
77
78
79
80
81
82
83
84
85
86
87
88
89
90
91
92
93
94
# index.js
/*
 * /store/index.js
 */

import { createStore } from "redux";
import reducer from "./reducer";

// 创建 store 的时候把 reducer 传给它
const store = createStore(
  reducer,
  window.__REDUX_DEVTOOLS_EXTENSION__ && window.__REDUX_DEVTOOLS_EXTENSION__()
);

export default store;
2
3
4
5
6
7
8
9
10
11
12
13
14
# reducer.js
/*
 * /store/reducer.js
 */

import {
  CHANGE_INPUT_VALUE,
  ADD_TODO_ITEM,
  DELETE_TODO_ITEM,
} from "./actionTypes";

const defaultState = {
  inputValue: "",
  list: [],
};

// reducer 可以接收 state,但是绝不能修改 state
// 所以我们需要把原来的 state 复制一份出来修改
// reducer 必须是个纯函数
// 纯函数是指,给定固定的输入,就一定会有固定的输出,而且不会有任何副作用
export default (state = defaultState, action) => {
  // console.log(state, action);
  if (action.type === CHANGE_INPUT_VALUE) {
    const newState = JSON.parse(JSON.stringify(state));
    newState.inputValue = action.value;
    return newState;
  }
  if (action.type === ADD_TODO_ITEM) {
    const newState = JSON.parse(JSON.stringify(state));
    newState.list.push(newState.inputValue);
    newState.inputValue = "";
    return newState;
  }
  if (action.type === DELETE_TODO_ITEM) {
    const newState = JSON.parse(JSON.stringify(state));
    newState.list.splice(action.index, 1);
    return newState;
  }
  return state;
};
2
3
4
5
6
7
8
9
10
11
12
13
14
15
16
17
18
19
20
21
22
23
24
25
26
27
28
29
30
31
32
33
34
35
36
37
38
39
# actionTypes.js
/*
 * /store/actionTypes.js
 */

// 统一管理 action 变量
export const CHANGE_INPUT_VALUE = "change_input_value";
export const ADD_TODO_ITEM = "add_todo_item";
export const DELETE_TODO_ITEM = "delete_todo_item";
2
3
4
5
6
7
8
# actionCreators.js
/*
 * /store/actionCreators.js
 */

// 通过 actionCreators 来统一派发 action

import {
  CHANGE_INPUT_VALUE,
  ADD_TODO_ITEM,
  DELETE_TODO_ITEM,
} from "./actionTypes";

export const getInputChangeAction = (value) => ({
  type: CHANGE_INPUT_VALUE,
  value,
});

export const getAddItemAction = () => ({
  type: ADD_TODO_ITEM,
});

export const getDeleteItemAction = (index) => ({
  type: DELETE_TODO_ITEM,
  index,
});
2
3
4
5
6
7
8
9
10
11
12
13
14
15
16
17
18
19
20
21
22
23
24
25
最终效果如下:

# 容器组件和 UI 组件的拆分
容器组件又被称为聪明组件,因为容器组件并不管页面最后长什么样,它关注的是整个组件的业务逻辑,主要负责整个组件的功能实现。
UI 组件又被称为傻瓜组件,它只负责页面的渲染展示,没有任何业务逻辑可言。
可以把上面做好的 todolist 组件拆成容器组件 TodoList 和 UI 组件 TodoListUI,如下:
/*
 * TodoList.js
 */

import React, { Component } from;
import "antd/dist/antd.css";
import store from "../../store";
import {
  getInputChangeAction,
  getAddItemAction,
  getDeleteItemAction,
} from "../../store/actionCreators";
import TodoListUI from "./TodoListUI";

class TodoList extends Component {
  constructor(props) {
    super(props);
    this.state = store.getState(); // 获取 store 里的数据
    this.handleInputChange = this.handleInputChange.bind(this);
    this.handleStoreChange = this.handleStoreChange.bind(this);
    this.handleBtnClick = this.handleBtnClick.bind(this);
    this.handleDelete = this.handleDelete.bind(this);
    store.subscribe(this.handleStoreChange); // 订阅,当 store 发生变化的时候,就会执行里面的函数
  }

  render() {
    return (
      <TodoListUI
        inputValue={this.state.inputValue}
        list={this.state.list}
        handleInputChange={this.handleInputChange}
        handleBtnClick={this.handleBtnClick}
        handleDelete={this.handleDelete}
      />
    );
  }

  handleInputChange(e) {
    const action = getInputChangeAction(e.target.value);
    store.dispatch(action);
  }

  handleStoreChange() {
    this.setState(store.getState());
  }

  handleBtnClick() {
    const action = getAddItemAction();
    store.dispatch(action);
  }

  handleDelete(idx) {
    const action = getDeleteItemAction(idx);
    store.dispatch(action);
  }
}

export default TodoList;
2
3
4
5
6
7
8
9
10
11
12
13
14
15
16
17
18
19
20
21
22
23
24
25
26
27
28
29
30
31
32
33
34
35
36
37
38
39
40
41
42
43
44
45
46
47
48
49
50
51
52
53
54
55
56
57
58
/*
 * TodoListUI.js
 */

// UI 组件,只负责渲染

import React, { Component } from;
import { Input, Button, List } from "antd";

class TodoListUI extends Component {
  render() {
    return (
      <div style={{ marginTop: "10px", marginLeft: "10px" }}>
        <div>
          <Input
            value={this.props.inputValue}
            placeholder="todo info"
            style={{ width: "300px", marginRight: "10px" }}
            onChange={this.props.handleInputChange}
          />
          <Button type="primary" onClick={this.props.handleBtnClick}>
            提交
          </Button>
          <List
            style={{ marginTop: "10px", width: "374px" }}
            bordered
            dataSource={this.props.list}
            renderItem={(item, index) => (
              <List.Item>
                <span>{item}</span>
                <Button
                  type="primary"
                  danger
                  onClick={() => {
                    this.props.handleDelete(index);
                  }}
                >
                  删除
                </Button>
              </List.Item>
            )}
          />
        </div>
      </div>
    );
  }
}

export default TodoListUI;
2
3
4
5
6
7
8
9
10
11
12
13
14
15
16
17
18
19
20
21
22
23
24
25
26
27
28
29
30
31
32
33
34
35
36
37
38
39
40
41
42
43
44
45
46
47
48
49
# 无状态组件
当一个组件只有一个 render 函数的时候,我们就可以把它改写成一个无状态组件,相对于普通组件来说性能比较高。这是因为无状态组件就是一个函数,普通组件会有各种生命周期要执行,性能肯定没法跟无状态组件相比。
将上面的 UI 组件 TodoListUI 改写成无状态组件如下:
import React from;
import { Input, Button, List } from "antd";

const TodoListUI = (props) => {
  return (
    <div style={{ marginTop: "10px", marginLeft: "10px" }}>
      <div>
        <Input
          value={props.inputValue}
          placeholder="todo info"
          style={{ width: "300px", marginRight: "10px" }}
          onChange={props.handleInputChange}
        />
        <Button type="primary" onClick={props.handleBtnClick}>
          提交
        </Button>
        <List
          style={{ marginTop: "10px", width: "374px" }}
          bordered
          dataSource={props.list}
          renderItem={(item, index) => (
            <List.Item>
              <span>{item}</span>
              <Button
                type="primary"
                danger
                onClick={() => {
                  props.handleDelete(index);
                }}
              >
                删除
              </Button>
            </List.Item>
          )}
        />
      </div>
    </div>
  );
};
2
3
4
5
6
7
8
9
10
11
12
13
14
15
16
17
18
19
20
21
22
23
24
25
26
27
28
29
30
31
32
33
34
35
36
37
38
39
← React 相关知识 Hook 相关知识 →