本文的主要内容有以下两部分:
使用 Webpack 编译前端代码。
使用 Gulp 对 Node.js 项目进行流清洗。
# 调整项目目录结构
在之前做好的项目基础上,新建一个 src 文件夹,并在其下面新建 web 和 server 两个文件夹。然后把原来的 models、config、libs、logs、controllers 文件夹和 app.js 文件整个挪到 server 里面,原来的 views、widgets 和 assets 文件夹整个挪到 web 里面。web 就是你的前端项目,server 就是你的后端项目。
完成以上调整后,再新建 gulpfile.js 和 webpack.config.js 文件,前者主要用来编译 Node.js,后者主要用来编译前端项目,编译完后还会生成一个 dist 目录。
为什么要使用 gulp 而不是使用 webpack 来编译 Node.js?原因可以查看这里。
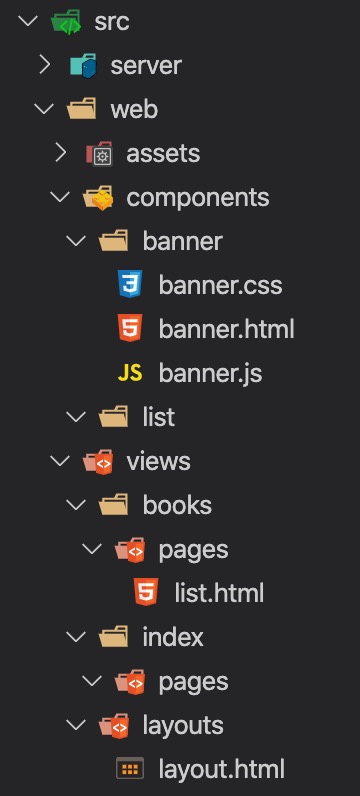
调整好之后的目录结构如下:
# 讲讲 package.json
在编写 webpack.config.js 之前,先来看下 package.json 文件的一些功能。
# 生命周期
- package.json 其实也是有生命周期的,比如在 scripts 中添加以下两句。
"scripts": {
    "pretest": "echo 11",
    "test": "echo 22"
}
2
3
4
然后执行 npm run test,会看到先输出 pretest 钩子的内容,再输出 test 钩子的内容。
# 运行多条命令
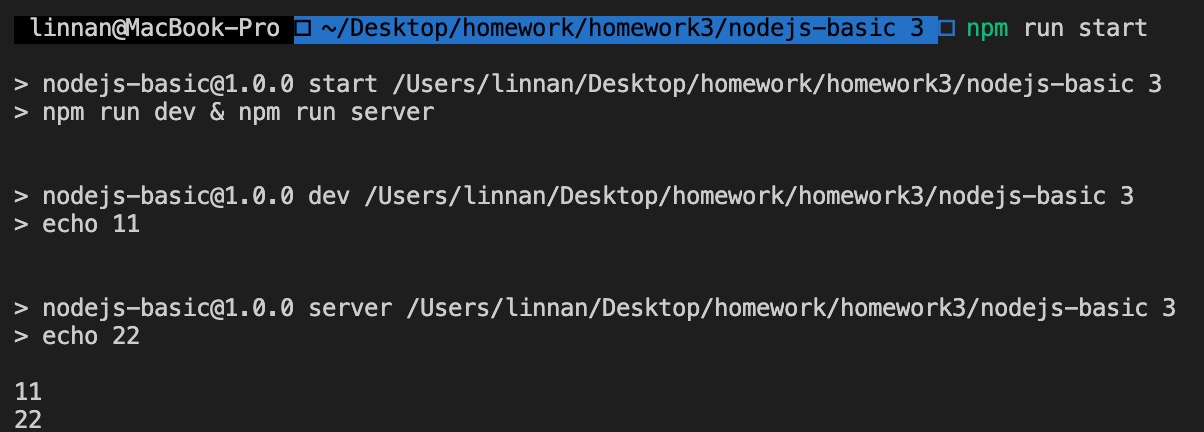
- 并行运行多条命令。
"scripts": {
    "dev": "echo 11",
    "server": "echo 22",
    "start": "npm run dev & npm run server"
}
2
3
4
5
结果如下:
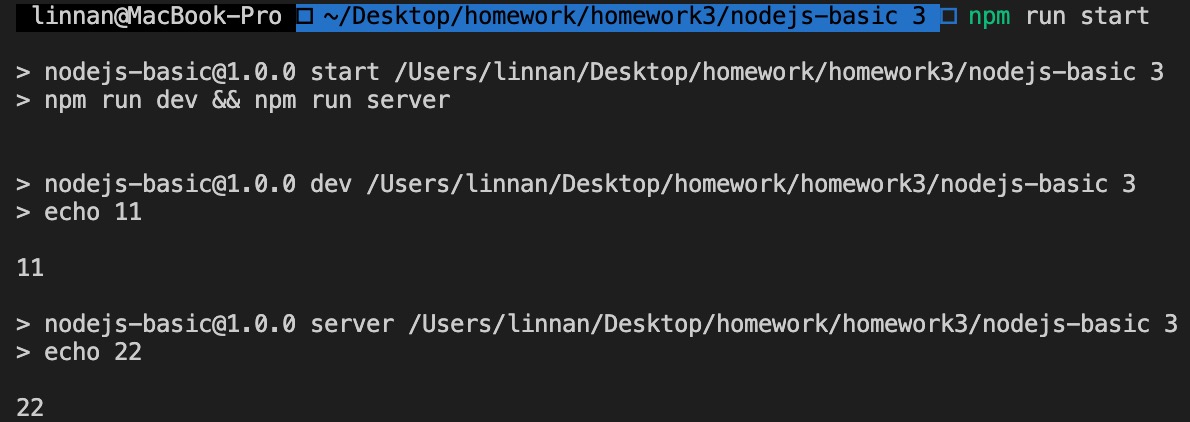
- 串行运行多条命令。
"scripts": {
    "dev": "echo 11",
    "server": "echo 22",
    "start": "npm run dev && npm run server"
}
2
3
4
5
结果如下:
# npm-run-all
不管是并行还是串行运行多条命令,上面的写法都有点繁琐,可以用 npm-run-all (opens new window) 这个包来简化写法。它可以通过指定参数来实现并行或者串行执行多条命令。
需要全局安装,局部安装好了之后还是会提示 npm-run-all 命令不存在。
sudo npm install -g npm-run-all
使用方法也很简单:
# 串行
npm-run-all dev server

# 并行
npm-run-all --parallel dev server
2
3
4
5
或者:
# 串行
run-s dev server

# 并行
run-p dev server
2
3
4
5
- 添加可能需要的脚本命令和对应的脚本文件。比如:
"scripts": {
    "client:dev": "webpack --mode development",
    "client:prod": "webpack --mode production",
    "server:start": "npm run dev && npm run server",
    "server:dev": "cross-env NODE_ENV=development gulp",
    "server:prod": "cross-env NODE_ENV=production gulp"
}
2
3
4
5
6
7
然后我们需要新建一个 scripts 文件夹,并在其下新建 server 和 client 文件夹,用来存放脚本执行文件,每个脚本执行文件的名称跟 scripts 中冒号后面的名称相对应。可以是 .sh 格式(shell 文件),也可以是 .js 格式。
# Concurrently
Concurrently (opens new window) 也是一个同时运行多个命令的工具。它是更通用的并行命令工具,不支持串行,输出体验好,更灵活;而 npm-run-all (opens new window) 是专为 npm scripts 优化,支持串行 + 并行,语法简洁。
# scripty
scripty (opens new window) 能够帮我们自动定位到相应的脚本文件,安装好这个包之后,scripts 里的命令就可以大大简化了。
先把 scripts 里的命令都移动到各自的脚本文件中,然后再把每行命令的内容改为 scripty 就行了。
# client/dev.sh
webpack --mode development

# client/prod.sh
webpack --mode production

# server/start.sh
cross-env NODE_ENV=development nodemon ./dist/app.js

# server/dev.sh
cross-env NODE_ENV=development gulp

# server/prod.sh
cross-env NODE_ENV=production gulp
2
3
4
5
6
7
8
9
10
11
12
13
14
"scripts": {
    "client:dev": "scripty",
    "client:prod": "scripty",
    "server:start": "scripty",
    "server:dev": "scripty",
    "server:prod": "scripty",
    "start": "",
    "build": "npm-run-all --parallel client:prod erver:prod"
}
2
3
4
5
6
7
8
9
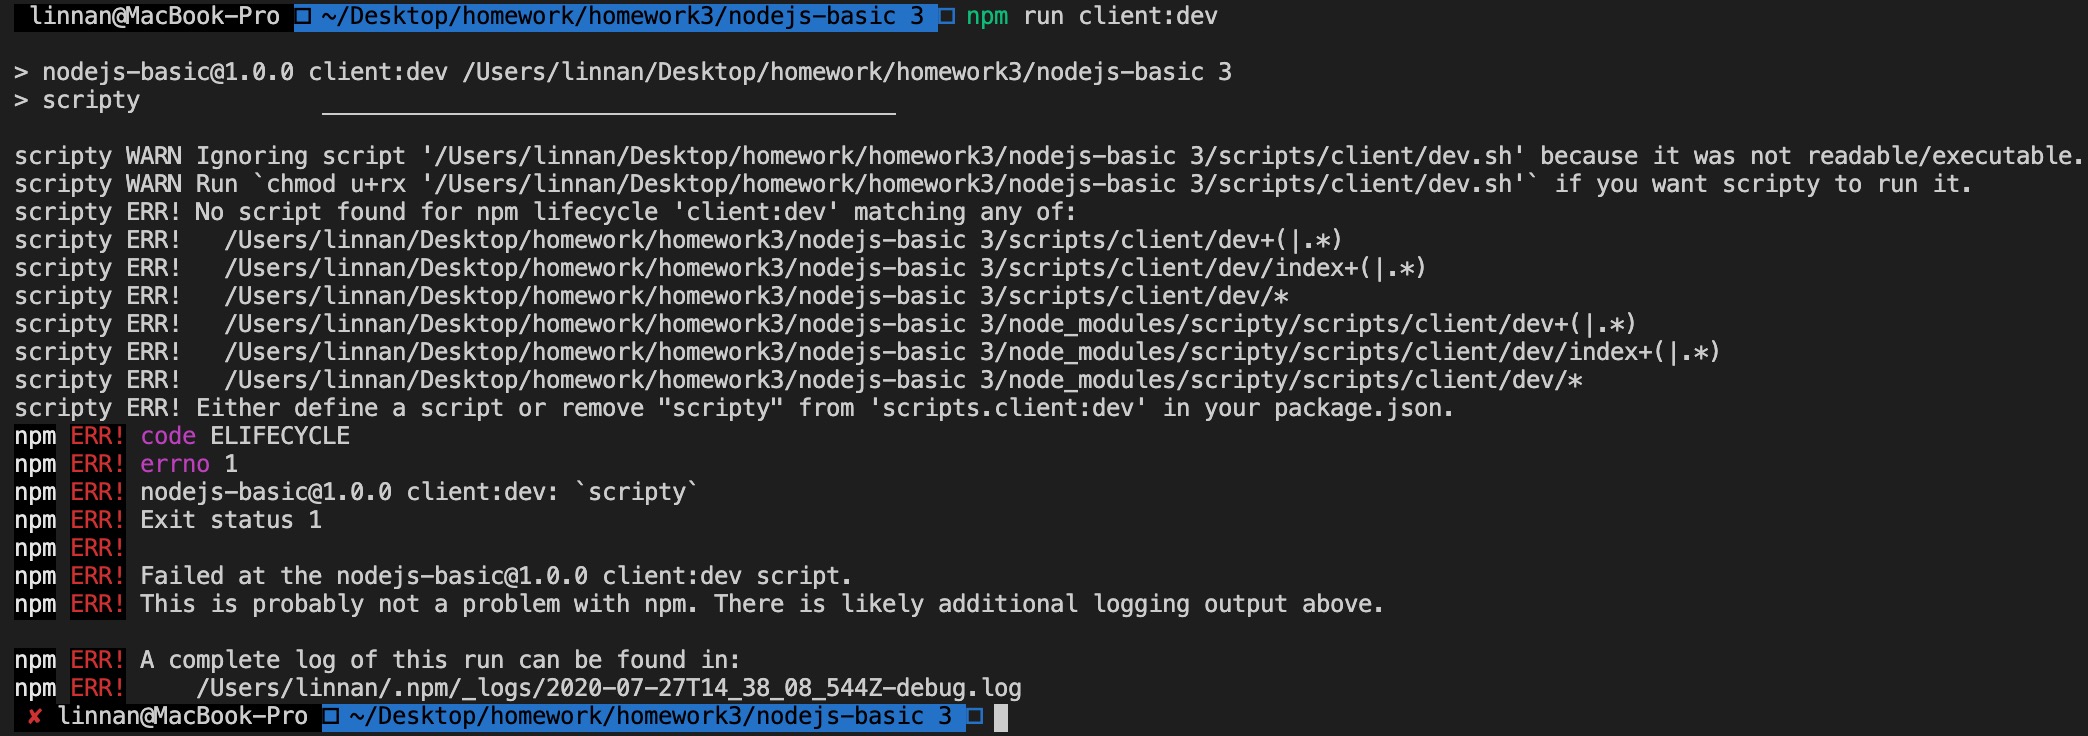
改好之后试着执行下 npm run client:dev,却发现报了下面的错误。
这是因为 scripts 文件夹下面的 shell 文件还没有执行权限,我们可以使用下面的命令给它们都加上执行权限。
chmod -R +x ./scripts
然后重新执行命令就可以了。
这样,我们就把 package.json 文件过渡到能够执行 shell 命令了,它不再只是一个依赖包的管理文件。此时的 package.json 就拥有了十分强大的功能了,它甚至可以在远程服务器上编译代码,实现集群编译。
集群编译是指,把我们本地的不同资源(css、js、静态资源图片等等)分别通过 scp 命令上传到各个专门处理相应资源的其他服务器上进行编译,编译完成后的资源再从各个服务器回传到本地,这样,我们就同时拥有了各种资源的编译结果。这就是所谓的集群编译。
- 在 package.json 中使用自定义的参数。
"scripts": {
    "star": "echo $npm_package_config_port"
},
"config": {
    "port": 3000
}
2
3
4
5
6
执行 npm run star 之后就会看到输出了3000。
直接执行 npm run env 能够得到 npm 的所有参数。
# jscpd
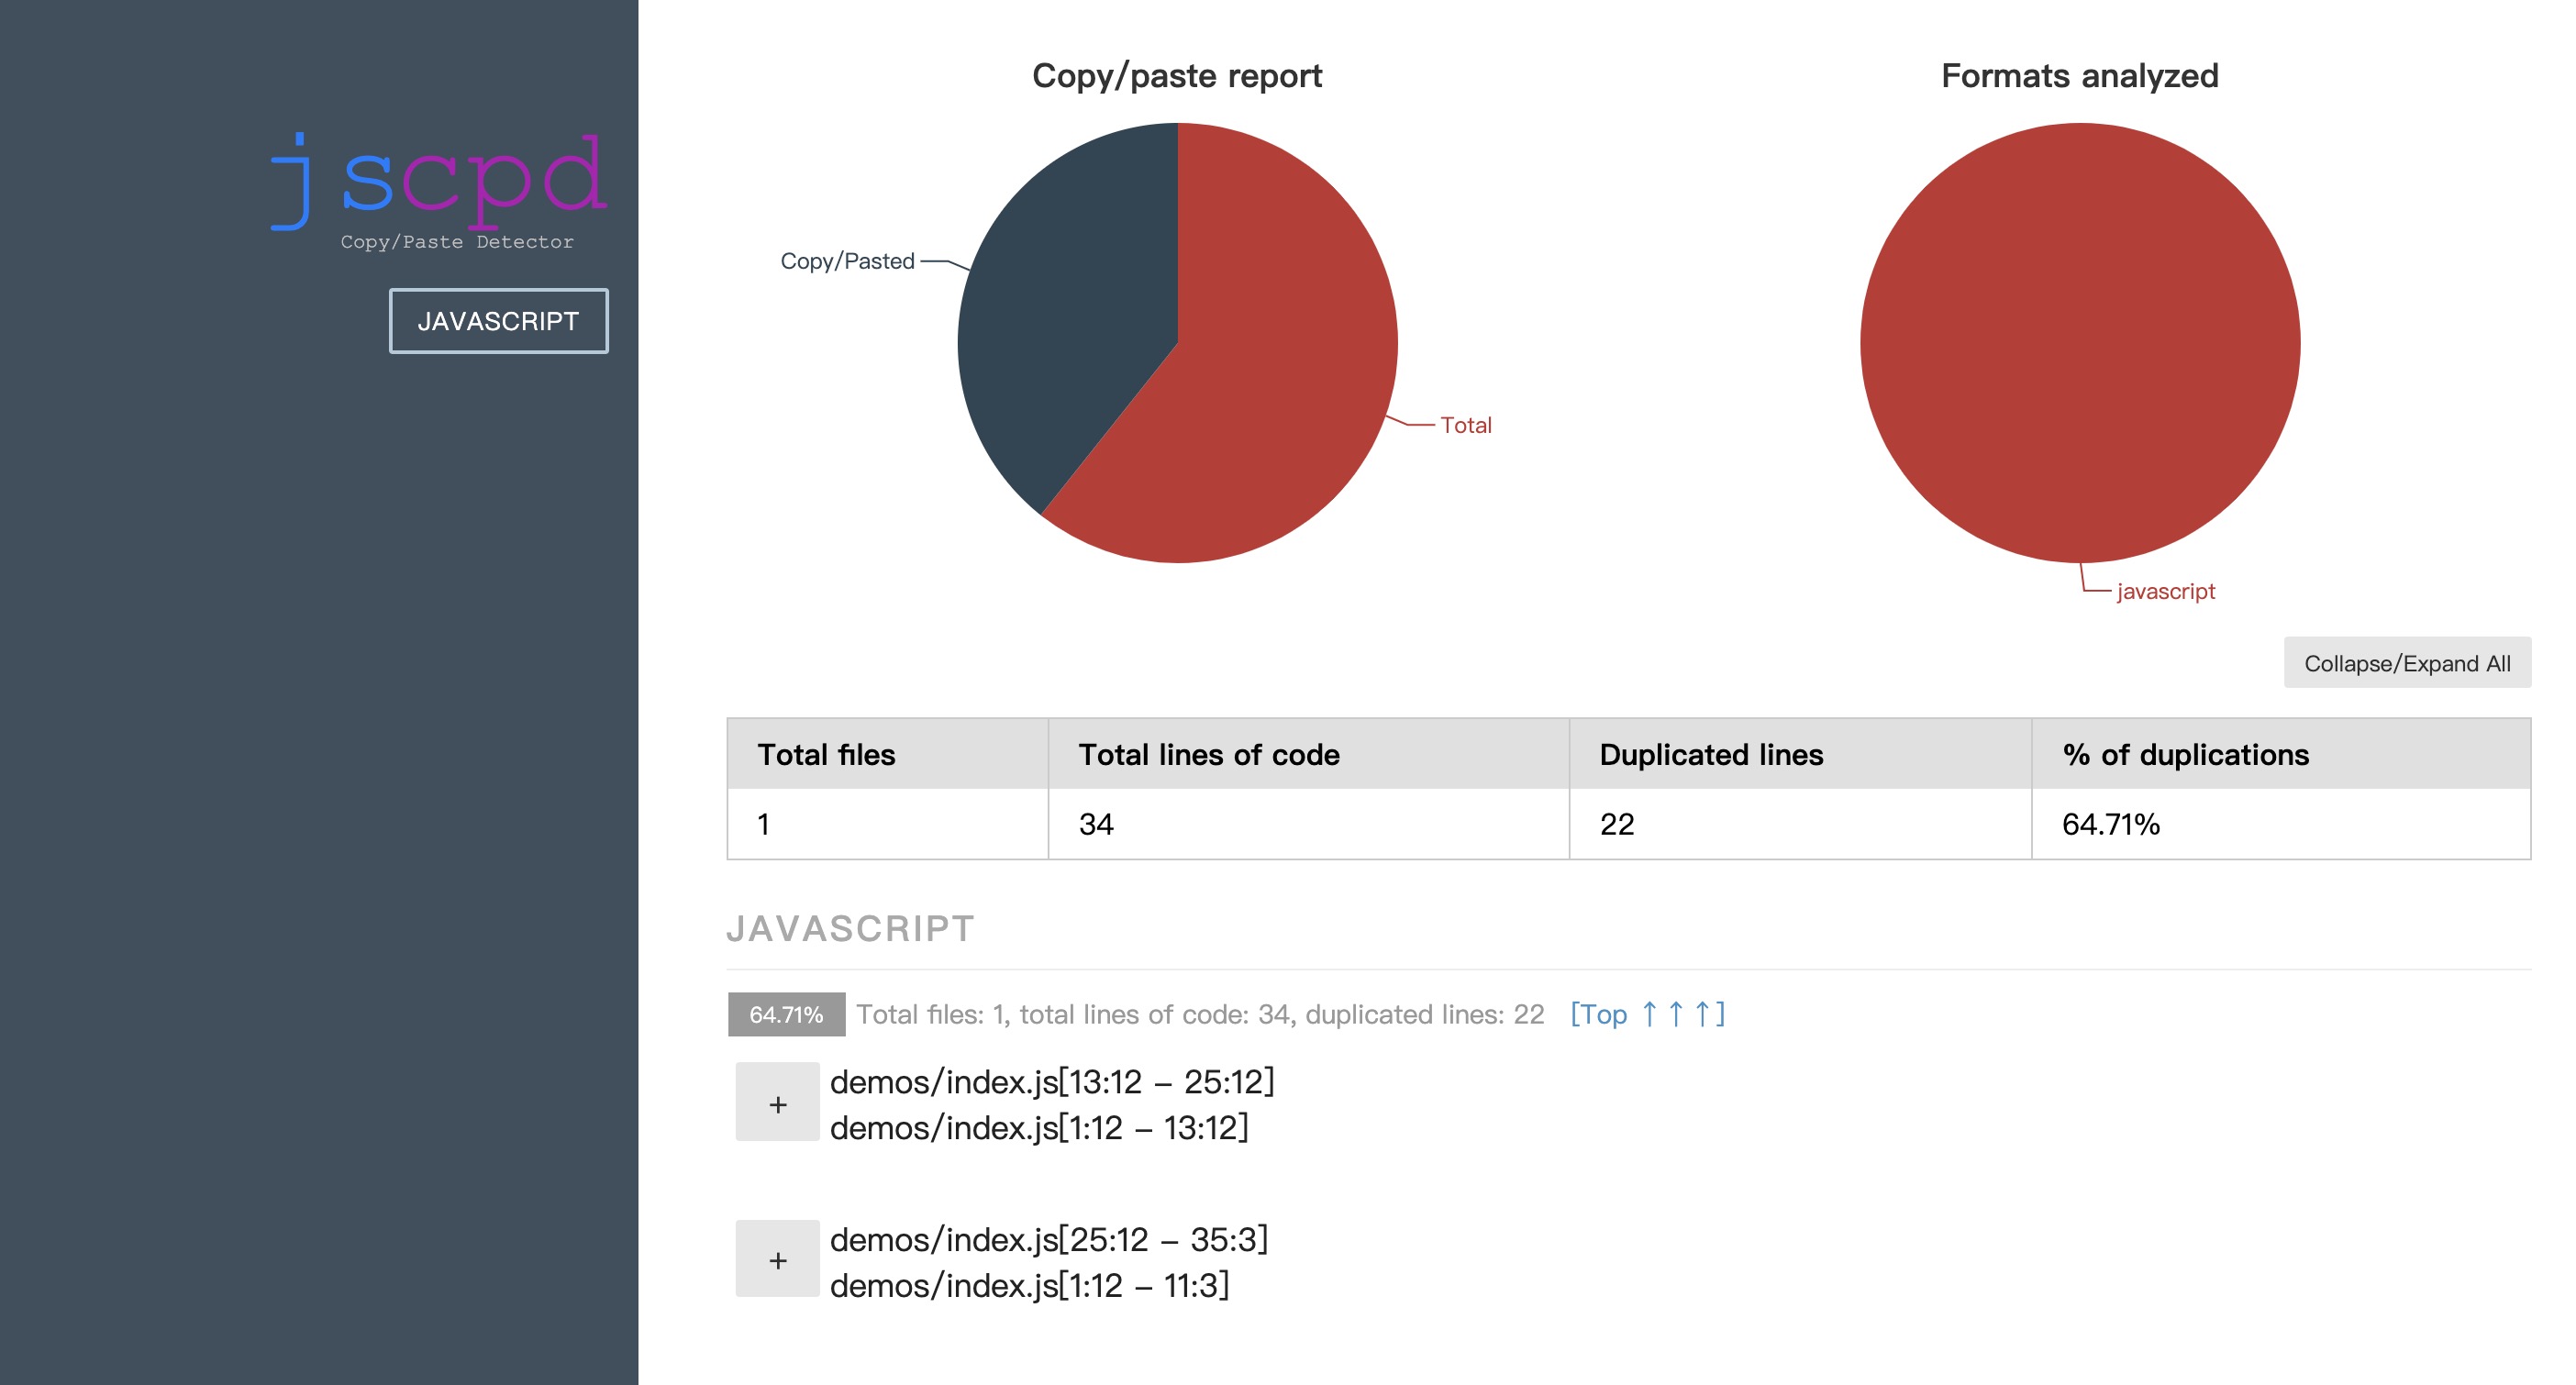
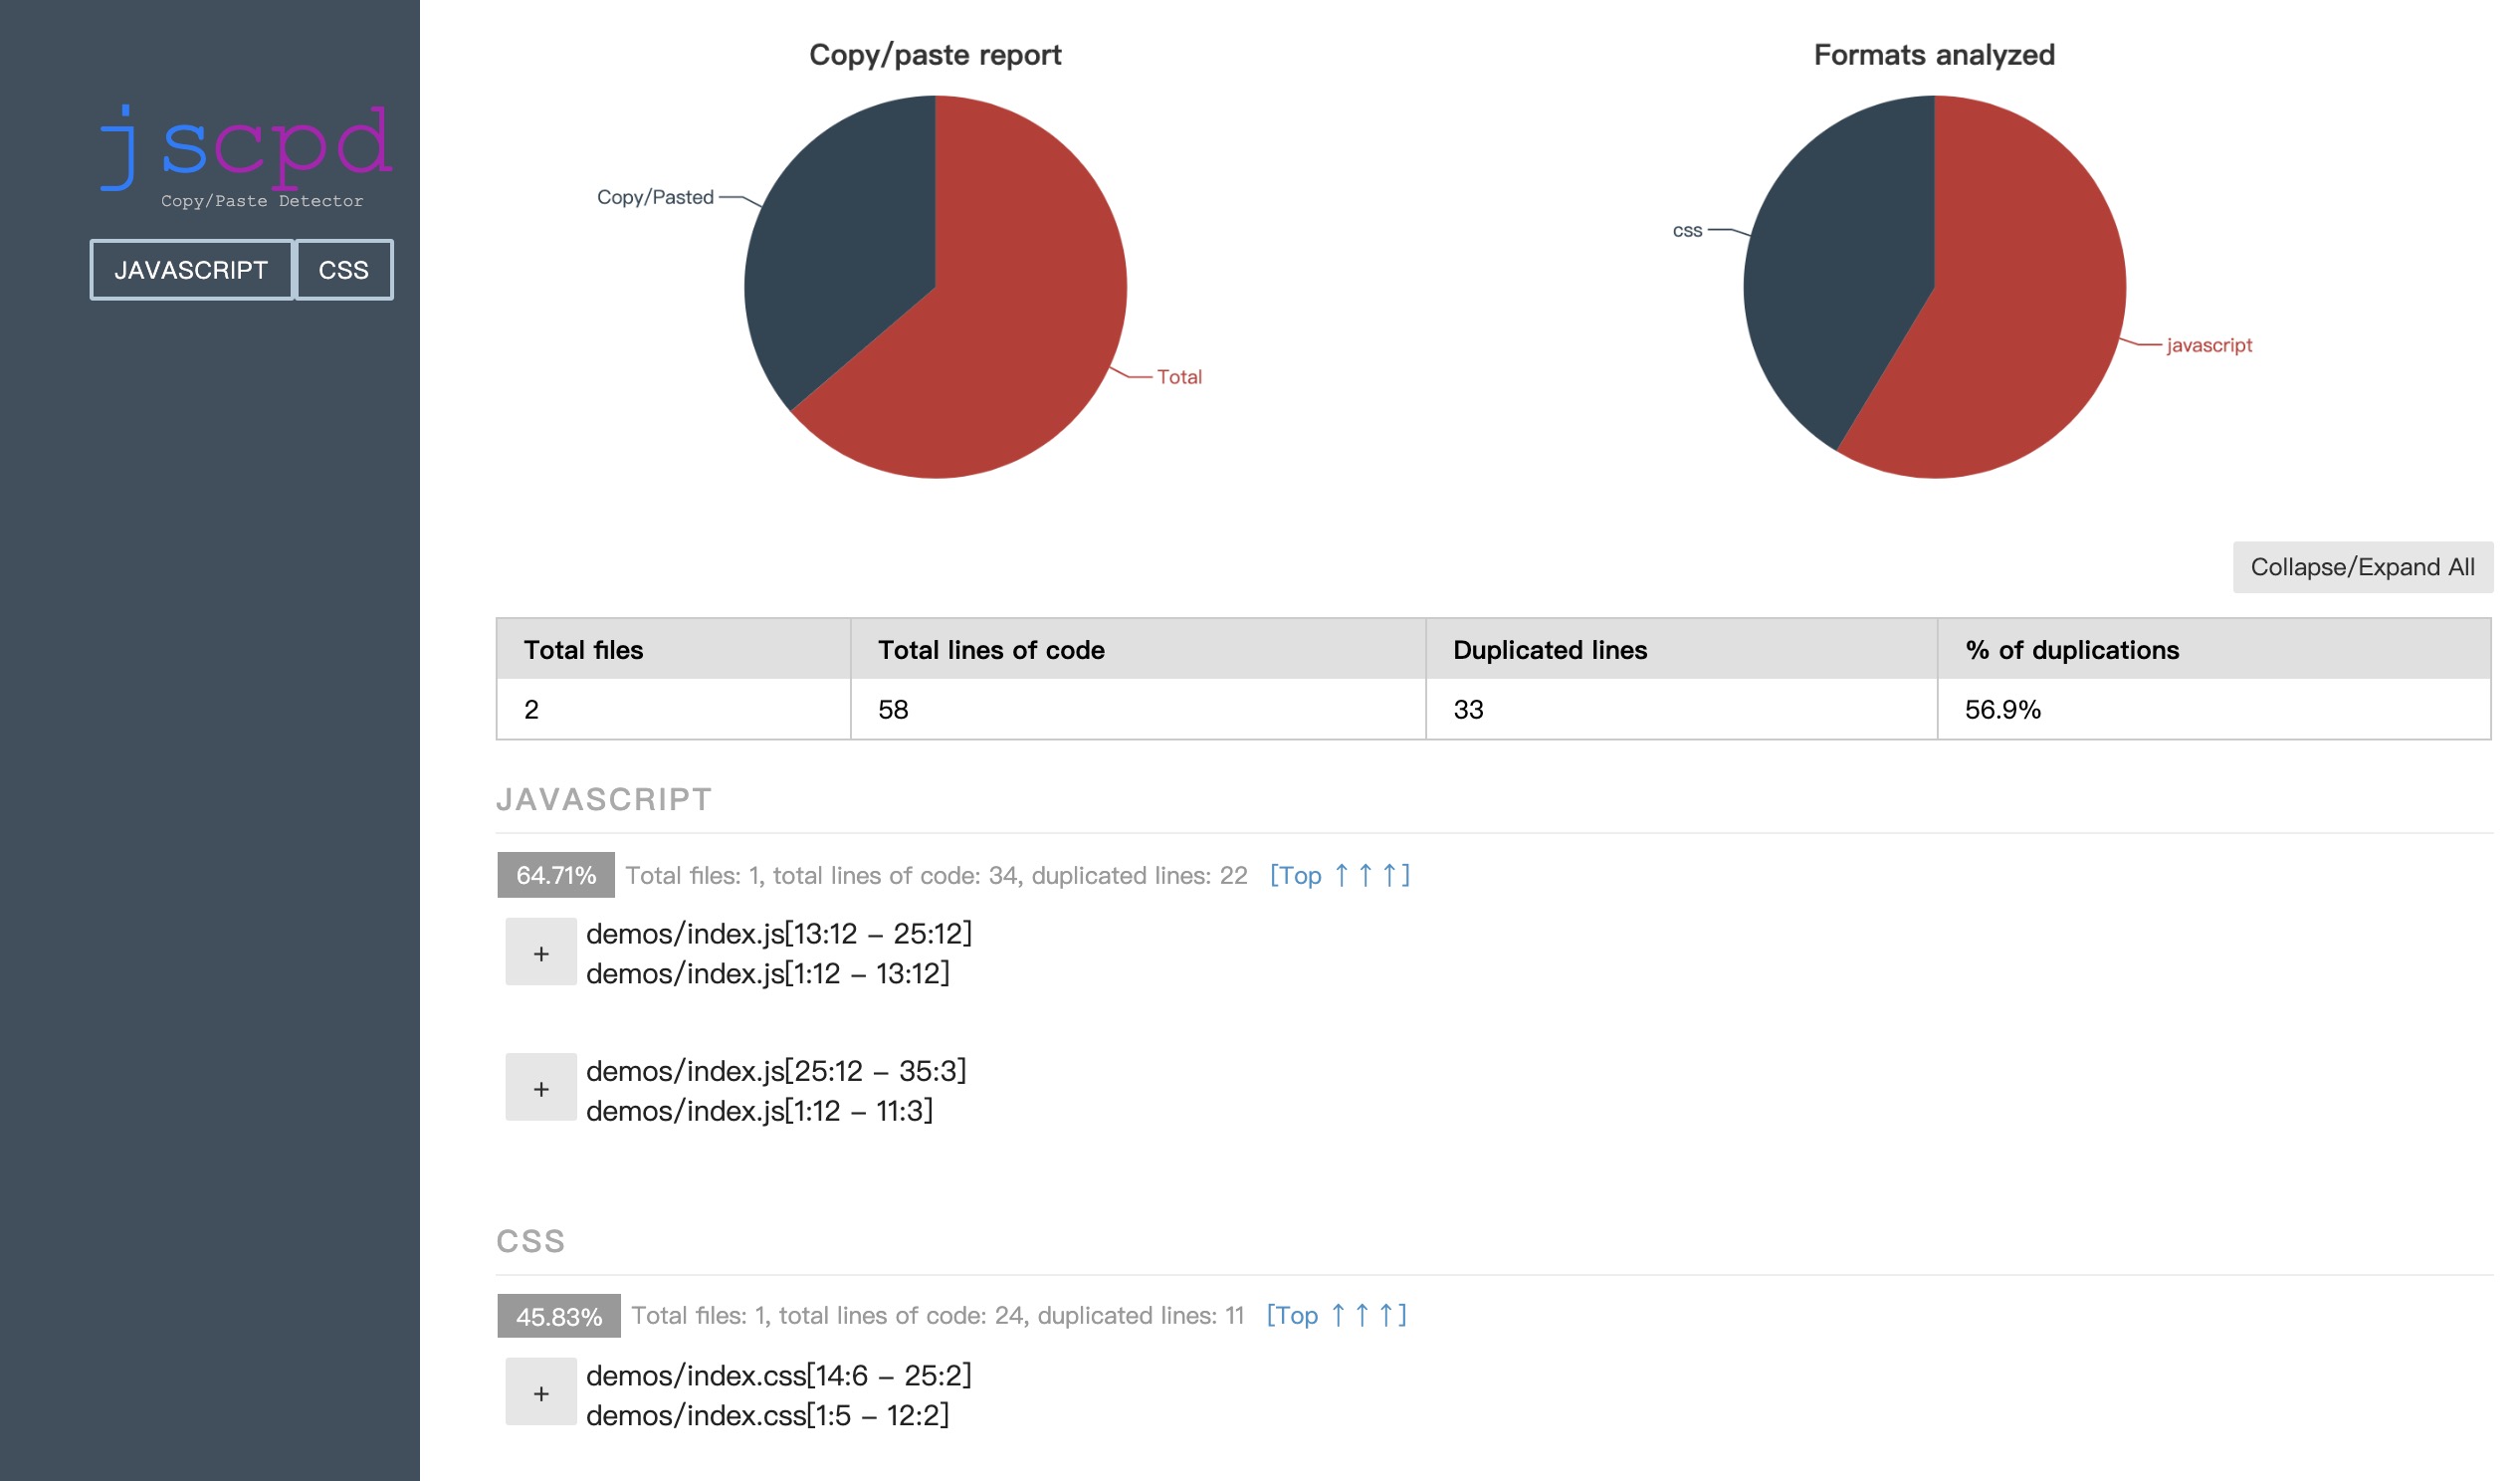
jscpd (opens new window) 可以用来快速搜索代码中的重复项,并生成报表进行展示。使用方法如下:
比如新建一个 demos 文件夹。下面的 index.js 文件中有一些重复的代码。
$('#index1').click(function() {
    function star() {
        console.log(123);
    }
    function init() {
        star();
    }
    if (true) {
        init();
    }
})

$('#index2').click(function() {
    function star() {
        console.log(123);
    }
    function init() {
        star();
    }
    if (true) {
        init();
    }
})

$('#index3').click(function() {
    function star() {
        console.log(123);
    }
    function init() {
        star();
    }
    if (true) {
        init();
    }
})
2
3
4
5
6
7
8
9
10
11
12
13
14
15
16
17
18
19
20
21
22
23
24
25
26
27
28
29
30
31
32
33
34
35
安装好 jscpd 之后,在 package.json 中增加一句自定义的命令。
"scripts": {
    "star": "jscpd ./demos"
}
2
3
然后再在根目录下新建一个 .jscpd.json 文件,配置如下:
{
    "mode": "strict",
    "threshold": 0,
    "reporters": ["html", "console"]
}
2
3
4
5
最后执行命令 npm run star,就可以看到执行结果了。并且会在项目根目录下生成一个 report 文件夹,里面有一个 jscpd-report.html 文件,打开就可以看到我们的代码的分析结果。
不过这个东西不太好用,它对 js 的检测力度还好,但是对 css 的检测力度太小了。在 demos 文件夹下新加一个 index.css。
body {
    background: red;
    color: yellowgreen;
    margin: 0;
    padding: 0;
    float: left;
}

.test {
    background: red;
    color: yellowgreen;
    margin: 0;
    padding: 0;
    float: left;
}
2
3
4
5
6
7
8
9
10
11
12
13
14
15
然后重新运行,结果如下。可以看到,并没有检测出重复的 css。
需要再增加一些 css,才能检测出来。
body {
    background: red;
    color: yellowgreen;
    margin: 0;
    padding: 0;
    float: left;
    background: red;
    color: yellowgreen;
    margin: 0;
    padding: 0;
    float: left;
}

.test {
    background: red;
    color: yellowgreen;
    margin: 0;
    padding: 0;
    float: left;
    background: red;
    color: yellowgreen;
    margin: 0;
    padding: 0;
    float: left;
}
2
3
4
5
6
7
8
9
10
11
12
13
14
15
16
17
18
19
20
21
22
23
24
25
检测结果如下。
它也可以检测不同文件之间的重复代码,比如新建一个内容跟 index.js 一样的文件,检测结果如下。
# Webpack 打包多页应用
Webpack5.0 新特性尝鲜实战(一) (opens new window)
Webpack5.0 新特性尝鲜实战(二) (opens new window)
- 要做的是多页应用 mpa 的 webpack 玩法,整体流程如下:
(1)node.js + 后台模板 + html
(2)pages/books/list.html -> 继承自 layout.html
(3)去找页面需要哪些组件?banner 组件
(4)最关键的一步,把 banner.js + banner.css 带过来
- 整体的文件查找流程如下:
路由 books/list -> list.html(引入了组件 banner.html)-> books-list.entry.js(统一将 banner.js + banner.css 交给 webpack)-> 生成 list.js(包含了 banner.js + banner.css 的内容)-> 再重新放到 list.html 中
- 首先安装 webpack-cli 和 webpack。
npm install webpack-cli webpack -D
不要指望把所有的配置都写在一个文件中,因此在根目录下新建 config 文件夹,里面有 webpack.development.js 和 webpack.production.js,分别代表本地和线上的配置文件。
使用 yargs-parser (opens new window) 获取进程参数。
// webpack.config.js
const argv = require('yargs-parser')(process.argv.slice(2));
console.log(argv);
2
3
执行 npm run client:dev 的话会看到输出了 { _: [], mode: 'development' }。
- 合并 webpack 配置文件,并导出最终的配置。需要安装 webpack-merge (opens new window)。
// webpack.config.js
const argv = require('yargs-parser')(process.argv.slice(2));
const _mode = argv.mode || 'development';
const _mergeConfig = require(`./config/webpack.${_mode}.js`);
const { merge } = require('webpack-merge');
const webpackConfig = {};

module.exports = merge(webpackConfig, _mergeConfig);

// webpack.development.js
module.exports = {};
2
3
4
5
6
7
8
9
10
11
- 重新调整 src 的目录结构如下。
补充
前端的几个不同阶段。
js、dom、jquery
组件(如 vue 组件)+ Node.js
mpa + spa,swig,真假路由
自己实现 next.js(react SSR) nuxt.js(vue SSR)
纯手写一套前后端通用的组件,并且 github 有项目有一定的 star 数。
- 使用 swig 模版补充 layout.html 和 list.html。
- layout.html
<!DOCTYPE html>
<html lang="en">
<head>
    <meta charset="UTF-8">
    <title>{% block title %}{% endblock %}</title>
    {% block head %}{% endblock %}
</head>
<body>
    <div>
        {% block content %}{% endblock %}
    </div>
    {% block script %}{% endblock %}
</body>
</html>
2
3
4
5
6
7
8
9
10
11
12
13
14
- list.html
<!-- 继承 layout.html -->
{% extends '../../layouts/layout.html' %}

{% block title %} 图书列表页 {% endblock %}

{% block head %}
    <!-- injectcss -->
{% endblock %}

{% block content %}
    <!-- 引入 banner 组件 -->
    {% include "../../../components/banner/banner.html" %}
{% endblock %}

{% block script %}
    <!-- injectjs -->
{% endblock %}
2
3
4
5
6
7
8
9
10
11
12
13
14
15
16
17
- 在 books 文件夹下新建 books-list.entry.js 文件,并补充它和 banner.js 文件的内容。
- books-list.entry.js
// 负责加载 list 页面中的组件需要用到的 js 文件,交给 webpack
// 再由 webpack 反向把分析好的 js 文件塞回到 list 页面中,还有 css 文件

import banner from '../../components/banner/banner.js';

banner.init();
2
3
4
5
6
- banner.js
const banner = {
    init() {
        console.log('banner');
    }
}

export default banner;
2
3
4
5
6
7
到此,我们的 html 和 js 就都有了,接下来可以继续写 webpack 的东西了。
在 books 文件夹下再建一个 books-create.entry.js,在 books/pages 下建一个 create.html。js 文件名字之所以用 books-create 这种格式,是为了后面方便查找,匹配用的。
正则匹配找到 .entry.js 文件,并使用 html-webpack-plugin (opens new window) 生成页面。
// webpack.config.js
const argv = require('yargs-parser')(process.argv.slice(2));
const _mode = argv.mode || 'development';
const _mergeConfig = require(`./config/webpack.${_mode}.js`);
const { merge } = require('webpack-merge');
const { sync } = require('glob');
const { join } = require('path');
const files = sync('./src/web/views/**/*.entry.js');
const HtmlWebpackPlugin = require('html-webpack-plugin');

let _entry = {};
let _plugins = [];
for (let item of files) {
    if (/.+\/([a-zA-Z]+-[a-zA-Z]+)(\.entry\.js)/g.test(item)) {
        console.log(RegExp.$1);
        const entryKey = RegExp.$1;
        _entry[entryKey] = item;
        const [dist, template] = entryKey.split('-');
        _plugins.push(
            new HtmlWebpackPlugin({
                filename: `../views/${dist}/pages/${template}.html`,
                template: `src/web/views/${dist}/pages/${template}.html`
            })
        );
    } else {
        console.log('项目配置匹配失败');
        process.exit(-1);
    }
}
const webpackConfig = {
    entry: _entry,
    output: {
        path: join(__dirname, './dist/assets'),
        publicPath: '/',
        filename: 'scripts/[name].bundle.js'
    },
    plugins: [..._plugins]
};

module.exports = merge(webpackConfig, _mergeConfig);
2
3
4
5
6
7
8
9
10
11
12
13
14
15
16
17
18
19
20
21
22
23
24
25
26
27
28
29
30
31
32
33
34
35
36
37
38
39
40
此时,执行 npm run client:dev 就可以看到在 dist 目录下生成文件了。
不过生成的 list.html 中 js 和 css 文件的插入位置并不对,而且还引入了 books-create.bundle.js,这是后面还需要进行处理的。
<!-- 继承 layout.html -->
{% extends '../../layouts/layout.html' %}

{% block title %} 图书列表页 {% endblock %}

{% block head %}
    <!-- injectcss -->
{% endblock %}

{% block content %}
    <!-- 引入 banner 组件 -->
    {% include "../../../components/banner/banner.html" %}
{% endblock %}

{% block script %}
    <!-- injectjs -->
{% endblock %}<script src="/scripts/books-create.bundle.js"></script><script src="/scripts/books-list.bundle.js"></script>
2
3
4
5
6
7
8
9
10
11
12
13
14
15
16
17
- 改进一下,将 output 挪到 webpack.development.js 中,并在 webpack.config.js 中加上 optimizations 属性将 webpack 的公用文件抽取出来。
// webpack.config.js
const webpackConfig = {
    entry: _entry,
    optimization: { // 把 webpack 公用代码抽出来
        runtimeChunk: {
            name: 'runtime',
        }
    },
    plugins: [..._plugins]
};
2
3
4
5
6
7
8
9
10
// webpack.development.js
const { join } = require('path');

module.exports = {
    output: {
        path: join(__dirname, '../dist/assets'),
        publicPath: '/',
        filename: 'scripts/[name].bundle.js'
    }
};
2
3
4
5
6
7
8
9
10
重新编译就会看到 dist 目录下生成了3个 js 文件了。其中,runtime.bundle.js 就是 webpack 的公用代码。
- 指定 chunks,让 html 文件只引入它自己对应的 js 文件。
// webpack.config.js
_plugins.push(
    new HtmlWebpackPlugin({
        filename: `../views/${dist}/pages/${template}.html`,
        template: `src/web/views/${dist}/pages/${template}.html`,
        chunks: ['runtime', entryKey]
    })
);
2
3
4
5
6
7
8
重新编译后,会发现 create.html 和 list.html 的内容都变了。
- create.html
<script src="/scripts/runtime.bundle.js"></script><script src="/scripts/books-create.bundle.js"></script>
- list.html
<!-- 继承 layout.html -->
{% extends '../../layouts/layout.html' %}

{% block title %} 图书列表页 {% endblock %}

{% block head %}
    <!-- injectcss -->
{% endblock %}

{% block content %}
    <!-- 引入 banner 组件 -->
    {% include "../../../components/banner/banner.html" %}
{% endblock %}

{% block script %}
    <!-- injectjs -->
{% endblock %}<script src="/scripts/runtime.bundle.js"></script><script src="/scripts/books-list.bundle.js"></script>
2
3
4
5
6
7
8
9
10
11
12
13
14
15
16
17
既然 js 文件的插入位置不对,也就不会生效,我们可以暂时不引入它们,通过指定 inject 属性。后面会通过别的方式来处理 js 和 css 的插入位置。
// webpack.config.js
_plugins.push(
    new HtmlWebpackPlugin({
        filename: `../views/${dist}/pages/${template}.html`,
        template: `src/web/views/${dist}/pages/${template}.html`,
        chunks: ['runtime', entryKey],
        inject: false
    })
);
2
3
4
5
6
7
8
9
重新编译后,create.html 和 list.html 就没有引入 js 文件了。
- 自己写一个 webpack 插件(HtmlAfterPlugin)来实现将 js 和 css 文件插入到指定位置的功能。
(1)在 config 文件夹下新建一个 HtmlAfterPlugin.js 文件。从 webpack 官网 (opens new window)复制一段插件代码。
// HtmlAfterPlugin.js
const pluginName = 'ConsoleLogOnBuildWebpackPlugin';

class ConsoleLogOnBuildWebpackPlugin {
    apply(compiler) {
        compiler.hooks.run.tap(pluginName, compilation => {
            console.log("webpack 构建过程开始!");
        });
    }
}

module.exports = ConsoleLogOnBuildWebpackPlugin;
2
3
4
5
6
7
8
9
10
11
12
然后在 webpack.config.js 中引入它。注意,一定要放在 HtmlWebpackPlugin 下面。
// webpack.config.js
const HtmlWebpackPlugin = require('html-webpack-plugin');
const HtmlAfterPlugin = require('./config/HtmlAfterPlugin');

const webpackConfig = {
    entry: _entry,
    optimization: { // 把 webpack 公用代码抽出来
        runtimeChunk: {
            name: 'runtime',
        }
    },
    plugins: [..._plugins, new HtmlAfterPlugin()]
};
2
3
4
5
6
7
8
9
10
11
12
13
执行 npm run client:dev 就可以看到输出了“webpack 构建过程开始!”。
(2)参考 html-webpack-plugin (opens new window) 来使用学习 webpack 各种 hook(钩子)的用法。
复制 html-webpack-plugin 页面下边 plugin.js 的代码到 HtmlAfterPlugin.js 中,这里的插件写法跟官网的不太一样,我们直接用这段,删掉原来的,并修改成我们自己的插件。
// HtmlAfterPlugin.js
const HtmlWebpackPlugin = require('html-webpack-plugin');
const pluginName = 'HtmlAfterPlugin';

class HtmlAfterPlugin {
    apply (compiler) {
      compiler.hooks.compilation.tap(pluginName, (compilation) => {
        HtmlWebpackPlugin.getHooks(compilation).beforeEmit.tapAsync(
            pluginName,
            (data, cb) => {
                // data 里就是 beforeEmit 这个钩子能拿到的信息
                // 有几个 chunk 就会输出几块信息
                // console.log(data)
                data.html += 'The Magic Footer'
                cb(null, data)
            }
        )
      })
    }
}

module.exports = HtmlAfterPlugin;
2
3
4
5
6
7
8
9
10
11
12
13
14
15
16
17
18
19
20
21
22
编译后就能看到拿到的信息了,并且 create.html 和 list.html 中还加上了 “The Magic Footer”。这就说明我们可以有能力往 create.html 和 list.html 中插入东西了。可以试下能不能替换掉 list.html 中的 ,加上以下几句:
// HtmlAfterPlugin.js
(data, cb) => {
    let _html = data.html;
    _html = _html.replace('<!-- injectjs -->', '123');
    data.html = _html;
    cb(null, data);
}
2
3
4
5
6
7
重新编译后可以看到 list.html 中的 就被替换成 123 了。
(3)获取我们的静态资源(js 和 css),然后替换掉 list.html 中的占位符。
beforeEmit 这个钩子并不能拿到我们需要的静态资源,我们得去 beforeAssetTagGeneration 这个钩子上拿。
// HtmlAfterPlugin.js
const HtmlWebpackPlugin = require('html-webpack-plugin');
const pluginName = 'HtmlAfterPlugin';

// 获取静态资源的帮助函数
const assetsHelp = data => {
    let js = [];
    const getAssetsName = {
        js: item => `<script src="${item}"></script>`
    }
    for (let jsItem of data.js) {
        js.push(getAssetsName.js(jsItem));
    }
    return { js };
}

class HtmlAfterPlugin {
    constructor () {
        this.jsArr = [];
    }
    apply (compiler) {
        compiler.hooks.compilation.tap(pluginName, (compilation) => {
            HtmlWebpackPlugin.getHooks(compilation).beforeAssetTagGeneration.tapAsync(
                pluginName,
                (data, cb) => {
                    const { js } = assetsHelp(data.assets); // 获取 js
                    this.jsArr = js;
                    console.log(js);
                    cb(null, data);
                }
            )
            HtmlWebpackPlugin.getHooks(compilation).beforeEmit.tapAsync(
                pluginName,
                (data, cb) => {
                    let _html = data.html;
                    const result = data.assets;
                    _html = _html.replace('<!-- injectjs -->', this.jsArr.join('')); // 替换掉 html 中的占位符
                    data.html = _html;
                    cb(null, data);
                }
            )
        })
    }
}

module.exports = HtmlAfterPlugin;
2
3
4
5
6
7
8
9
10
11
12
13
14
15
16
17
18
19
20
21
22
23
24
25
26
27
28
29
30
31
32
33
34
35
36
37
38
39
40
41
42
43
44
45
46
编译后,就可以看到 list.html 的占位符已被成功替换了。
<!-- 继承 layout.html -->
{% extends '../../layouts/layout.html' %}

{% block title %} 图书列表页 {% endblock %}

{% block head %}
    <!-- injectcss -->
{% endblock %}

{% block content %}
    <!-- 引入 banner 组件 -->
    {% include "../../../components/banner/banner.html" %}
{% endblock %}

{% block script %}
    <script src="/scripts/runtime.bundle.js"></script><script src="/scripts/books-list.bundle.js"></script>
{% endblock %}
2
3
4
5
6
7
8
9
10
11
12
13
14
15
16
17
(4)替换路径
- 由于在 list.html 中引用其他 html 文件时写相对路径是比较痛苦的事,以后如果目录改变了,有多个文件的话,修改起来也麻烦。所以我们可以自定义一个路径,然后自动将它替换成对应的相对路径。比如在 list.html 中可以这么写:
{% extends '@layouts/layout.html' %}

...

{% include "@components/banner/banner.html" %}
2
3
4
5
然后在 HtmlAfterPlugin.js 中,配置以下替换路径。
HtmlWebpackPlugin.getHooks(compilation).beforeEmit.tapAsync(
    pluginName,
    (data, cb) => {
        let _html = data.html;
        const result = data.assets;
        _html = _html.replace('<!-- injectjs -->', this.jsArr.join('')); // 替换掉 html 中的占位符
        _html = _html.replace(/@components/g, '../../../components');
        _html = _html.replace(/@layouts/g, '../../layouts');
        data.html = _html;
        cb(null, data);
    }
)
2
3
4
5
6
7
8
9
10
11
12
打包生成后的 list.html 中的路径就会被替换成正确的了,以后如果目录有变化,我们直接修改 HtmlAfterPlugin.js 文件就行了,比较方便。
- 同样的,我们把 js 文件中的相对路径也给替换掉。但是要注意,js 文件中路径的自动替换需要在 webpack.config.js 中进行配置,这个跟上面那个是两回事,上面那个是我们自己写的插件替换的,而这里是 webpack 去处理的。
// books-list.entry.js
import banner from '@/components/banner/banner.js';

banner.init();
2
3
4
然后需要在 webpack.config.js 中加入以下配置。
const { resolve } = require('path');

const webpackConfig = {
    entry: _entry,
    optimization: { // 把 webpack 公用代码抽出来
        runtimeChunk: {
            name: 'runtime',
        }
    },
    plugins: [..._plugins, new HtmlAfterPlugin()],
    resolve: {
        alias: {
            '@': resolve('src/web')
        }
    }
};
2
3
4
5
6
7
8
9
10
11
12
13
14
15
16
(5)补充完整 create.html,以及新建 list 和 create 组件。
<!-- 继承 layout.html -->
{% extends '@layouts/layout.html' %}

{% block title %} 添加图书 {% endblock %}

{% block head %}
    <!-- injectcss -->
{% endblock %}

{% block content %}
    <!-- 引入 banner 组件 -->
    {% include "@components/banner/banner.html" %}
    <h1>添加图书</h1>
{% endblock %}

{% block script %}
    <!-- injectjs -->
{% endblock %}
2
3
4
5
6
7
8
9
10
11
12
13
14
15
16
17
18
到此,页面模版组件基本上就弄好了,接下来要开始弄 Node.js 的部分了。
(6)把 server 文件夹下的 js 文件中 require 换成 ES6 的导入导出模块形式,这是现在更常用的方式。点击快速修复就可以一键转换了。
然后把 ApiController.js 和 IndexController.js 文件的内容修改如下:
// ApiController.js
import Controller from './Controller';
class ApiController extends Controller {
    constructor() {
        super();
    }
    async actionIndex(ctx, next) {
        ctx.body = await ctx.render('books/pages/list');
    }
    async actionCreate(ctx, next) {
        ctx.body = await ctx.render('books/pages/create');
    }
}
export default ApiController;
2
3
4
5
6
7
8
9
10
11
12
13
14
// IndexController.js
import Controller from './Controller';
class IndexController extends Controller {
    constructor() {
        super();
    }
    async actionIndex(ctx, next) {
        ctx.body = '首页';
    }
}

export default IndexController;
2
3
4
5
6
7
8
9
10
11
12
(7)补充 banner.html,然后把 ApiController.js 重命名为 BooksController.js,并且 BooksController.js 和 controllers/index.js 里面的 ApiController 也都要改成 BooksController。
<div class="banner">
    <ul>
        <li><a href="/">首页</a></li>
        <li><a href="/books/list">展示图书</a></li>
        <li><a href="/books/create">添加图书</a></li>
    </ul>
</div>
2
3
4
5
6
7
到这里,后端的准备工作也基本完成了。下面可以进行 Gulp 清洗了。
# Gulp 清洗 Node.js 项目
此时,dist 文件夹下还缺少 components 里边的组件的 html 内容,我们将它们拷贝过去就行了,但是注意不是手动的拷贝,不能往 dist 文件夹里手动拷贝任何东西。
接下来就要开始编写 gulpfile.js 了。
需要安装以下插件:
gulp-plumber (opens new window),防止因 gulp 插件错误而导致管道中断。
gulp-rollup (opens new window),负责代码清洗。
// gulpfile.js
const gulp = require('gulp');
const watch = require('gulp-watch');
const plumber = require('gulp-plumber');
const entry = './src/server/**/*.js'; // 入口文件
const cleanEntry = './src/server/config/index.js'; // 想要进行清洗的文件
const rollup = require('gulp-rollup');
const babel = require('gulp-babel');

function buildDev() {
    return watch(entry, { ignoreInitial: false }, () => {
        gulp
            .src(entry)
            .pipe(plumber()) // 防止因 gulp 插件错误而导致管道中断
            .pipe(
                babel({
                    babelrc: false, // 使用 gulp-babel 时加上这个属性,防止跟外边的 babel 相互影响,最后出来的代码乱
                    plugins: ['@babel/plugin-transform-modules-commonjs']
                })
            )
            .pipe(gulp.dest('dist'));  // 输出到 dist 文件夹下
    });
}

function buildProd() {
    return gulp
        .src(entry)
        .pipe(
            babel({
                babelrc: false, // 使用 gulp-babel 时加上这个属性,防止跟外边的 babel 相互影响,最后出来的代码乱
                ignore: [cleanEntry], // 忽略掉清洗的文件
                plugins: ['@babel/plugin-transform-modules-commonjs']
            })
        )
        .pipe(gulp.dest('dist'));  // 输出到 dist 文件夹下
}

// 清理环境变量
function buildConfig() {
    return gulp
        .src(entry)
        .pipe(
            rollup({
                input: cleanEntry,
                output: {
                    format: 'cjs'
                }
            })
        )
        .pipe(gulp.dest('./dist'));  // 输出到 dist 文件夹下
}

let build = gulp.series(buildDev);
if (process.env.NODE_ENV == 'production') {
    build = gulp.series(buildProd, buildConfig);
}

gulp.task('default', build);
2
3
4
5
6
7
8
9
10
11
12
13
14
15
16
17
18
19
20
21
22
23
24
25
26
27
28
29
30
31
32
33
34
35
36
37
38
39
40
41
42
43
44
45
46
47
48
49
50
51
52
53
54
55
56
57
58
上面这段代码就能帮我们清洗掉一些没用的代码了,执行 npm run server:prod。
但是,清洗好像不太干净,因为 config/index.js 里判断环境变量的 if 语句还在。我们可以借助另外一个插件。
@rollup/plugin-replace (opens new window)
在 gulpfile.js 中加入以下配置。
const replace = require('@rollup/plugin-replace');

function buildConfig() {
    return gulp
        .src(entry)
        .pipe(
            rollup({
                input: cleanEntry,
                output: {
                    format: 'cjs'
                },
                plugins: [
                    replace({
                        'process.env.NODE_ENV': JSON.stringify('production')
                    })
                ]
            })
        )
        .pipe(gulp.dest('./dist'));  // 输出到 dist 文件夹下
}
2
3
4
5
6
7
8
9
10
11
12
13
14
15
16
17
18
19
20
重新执行命令就可以看到打包出来的 dist/config/index.js 的内容就没有 if 语句了。
'use strict';

var lodash = require('lodash');
var path = require('path');

let config = {
    viewDir: path.join(__dirname, '..', 'views'),
    staticDir: path.join(__dirname, '..', 'assets')
};

{
    let prodConfig = {
        port: 80,
        memoryFlag: 'memory',
    };
    config = lodash.extend(config, prodConfig);
}

var config$1 = config;

module.exports = config$1;
2
3
4
5
6
7
8
9
10
11
12
13
14
15
16
17
18
19
20
21
如果想清洗的更干净,可以再借助另外一个插件。
我们可以去 prepack 官网上找一些例子下来试试,比如:
(function () {
  function hello() { return 'hello'; }
  function world() { return 'world'; }
  global.s = hello() + ' ' + world();
})();
2
3
4
5
执行之后清洗效果如下:
gulp-prepack (opens new window)
在 gulpfile.js 中加入以下配置。
const prepack = require('gulp-prepack');

function buildConfig() {
    return gulp
        .src(entry)
        .pipe(
            rollup({
                input: cleanEntry,
                output: {
                    format: 'cjs'
                },
                plugins: [
                    replace({
                        'process.env.NODE_ENV': JSON.stringify('production')
                    })
                ]
            })
        )
        .pipe(prepack({}))
        .pipe(gulp.dest('./dist'));  // 输出到 dist 文件夹下
}
2
3
4
5
6
7
8
9
10
11
12
13
14
15
16
17
18
19
20
21
重新打包后会发现 index.js 中清洗更干净了,不过因为不支持 require,所以报了点错误。
到此,我们整个项目的打包编译就告一段落了。
# 启动项目
- 接下来启动下项目。开三个终端,分别执行
npm run server:dev、npm run client:dev、npm run server:start。
但是执行 npm run server:start 的时候报错了。
这是个很坑的错误,报错的原因是 commonjs 模块规范使用时,有些解构方式不兼容。解决方法是修改 app.js 里的模块导入解构的方式。
import errorHandler from './middlewares/errorHandler';
import config from './config';
const { port, viewDir, staticDir, memoryFlag } = config;
import controllers from './controllers';

...

errorHandler.error(app, logger);
controllers(app);
2
3
4
5
6
7
8
9
改完之后重新启动,终于成功了!
但是此时不管是访问 http://localhost:8081/books/list 还是 http://localhost:8081/books/create 都是报了500,查看日志文件 error.log 才知道是因为打包后找不到 layout.html。
- 要解决以上问题,就需要在打包的时候把 layout.html 拷贝到 dist 文件夹里。可以借助一个插件。
copy-webpack-plugin (opens new window)
但是,在使用这个插件的时候,有一点要特别注意的,就是要去掉 Mac 或 Windows 自带的一些隐藏文件,不要把这些隐藏文件也一起拷贝过去!!!
在 webpack.development.js 中加入以下配置。
const { join } = require('path');
const CopyPlugin = require('copy-webpack-plugin');

module.exports = {
    output: {
        path: join(__dirname, '../dist/assets'),
        publicPath: '/',
        filename: 'scripts/[name].bundle.js'
    },
    plugins: [
        // 拷贝 layout.html
        new CopyPlugin({
          patterns: [
            {
                from: join(__dirname, '../', 'src/web/views/layouts/layout.html'),
                to: '../views/layouts/layout.html'
            }
          ]
        }),
        // 拷贝 components 文件夹下的内容
        new CopyPlugin({
            patterns: [
                {
                    from: 'src/web/components/**/*.html',
                    to: '../components',
                    transformPath(targetPath, absolutePath) {
                        return targetPath.replace('src/web/components/', '');
                    }
                }
            ]
        })
    ],
};
2
3
4
5
6
7
8
9
10
11
12
13
14
15
16
17
18
19
20
21
22
23
24
25
26
27
28
29
30
31
32
33
然后执行 npm run client:dev,就可以看到 dist 文件夹下也有这两部分内容了。
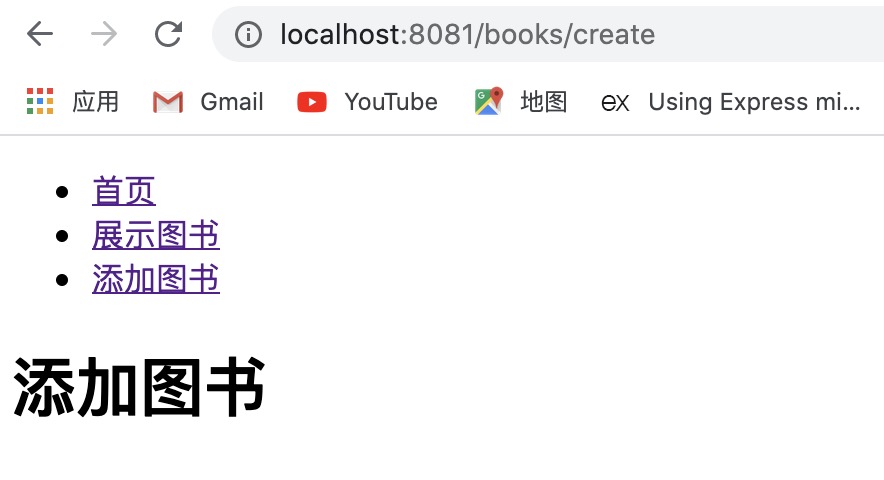
此时,重新启动项目,再访问 http://localhost:8081/books/list 和 http://localhost:8081/books/create 就可以了。
- 开发环境解决了,我们还得解决线上环境的。
把 webpack.development.js 的内容复制到 webpack.production.js 中。线上跟本地开发环境的区别就是要对代码做一个压缩优化处理,这需要用到一个插件。
html-minifier (opens new window)
// webpack.production.js
const { join } = require('path');
const CopyPlugin = require('copy-webpack-plugin');
const minify = require('html-minifier').minify;

module.exports = {
    output: {
        path: join(__dirname, '../dist/assets'),
        publicPath: '/',
        filename: 'scripts/[name].[contenthash:5].bundle.js'
    },
    plugins: [
        // 拷贝 layout.html
        new CopyPlugin({
          patterns: [
            {
                from: join(__dirname, '../', 'src/web/views/layouts/layout.html'),
                to: '../views/layouts/layout.html'
            }
          ]
        }),
        // 拷贝 components 文件夹下的内容
        new CopyPlugin({
            patterns: [
                {
                    from: 'src/web/components/**/*.html',
                    to: '../components',
                    transform(content, absoluteFrom) {
                        const resutlt = minify(content.toString('utf-8'), {
                          collapseWhitespace: true,  // 处理空格
                        });
                        return resutlt;
                    },
                    transformPath(targetPath, absolutePath) {
                      return targetPath.replace('src/web/components/', '');
                    },
                }
            ]
        }),
    ],
};
2
3
4
5
6
7
8
9
10
11
12
13
14
15
16
17
18
19
20
21
22
23
24
25
26
27
28
29
30
31
32
33
34
35
36
37
38
39
40
41
然后执行 npm run client:prod 命令就可以打线上环境的包了。


