# BFF 层
1. 什么是 BFF?
BFF 全称是 Backend For Frontend (服务于前端的后端),也就是服务器设计 API 时会考虑前端的使用,并在服务端直接进行业务逻辑的处理,又称为用户体验适配器。BFF 只是一种逻辑分层,而非一种技术,虽然 BFF 是一个新名词,但它的理念由来已久。
2. BFF 解决了什么问题?
在实际项目中,经常会有某个页面需要向多个不同的服务发送请求,然后将请求回来的数据用来渲染页面不同的组件的情况,即一个页面同时存在多个请求的场景。假设每次访问一个页面都需要发送 3 个请求,同时为了保障 Android,iOS,以及 Web 端的不同需求,需要为不同的平台写不同的 API 接口,而每当值发生一些变化时,需要 Android,iOS,Web 做出修改。这样的代价显然是相当大的,也相当麻烦。
因此,我们就需要 BFF 作为中间层,在这个中间层上做一些业务逻辑处理。当有了 BFF 这一层之后,我们就不需要考虑系统后端的迁移了,后端发生的变化都可以在 BFF 层做一些响应修改。像上面所说的场景,加入了 BFF 层之后,原本每次访问发送 3 个请求,现在就变成一个请求了。
3. 如何正确使用 BFF?
(1)多端应用
我们在设计 API 时会考虑到不同设备的需求,也就是为不同的设备提供不同的 API,虽然它们可能是实现相同的功能,但因为不同设备的特殊性,它们对服务端的 API 访问也各有其特点,需要区别处理。
(2)服务聚合
随着微服务的兴起,原本在同一个进程内运行的业务流程被拆分到了不同的服务中。这在增加业务灵活性的同时,也让前端的调用变得更复杂。BFF 的出现为前端应用提供了一个对业务服务调用的聚合点,它屏蔽了复杂的服务调用链,让前端可以聚焦在所需要的数据上,而不用关注底层提供这些数据的服务。
(3)非必要,莫新增
我们在看到 BFF 带来的各种好处的同时,也要注意到它所带来的代码重复和工作量增加方面的问题。如果与已有 BFF 功能类似,且展现数据的要求也相近的话,一定要谨慎对待新增 BFF 的行为。因此,建议非必要,莫新增。
4. BFF 的实战应用
(1)访问控制
例如,服务中的权限控制,将所有服务中的权限控制集中在 BFF 层,使下层服务更加纯粹和独立。
(2)应用缓存
项目中时常存在一些需要缓存的临时数据,此时 BFF 作为业务的汇聚点,距离用户请求最近,遂将该缓存操作放在 BFF 层。
(3)第三方入口
在业务中需要与第三交互时,将该交互放在 BFF 层,这样可以只暴露必要信息给第三方,从而便于控制第三方的访问。
# 构建项目结构
1. 参考 yii 项目
首先拷贝一份之前已经完成的作业一,进入项目目录,执行 npm init -y 初始化一个 package.json 文件。之所以要把 yii 项目的内容拷贝过来,是为了借鉴它的项目目录结构。
2. 删除没用的文件并重命名一些文件夹
(1)删掉 assets 文件夹下的内容。
(2)删掉 commands 文件夹下的内容,并重命名为 bin。
(3)删掉 mail、runtime、vagrant、vendor 和 web 文件夹及其下面的内容。
(4)删掉 codeception.yml、composer.json、composer.lock、docker-compose.yml、LICENSE.md、yii、yii.bat、Vagrantfile 文件。
(5)新增一个启动文件 app.js。
(6)完成以上操作之后,一个比较成熟的项目目录结构就出来了。

# 实现 MVC 结构
3. 编写路由 controllers
参照 yii,在 controllers 文件夹下新建 IndexController.js、ApiController.js、Controller.js 和 index.js 文件,并删掉其他的文件。分别编写内容如下:
// Controller.js
class Controller {
    constructor() {}
}
module.exports = Controller;
2
3
4
5
// IndexController.js
class IndexController extends Controller {
    constructor() {}
    actionIndex() {}
}
2
3
4
5
// ApiController.js
class ApiController extends Controller {
    constructor() {}
    actionIndex() {}
    actionCreate() {}
}
module.exports = ApiController;
2
3
4
5
6
7
这里推荐一个插件 TabNine,这是一个基于机器学习的插件,能够“学习”我们平时的代码习惯,然后在我们编码时给一些友好的提示,方便我们编写代码。
这样,一个基本的路由结构就编写完成了。
4. 编写配置文件 config
删掉 config 文件夹下的所有文件,然后新建 index.js 文件。
const config = {};

module.exports = config;
2
3
5. 编写数据 models
删掉 models 文件夹下的所有文件,然后新建 Books.js 文件。这部分专门用来处理数据。
class Books {}
6. 测试文件夹 tests
删掉 tests 文件夹下的所有内容。
7. 模版文件夹 views
删掉 views 文件夹下的所有内容。
8. 组件文件夹 widgets
删掉 widgets 文件夹下的所有内容。
# 使用 Koa2 启动项目
9. 编写启动文件 app.js
需要安装 koa、nodemon。
上线的时候需要用到的包就用 --save 或 -S,上线之后不需要用到的包就用 --save-dev 或 -D。
热更新工具 nodemon (opens new window),只适用于开发环境。
注意 nodemon 需要全局安装才能使用,本地安装的话还是一直提示我 nodemon 不是命令。
sudo npm install -g nodemon1pm2 (opens new window) 是一个 Node.js 进程管理工具,上线时使用的。
const Koa = require('koa');

const app = new Koa();

app.listen(3000, () => {
  console.log('服务启动成功');
})
1
2
3
4
5
6
7
10. 完善各个文件
(1)配置文件 config/index.js
需要安装 lodash (opens new window)。
const { extend } = require('lodash');
let config = {};

if (process.env.NODE_ENV === 'development') {
    let localConfig = {
        port: 8081
    };
    config = extend(config, localConfig);
}

if (process.env.NODE_ENV === 'production') {
    let prodConfig = {
        port: 80
    };
    config = extend(config, prodConfig);
}

module.exports = config;
2
3
4
5
6
7
8
9
10
11
12
13
14
15
16
17
18
(2)启动文件 app.js
const Koa = require('koa');
const { port } = require('./config');
const app = new Koa();

require('./controllers')(app);

app.listen(port, () => {
    console.log('服务启动成功', port);
})
2
3
4
5
6
7
8
9
(3)package.json
需要安装 cross-env (opens new window)。然后添加以下脚本命令:
"scripts": {
    "start": "cross-env NODE_ENV=development nodemon app.js"
}
2
3
# npm 关键字
注意,如果脚本命令的名字是 npm 自带的关键字,那么运行的时候就可以直接 “npm 关键字”,比如:npm start;如果不是 npm 自带的关键字,就需要执行 “npm run 自定义的脚本命令名字”。npm 的关键字有以下这些:
以上脚本配置好之后就可以用 npm start 命令启动项目了。
(4)路由文件
安装 koa-simple-router (opens new window),这个包比 koa-router 更轻量,也够我们使用了。
// controllers/index.js
const router = require('koa-simple-router');

module.exports = (app) => {
    app.use(
        router(_ => {
            _.get('/', (ctx, next) => {
                ctx.body = 'hello';
            })
        })
    );
}
2
3
4
5
6
7
8
9
10
11
12
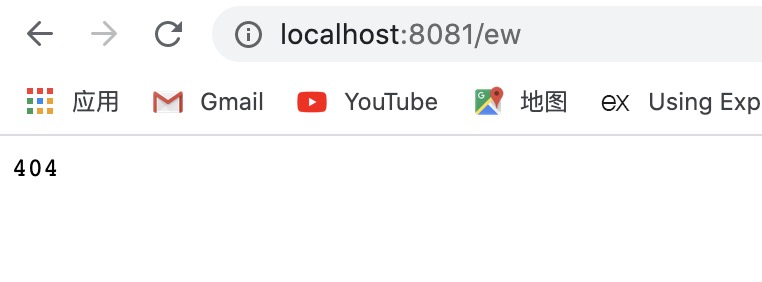
做到这里,路由就配置成功了,启动项目并访问 localhost:8081 就可以看到页面输出 hello 了。
继续改造下路由文件的代码。
// controllers/index.js
const router = require('koa-simple-router');
const ApiController = require('./ApiController');
const IndexController = require('./IndexController');
const apiController = new ApiController();
const indexController = new IndexController();

module.exports = (app) => {
    app.use(
        router(_ => {
            _.get('/', indexController.actionIndex);
            _.get('/api/list', apiController.actionIndex);
            _.get('/api/create', apiController.actionCreate);
        })
    );
}
2
3
4
5
6
7
8
9
10
11
12
13
14
15
16
// controllers/IndexController.js
const Controller = require('./Controller');
class IndexController extends Controller {
    constructor() {
        super();
    }
    async actionIndex(ctx, next) {
        ctx.body = 'hello';
    }
}

module.exports = IndexController;
2
3
4
5
6
7
8
9
10
11
12
// controllers/ApiController.js
const Controller = require('./Controller');
class ApiController extends Controller {
    constructor() {
        super();
    }
    async actionIndex(ctx, next) {
        ctx.body = {
            data: 123
        }
    }
    async actionCreate() {}
}
module.exports = ApiController;
2
3
4
5
6
7
8
9
10
11
12
13
14
此时访问 localhost:8081 会看到页面上出现 hello;访问 localhost:8081/api/list 会看到页面上出现 {"data":123}。
# 模板渲染
(5)页面渲染
在 views 文件夹下新建 index.html 文件。
安装模版中间件 koa-swig (opens new window) ,它的缓存是最好的,渲染很快。
修改 app.js、config/index.js、IndexController.js 文件。
// app.js
const Koa = require('koa');
const render = require('koa-swig');
const { port, viewDir, memoryFlag } = require('./config');
const app = new Koa();
const co = require('co');

app.context.render = co.wrap(render({
    root: viewDir,
    autoescape: true,
    cache: memoryFlag,
    ext: 'html',
    writeBody: false
}));

require('./controllers')(app);

app.listen(port, () => {
    console.log('服务启动成功', port);
})
2
3
4
5
6
7
8
9
10
11
12
13
14
15
16
17
18
19
20
// config/index.js
const { extend } = require('lodash');
const { join } = require('path');
let config = {
    viewDir: join(__dirname, '..', 'views'),
};

if (process.env.NODE_ENV === 'development') {
    let localConfig = {
        port: 8081,
        memoryFlag: false,
    };
    config = extend(config, localConfig);
}

if (process.env.NODE_ENV === 'production') {
    let prodConfig = {
        port: 80,
        memoryFlag: 'memory',
    };
    config = extend(config, prodConfig);
}

module.exports = config;
2
3
4
5
6
7
8
9
10
11
12
13
14
15
16
17
18
19
20
21
22
23
24
// IndexController.js
const Controller = require('./Controller');
class IndexController extends Controller {
    constructor() {
        super();
    }
    async actionIndex(ctx, next) {
        ctx.body = await ctx.render('index');
    }
}

module.exports = IndexController;
2
3
4
5
6
7
8
9
10
11
12
此时启动项目,访问 http://localhost:8081/,会看到页面显示这个:
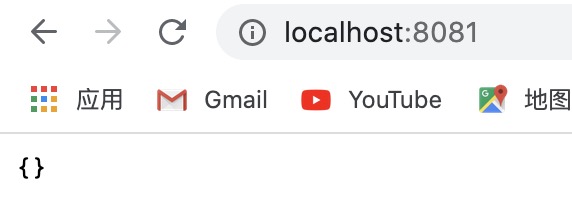
如果看到页面上显示 {} 或者 ok,要么就是模版位置不对,要么就是异步引起的,即没有等待数据回来就去渲染了,所以返回空标识。因此解决方法就是 IndexController.js 文件中的方法加上 await。重新访问就可以看到显示正常了。
完成以上这些,整个项目的后端基础就都弄好了。接下来可以开始做真假路由的混用了。
# 真假路由
11. 真假路由的混用
(1)全局安装 vue-cli (opens new window),安装 vue cli 3.x
sudo cnpm install -g @vue/cli
并使用它创建一个项目。项目创建的时候只需要 Babel 和 Router 就行了。
(2)将创建好的 vue 项目跟原来的项目放在同个工作区中
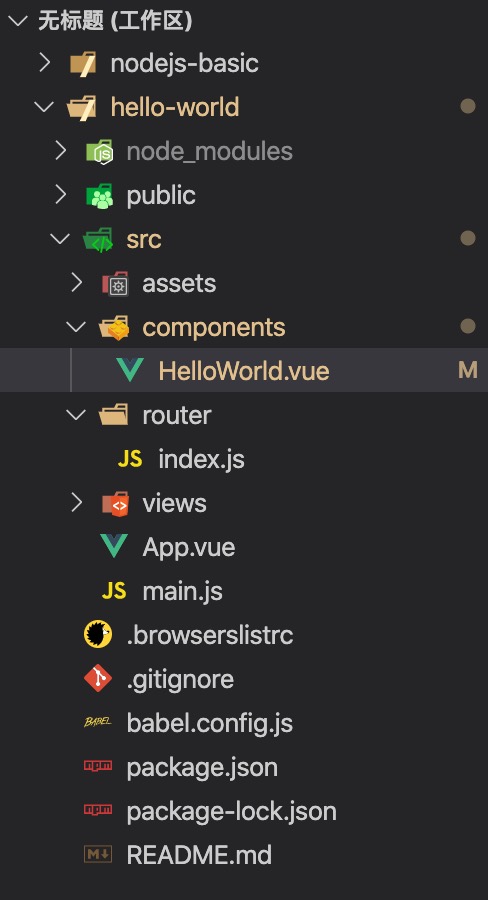
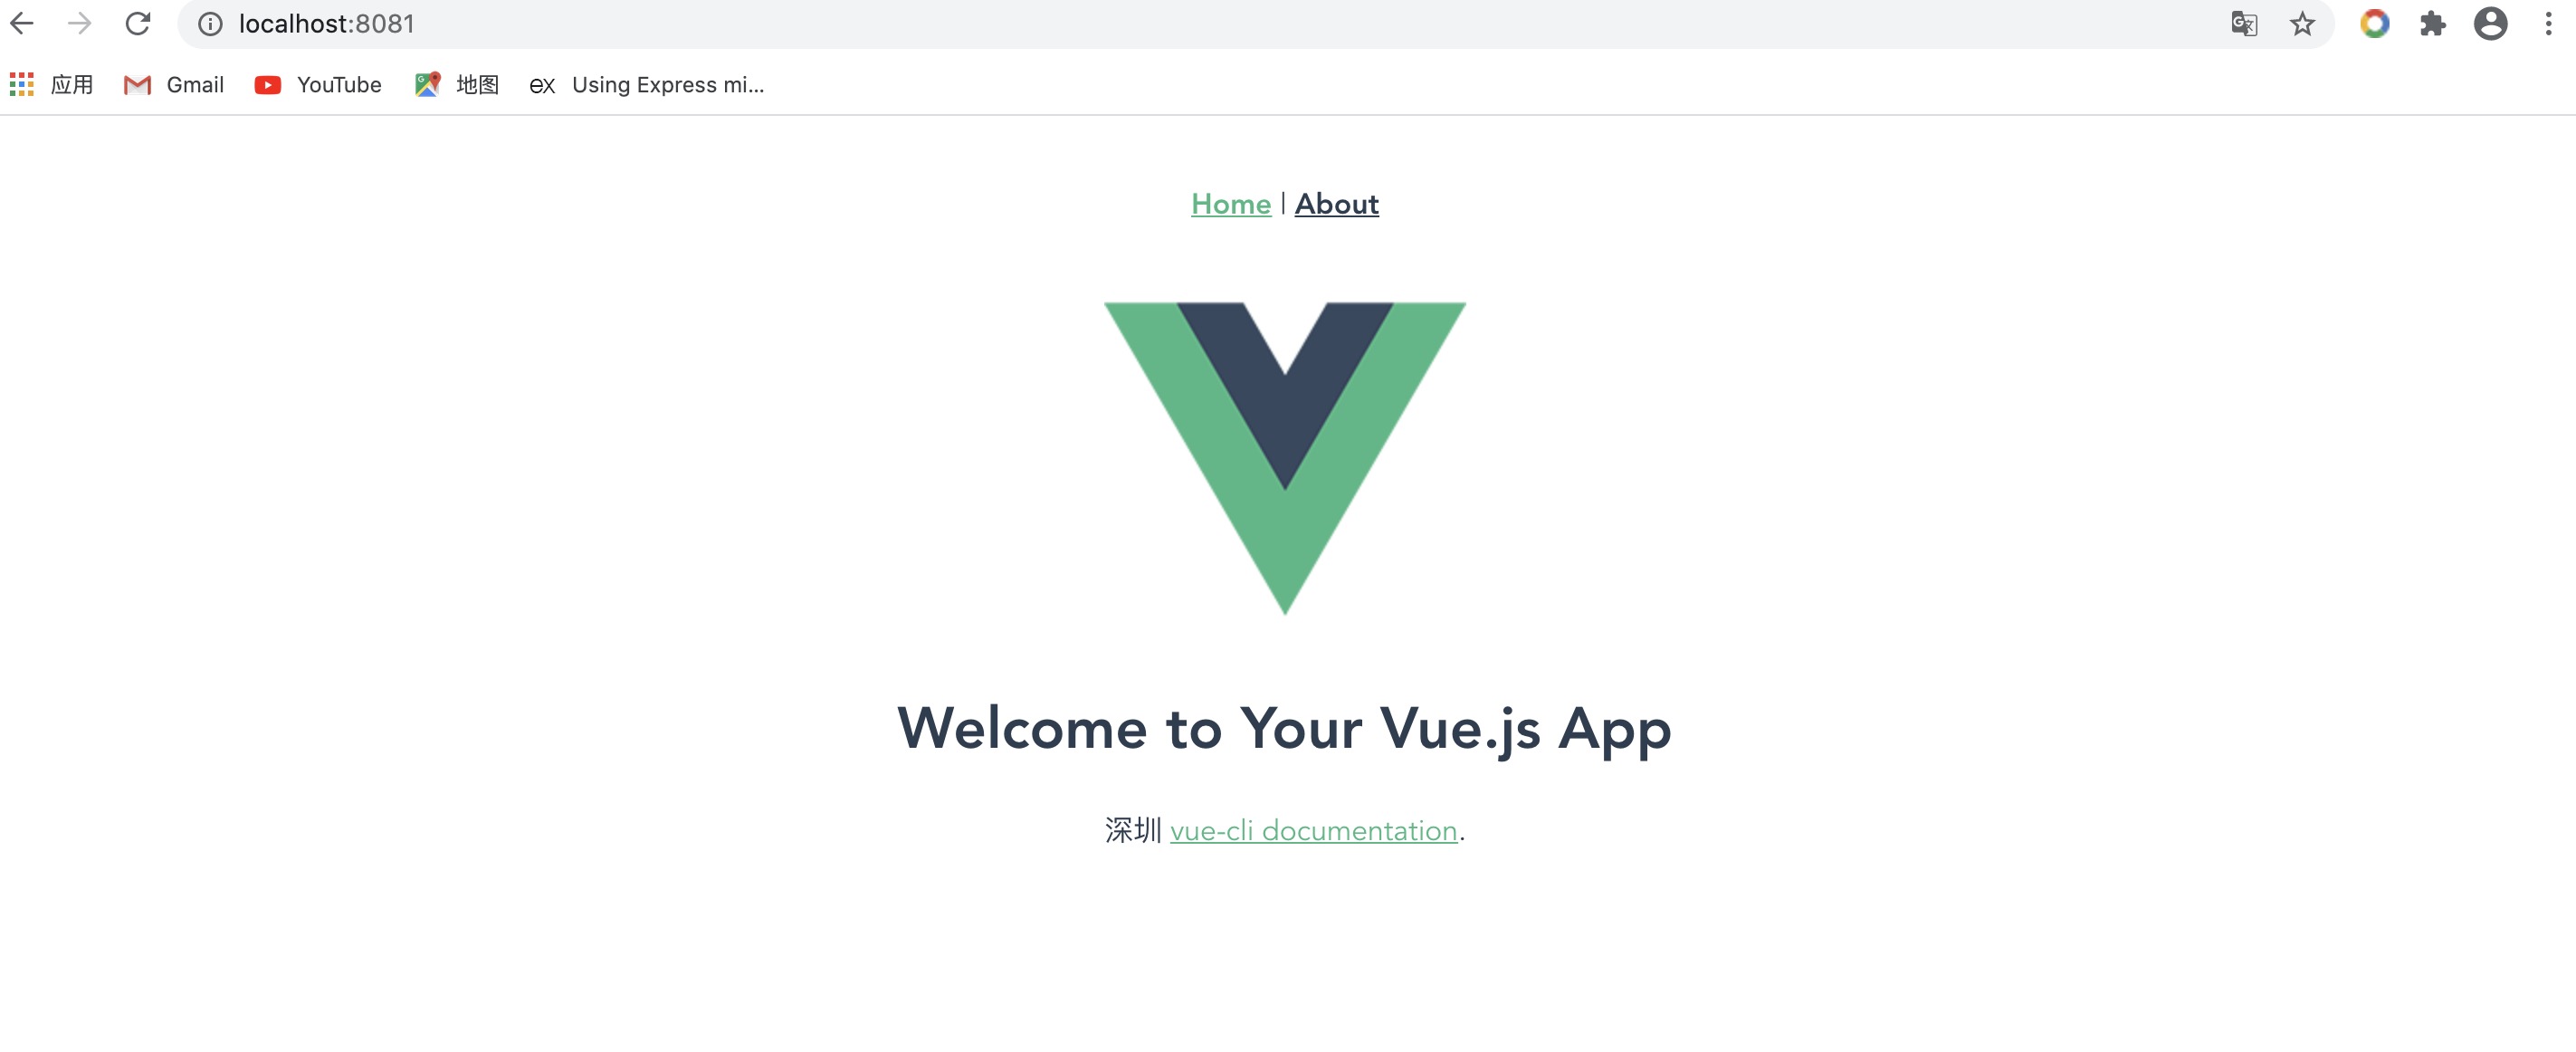
然后修改 HelloWorld.vue 的内容,并启动 vue 项目。启动之后访问是正常的。
(3)接下来执行 npm run build 命令,构建下项目。构建完成后,将生成的 dist 文件夹的 index.html 文件复制到 views 文件夹中,覆盖掉原来的文件。再把 dist 中的其他文件都复制放到 assets 文件夹中。这样就可以将 hello-world 项目从工作区移除了,我们的 nodejs-basic 项目已经齐全了。
(4)重新启动 nodejs-basic 项目,却发现页面上找不到静态资源。所以还得进行处理。这就需要用到 koa-static (opens new window) 了。
首先安装 koa-static。
然后修改下 app.js 和 config/index.js。
// app.js

const Koa = require('koa');
const render = require('koa-swig');
const serve = require('koa-static');
const co = require('co');
const { port, viewDir, staticDir, memoryFlag } = require('./config');
const app = new Koa();

app.use(serve(staticDir));

app.context.render = co.wrap(render({
    root: viewDir,
    autoescape: true,
    cache: memoryFlag,
    ext: 'html',
    writeBody: false
}));

require('./controllers')(app);

app.listen(port, () => {
    console.log('服务启动成功', port);
})
2
3
4
5
6
7
8
9
10
11
12
13
14
15
16
17
18
19
20
21
22
23
24
// config/index.js

const { extend } = require('lodash');
const { join } = require('path');
let config = {
    viewDir: join(__dirname, '..', 'views'),
    staticDir: join(__dirname, '..', 'assets')
};

if (process.env.NODE_ENV === 'development') {
    let localConfig = {
        port: 8081,
        memoryFlag: false,
    };
    config = extend(config, localConfig);
}

if (process.env.NODE_ENV === 'production') {
    let prodConfig = {
        port: 80,
        memoryFlag: 'memory',
    };
    config = extend(config, prodConfig);
}

module.exports = config;
2
3
4
5
6
7
8
9
10
11
12
13
14
15
16
17
18
19
20
21
22
23
24
25
26
- 最后重新启动项目,就可以正常访问了。而且访问我们之前定义好的接口路由也是可以的:localhost:8081/api/list。这样我们就把一个前端项目整合到我们搭建好的后端框架里来了。
但是,现在有个问题,about 路由是假的。如果直接浏览器访问 http://localhost:8081/about 会发现 404,虽然我们切换的时候是没问题的。
- 解决这个问题需要安装 koa2-connect-history-api-fallback (opens new window)。然后修改 app.js 文件。
const Koa = require('koa');
const render = require('koa-swig');
const serve = require('koa-static');
const co = require('co');
const { historyApiFallback } = require('koa2-connect-history-api-fallback');
const { port, viewDir, staticDir, memoryFlag } = require('./config');
const app = new Koa();

app.use(historyApiFallback({ index: '/', whiteList: ['/api'] })); // 一定要放在 router 之前

app.use(serve(staticDir));

app.context.render = co.wrap(render({
    root: viewDir,
    autoescape: true,
    cache: memoryFlag,
    ext: 'html',
    writeBody: false
}));

require('./controllers')(app);

app.listen(port, () => {
    console.log('服务启动成功', port);
})
2
3
4
5
6
7
8
9
10
11
12
13
14
15
16
17
18
19
20
21
22
23
24
25
再重新访问就不会有刚刚的问题了。
🔔 我们也可以把 controllers/Index.js 文件中的根路由改成 '/index.html',这样就成了伪静态页面。
const router = require('koa-simple-router');
const ApiController = require('./ApiController');
const IndexController = require('./IndexController');
const apiController = new ApiController();
const indexController = new IndexController();

module.exports = (app) => {
    app.use(
        router(_ => {
            _.get('/index.html', indexController.actionIndex);
            _.get('/api/list', apiController.actionIndex);
            _.get('/api/create', apiController.actionCreate);
        })
    );
}
2
3
4
5
6
7
8
9
10
11
12
13
14
15

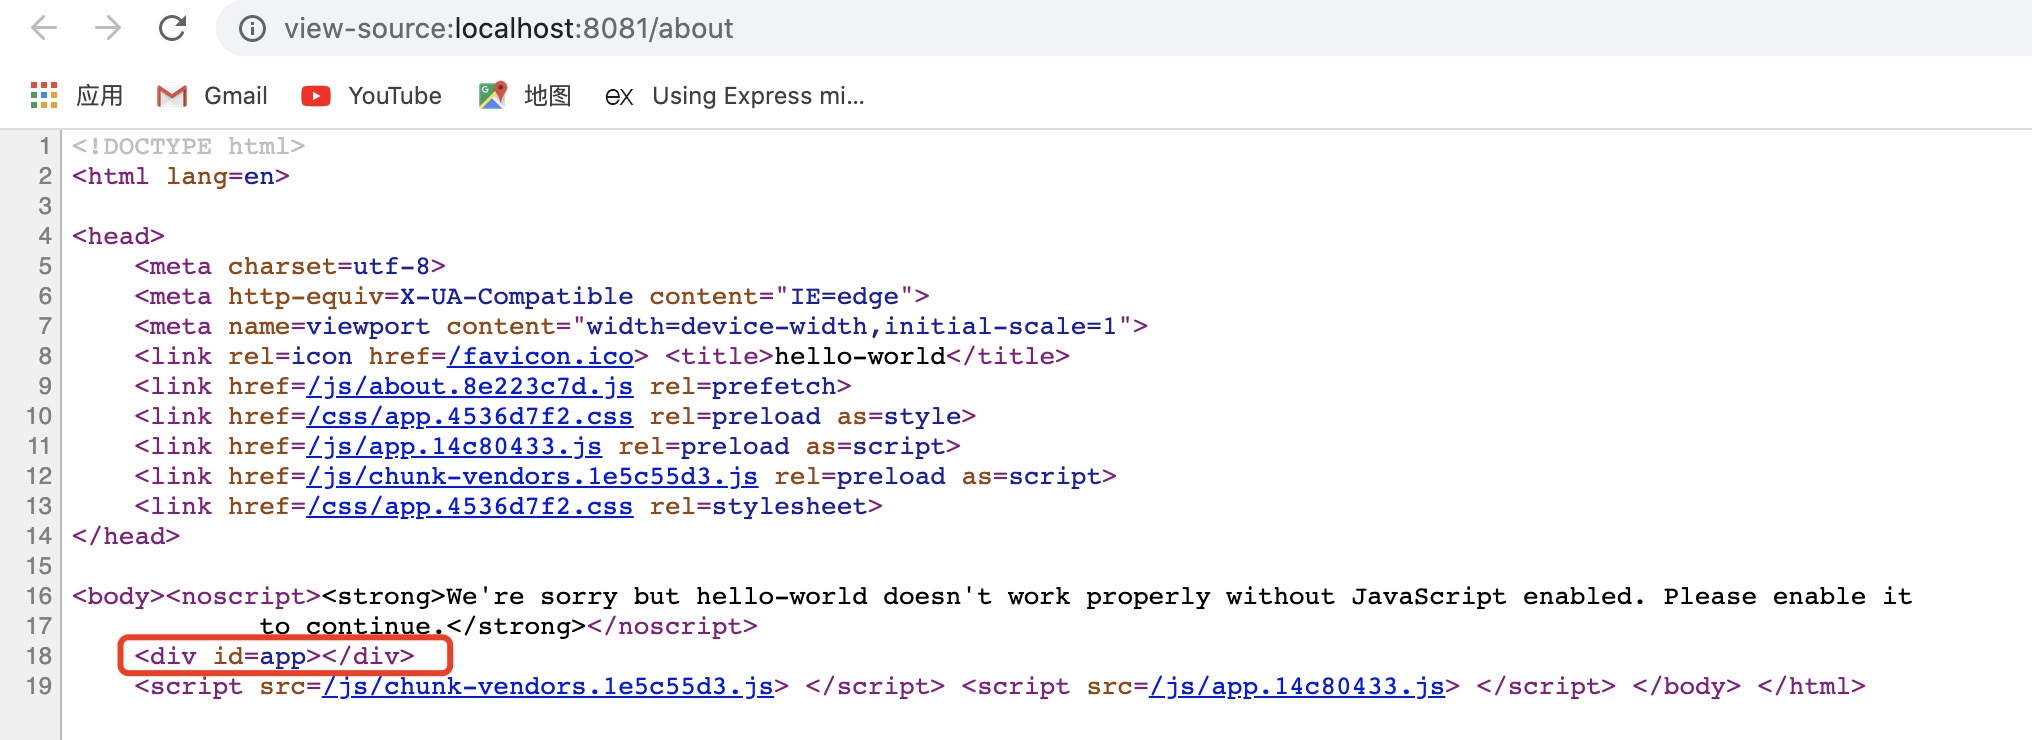
🔔 如何区分真假路由?
右键检查框架源代码,如果是像下面这种只有一个 div,里面是空的,就是假路由。如果是有具体的 dom 元素,就是真路由。
到此,就完成了作业二的前两步。
12. 把项目改成都用真路由
(1)把刚刚引入的 koa2-connect-history-api-fallback 注释掉。
(2)把已有的 index.html 文件的名字改成别的,比如 index.back.html。然后新建一个 index.html 文件。
(3)到下面这个开源库中找一个 vue 的资源链接。并在 index.html 文件中引用它。
Staticfile CDN (opens new window) 收录了很多优秀的开源库,并免费为之提供 CDN 加速服务,使之有更好的访问速度和稳定的环境。
(4)在 assets 文件夹中新建 back 文件夹,然后把 assets 文件夹下的东西都移到这里面。然后在 assets 文件夹中新建 scripts 文件夹,在 scripts 里面再建一个 index.js。并且在 index.html 中引用它。
(5)从 vue 官网上随便复制一段代码下来,放到 index.html 和 index.js 文件中。
<!DOCTYPE html>
<html lang="en">
<head>
    <meta charset="UTF-8">
    <meta name="viewport" content="width=device-width, initial-scale=1.0">
    <title>Document</title>
</head>
<body>
    <div id="app-6">
        <p>{{ message }}</p>
        <input v-model="message">
    </div>
    <script src="https://cdn.staticfile.org/vue/2.6.11/vue.min.js"></script>
    <script src="/scripts/index.js"></script>
</body>
</html>
2
3
4
5
6
7
8
9
10
11
12
13
14
15
16
var app6 = new Vue({
    el: '#app-6',
    data: {
      message: 'Hello Vue!'
    }
})
2
3
4
5
6
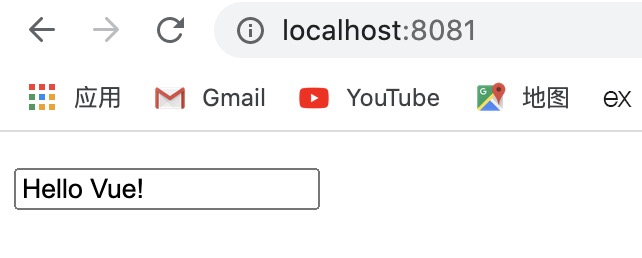
访问页面可见:
(6)自定义我们自己后端发送的数据的渲染形式
这个时候我们就可以自己通过后端去发送数据了。
// IndexController.js

const Controller = require('./Controller');
class IndexController extends Controller {
    constructor() {
        super();
    }
    async actionIndex(ctx, next) {
        ctx.body = await ctx.render('index', {
            data: '后端数据'
        });
    }
}

module.exports = IndexController;
2
3
4
5
6
7
8
9
10
11
12
13
14
15
但是此时刷新页面发现我们后端发送的数据没有在前端显示,这是因为 swig 的模版渲染方式跟 vue 的模版渲染方式冲突了。解决这个问题的方法是我们需要去自定义后端发送的数据的渲染形式。
首先在 app.js 中配置:
app.context.render = co.wrap(render({
    root: viewDir,
    autoescape: true,
    cache: memoryFlag,
    ext: 'html',
    varControls: ['[[', ']]'],
    writeBody: false
}));
2
3
4
5
6
7
8
然后在 index.html 中写上:
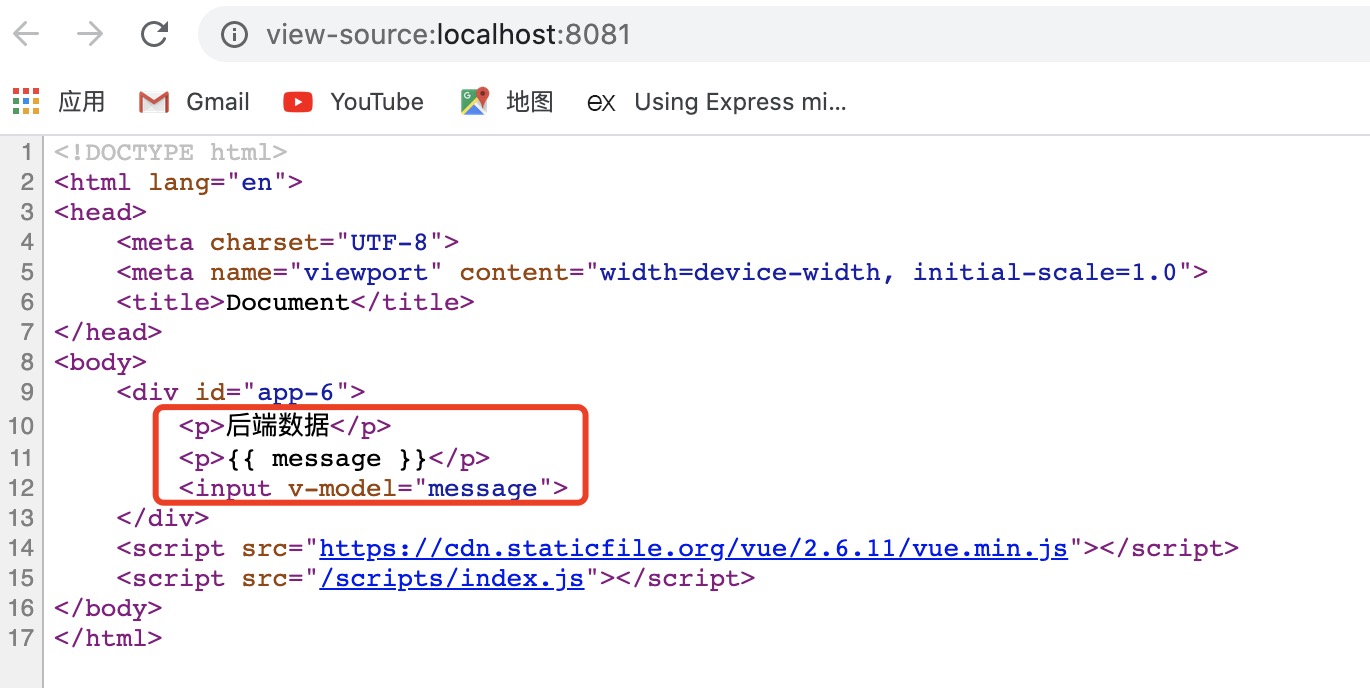
<div id="app-6">
    <p>[[ data ]]</p>
    <p>{{ message }}</p>
    <input v-model="message">
</div>
2
3
4
5
此时,重新刷新页面就可以看到前端数据和后端数据都成功渲染出来了。
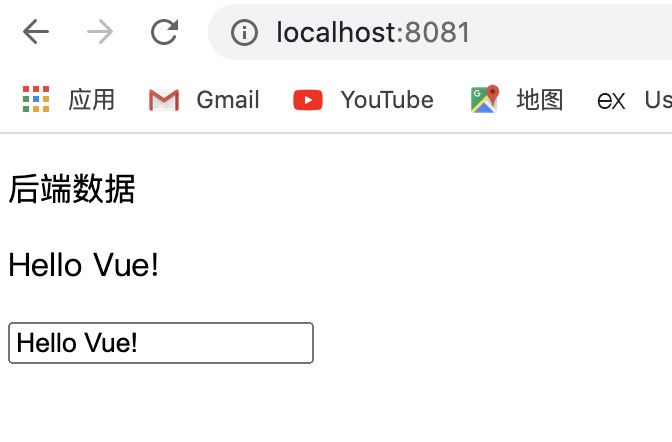
查看框架的源代码可以看到,此时已经不是只有一个 div 元素了,具体的 dom 元素都有。现在的路由就是真路由了。
刷新的时候会发现 vue 渲染出来的数据会闪一下,体验不好,但是我们自己用后端渲染出来的数据就不会有这个问题。
其实这就是所谓的 SSR,由服务端来渲染数据。SSR 其实在很早之前就有了,类似以前的 jsp。
# 处理不同浏览器对 ES module 的支持
13. 使用 Babel 编译 systemjs 加载
systemjs (opens new window) 是一个模块加载器,现在的微前端框架都是用它完成模块化的。
(1)新建 libs 文件夹。
(2)在 scripts 文件夹下新建 data.js。
const data = 'shenzhen';
export default data;
2
(3)在 index.html 中引用它,注意要加上 type="module",来声明这个脚本是一个模块。
<script type="module" src="/scripts/data.js"></script>
刷新页面发现没问题。
🔔 动态加载模块
动态加载模块就是仅在需要时动态加载模块,而不必预先加载所有模块。它将 import() 作为函数调用,并返回一个 promise。
接着再改下 index.html,让它动态加载模块。
<script type="module">
    import('./scripts/data.js').then((_) => {
        console.log(_);
    })
</script>
2
3
4
5
浏览器中会打印出以下结果,我们导出的数据就在 default 属性中:
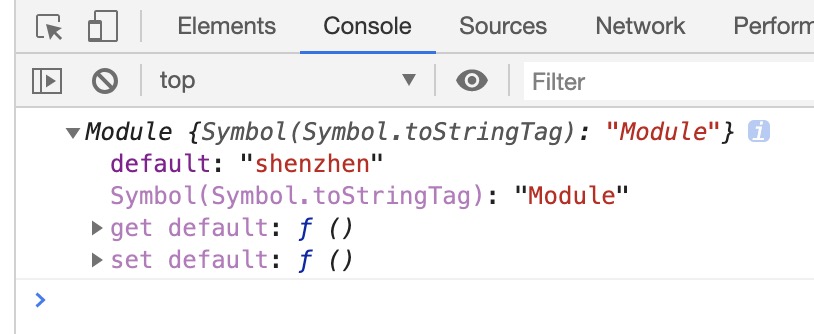
因此,如果浏览器支持 module,我们可以直接用以上这种方式导入文件获取数据。
有的浏览器就不支持 module:
<script type="nomodule"></script>
因为这里的浏览器是支持 module 的,所以 type="nomodule" 里的代码不执行。为了演示 nomodule 如何处理,这里暂时用 module 代替 nomodule。
<script type="module" src="https://cdn.staticfile.org/systemjs/6.3.3/system.js"></script>
<script type="module">
    import('./scripts/data_bundle.js').then((_) => {
        console.log(_);
    })
</script>
2
3
4
5
6
(4)在 package.json 中添加以下脚本命令:
"build": "babel ./assets/scripts/data.js -o ./assets/scripts/data_bundle.js"
(5)安装 @babel/cli 和 @babel/core。
npm install @babel/cli @babel/core @babel/preset-env --save-dev
(6)新建 .babelrc 文件
{
    "presets": ["@babel/preset-env"]
}
2
3
(7)执行 npm run build 命令,就可以看到在 scripts 文件夹下生成了 data_bundle.js 文件。
"use strict";

Object.defineProperty(exports, "__esModule", {
  value: true
});
exports["default"] = void 0;
var data = 'shenzhen';
var _default = data;
exports["default"] = _default;
2
3
4
5
6
7
8
9
我们发现,babel 直接编译成了 exports 的,这样肯定不行,浏览器识别不了。所以需要用 systemjs 来加载。
(8)安装 @babel/plugin-transform-modules-systemjs (opens new window)
npm install @babel/plugin-transform-modules-systemjs --save-dev
然后在 .babelrc 文件中添加:
{
    "presets": ["@babel/preset-env"],
    "plugins": ["@babel/plugin-transform-modules-systemjs"]
}
2
3
4
(9)重新执行命令 npm run build ,可以发现 data_bundle.js 文件的内容变了。
"use strict";

System.register([], function (_export, _context) {
  "use strict";

  var data;
  return {
    setters: [],
    execute: function () {
      data = 'shenzhen';

      _export("default", data);
    }
  };
});
2
3
4
5
6
7
8
9
10
11
12
13
14
15
启动项目,浏览器中也能正常访问了。
(10)演示完毕后,把 module 改回 nomodule,最终 index.html 中应该是这样的:
<script type="module">
    import('./scripts/data.js').then((_) => {
        console.log(_);
    })
</script>
<script type="nomodule" src="https://cdn.staticfile.org/systemjs/6.3.3/system.js"></script>
<script type="nomodule">
    import('./scripts/data_bundle.js').then((_) => {
        console.log(_);
    })
</script>
2
3
4
5
6
7
8
9
10
11
(11)由 ES Module 引出的 script 标签 type 属性总结
如果浏览器支持 type="module",那么 script 标签里的代码就不需要编译,因为它本身就支持 ES Module 了。
如果浏览器不支持 type="module",那么在它眼里就相当于是 type="xxx",script 标签里的代码就不会执行。于是就会开始降级处理。
如果浏览器既不支持 type="module",也不支持 type="nomodule"(比如:IE),那么 script 标签里的代码都不会执行。
如果给 script 标签加上 type="xxx"(xxx是随便定义的类型),那么 script 标签里的代码是会不执行的。
type="module" 和 type="nomodule" 还支持另外一种写法。如果是采用下面这种写法,那就无所谓了,script 标签里的代码是可以执行的,因为浏览器此时只是把它们当成一个普通的属性。
<script module></script>

<script nomodule></script>
1
2
3针对下面这段代码:
<script type="module">
  import('./scripts/data.js').then((_) => {
      console.log(_);
  })
</script>
<script nomodule src="https://cdn.staticfile.org/systemjs/6.3.3/system.js"></script>
<script nomodule>
  import('./scripts/data_bundle.js').then((_) => {
      console.log(_);
  })
</script>
1
2
3
4
5
6
7
8
9
10
11I. 如果浏览器既支持 type="module",也支持 type="nomodule",那么就会执行 type="module" 里面的代码。浏览器支持 type="nomodule" 的话不执行 nomodule 里面的代码。执行一次
II. 如果浏览器支持 type="module",不支持 type="nomodule",就相当于给 script 标签加了个 xxx 属性,没影响,所以 nomodule 里面的代码也会执行。执行两次
III. 如果浏览器既不支持 type="module",也不支持 type="nomodule",那么就只会执行 nomodule 里面的代码。执行一次
第二种情况中会执行两次代码,这个就需要做处理。把不支持 type="nomodule" 时的代码阻止掉,不让它执行。阻止方法可以参考这个:safari-nomodule.js (opens new window)。
浏览器对 module 和 nomodule 的支持情况可在 caniuse (opens new window) 上查看。
# 使用函数式编程进行稀释(节流)
参考 Underscore.JS (opens new window) 的 UMD (Development) (opens new window) 源码。在 assets/scripts 下新建一个 my_lib.js 文件,然后把 UMD (Development) 源码复制粘贴到这里。
接下来就是通过分析这份源码,实现自己需要的库 my_lib.js。
(function () {
    var root = typeof self == 'object' && self.self === self && self ||
            typeof global == 'object' && global.global === global && global ||
            Function('return this')() ||
            {};
    var ArrayProto = Array.prototype;
    var push = ArrayProto.push;

    function _(obj) {
        // if (obj instanceof _) return obj;
        if (!(this instanceof _)) return new _(obj);
        this._wrapped = obj; // 初始化的构造函数
    }

    function map (obj, iteratee) {
        // 第二个参数一定得是函数才能往下执行,不然就违背了 map 的设计原则了
        if (isFunction(iteratee)) {
            // 这里自己再实现具体的 map 逻辑就行了,只要两种方式都能拿到参数就证明没问题了
            console.log('第一个参数:', obj);
            console.log('第二个参数:', iteratee);
        } else {
            throw new Error('参数错误');
        }
    };

    function throttle (fn, wait = 500) { // 节流函数
        let timer;
        return function (...args) {
            if (timer == null) {
                timer = setTimeout(() => {
                    timer = null;
                }, wait);
                return fn.apply(this, args);
            }
        }
    }

    function each (obj, callback) {
        if (Array.isArray(obj)) {
            for (let item of obj) {
                callback && callback.call(_, item);
            }
        }
    }

    function isFunction (obj) {
        return typeof obj === 'function' || false;
    }

    function functions (obj) {
        var names = [];
        for (let key in obj ) {
            if (isFunction(obj[key])) {
                names.push(key);
            }
        }
        return names;
    }

    // 想暴露出去的方法放到 allExports 对象里就行了
    var allExports = {
        isFunction,
        map,
        throttle
    };

    // mixin 其实只做两件事
    // 判断 _.map = function () {}
    // 判断 _.prototype.map = function () {}
    function mixin (obj) {
        each(functions(obj), function(name) {
            var func = _[name] = obj[name];
            _.prototype[name] = function() {
                var args = [this._wrapped];
                push.apply(args, arguments); // 合并参数
                return func.apply(_, args);
            };
        });
    }

    mixin(allExports);

    root._ = _;
})()
2
3
4
5
6
7
8
9
10
11
12
13
14
15
16
17
18
19
20
21
22
23
24
25
26
27
28
29
30
31
32
33
34
35
36
37
38
39
40
41
42
43
44
45
46
47
48
49
50
51
52
53
54
55
56
57
58
59
60
61
62
63
64
65
66
67
68
69
70
71
72
73
74
75
76
77
78
79
80
81
82
83
84
# 容错处理
新建一个 middlewares 文件夹,并在 middlewares 下新建 errorHandler.js 文件。
要想做容错处理,首先得明白 koa 的执行顺序。它的执行顺序是这样的:
先执行 await next(); 前面的代码,然后再倒着执行 await next(); 后面的代码。
所以这段代码的执行顺序就应该是:1 -> 3 -> 5 -> 4 -> 2
const Koa = require('koa');
const app = new Koa();

// logger

app.use(async (ctx, next) => {
  // 1
  await next();
  // 2
});

// x-response-time

app.use(async (ctx, next) => {
  // 3
  await next();
  // 4
});

// response

app.use(async ctx => {
  // 5
  ctx.body = 'Hello World';
});

app.listen(3000);
2
3
4
5
6
7
8
9
10
11
12
13
14
15
16
17
18
19
20
21
22
23
24
25
26
27
- 编写 errorHandler.js,先做一个 404 处理。
注意,即使是404和500,返回的状态码也应该是200,因为这是为了防止网站被占权,如果页面上太多404和500,搜索引擎会把网页的排名挪后。
之前是需要自己手动设置状态码为200的,但是现在 koa 优化了这点,只要有返回内容,也就是 ctx.body 有内容,就会自动将404转换为200.
class errorHandler {
    static error(app, logger) {
        app.use(async(ctx, next) => {
            await next();
            if (ctx.status !== 404) {
                return;
            }
            ctx.status = 200;
            ctx.body = '404';
        })
    }
}
module.exports = errorHandler;
2
3
4
5
6
7
8
9
10
11
12
13
然后在 app.js 中使用它,注意在 app.js 中 errorHandler 的放置位置是有讲究的。
const Koa = require('koa');
const render = require('koa-swig');
const serve = require('koa-static');
const co = require('co');
const errorHandler = require('./middlewares/errorHandler');
// const { historyApiFallback } = require('koa2-connect-history-api-fallback');
const { port, viewDir, staticDir, memoryFlag } = require('./config');
const app = new Koa();

// app.use(historyApiFallback({ index: '/', whiteList: ['/api'] })); // 一定要放在 router 之前

app.use(serve(staticDir));

app.context.render = co.wrap(render({
    root: viewDir,
    autoescape: true,
    cache: memoryFlag,
    ext: 'html',
    varControls: ['[[', ']]'],
    writeBody: false
}));

errorHandler.error(app);

require('./controllers')(app);

app.listen(port, () => {
    console.log('服务启动成功', port);
})
2
3
4
5
6
7
8
9
10
11
12
13
14
15
16
17
18
19
20
21
22
23
24
25
26
27
28
29
此时,如果在浏览器中访问一个不存在的路径,就会看到页面上显示 404。
如果没有404页面,可以用腾讯公益的404页面:
ctx.body = '<script type="text/javascript" src="//qzonestyle.gtimg.cn/qzone/hybrid/app/404/search_children.js" charset="utf-8" homePageUrl="http://yoursite.com/yourPage.html" homePageName="回到我的主页"></script>';
- 接着,再加上对500的处理。
class errorHandler {
    static error(app, logger) {
        app.use(async(ctx, next) => {
            try {
                await next();
            } catch(e) {
                ctx.body = '500请求,恢复中~'
            }
        })
        app.use(async(ctx, next) => {
            await next();
            if (ctx.status !== 404) {
                return;
            }
            ctx.status = 200;
            ctx.body = '<script type="text/javascript" src="//qzonestyle.gtimg.cn/qzone/hybrid/app/404/search_children.js" charset="utf-8" homePageUrl="http://yoursite.com/yourPage.html" homePageName="回到我的主页"></script>';
        })
    }
}
module.exports = errorHandler;
2
3
4
5
6
7
8
9
10
11
12
13
14
15
16
17
18
19
20
如果把 ApiController.js 文件中的 ctx.body 改成:
ctx.body = {
    data: xxx // xxx 是没定义的变量
}
2
3
此时访问 http://localhost:8081/api/list,就会看到页面显示500的信息。同样的,只要有返回内容,koa 也对500做了优化,会自动把状态码转为200。

- 不过,出错了不仅仅是给用户一个友好的提示,还需要记录报错的日志信息。
此时可以用到 log4js (opens new window)。安装好 log4js 之后,就可以使用它了。
// app.js
const Koa = require('koa');
const render = require('koa-swig');
const serve = require('koa-static');
const co = require('co');
const log4js = require("log4js");
const errorHandler = require('./middlewares/errorHandler');
// const { historyApiFallback } = require('koa2-connect-history-api-fallback');
const { port, viewDir, staticDir, memoryFlag } = require('./config');
const app = new Koa();

// app.use(historyApiFallback({ index: '/', whiteList: ['/api'] })); // 一定要放在 router 之前

log4js.configure({
    appenders: { cheese: { type: "file", filename: "logs/error.log" } },
    categories: { default: { appenders: ["cheese"], level: "error" } }
});
const logger = log4js.getLogger("cheese");

app.use(serve(staticDir));

app.context.render = co.wrap(render({
    root: viewDir,
    autoescape: true,
    cache: memoryFlag,
    ext: 'html',
    varControls: ['[[', ']]'],
    writeBody: false
}));

errorHandler.error(app, logger);

require('./controllers')(app);

app.listen(port, () => {
    console.log('服务启动成功', port);
})
2
3
4
5
6
7
8
9
10
11
12
13
14
15
16
17
18
19
20
21
22
23
24
25
26
27
28
29
30
31
32
33
34
35
36
37
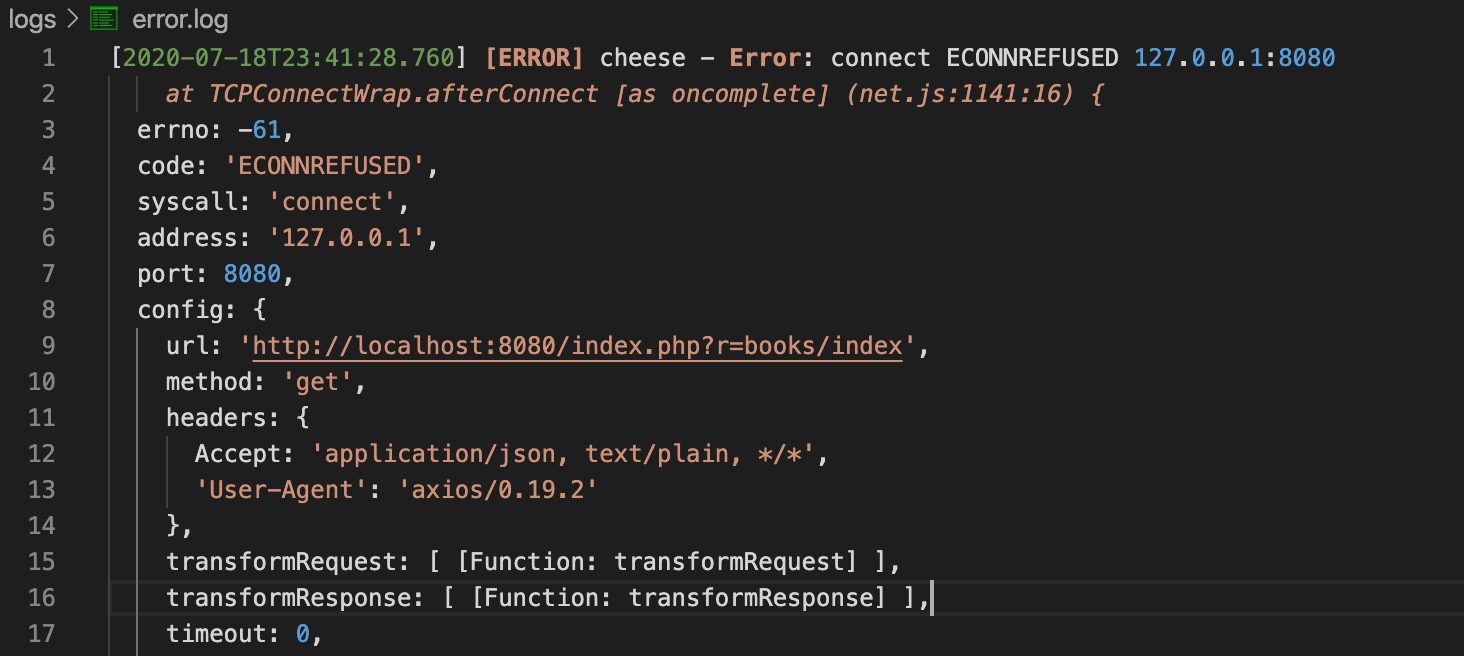
然后在浏览器中重新访问 http://localhost:8081/api/list,就会看到生成了一个 logs 文件夹,里面有一个 error.log 文件。
# 将 Yii 接口输出 JSON 给 Node.js 使用
- 打开之前作业一的项目,在 XAMPP 的 htdocs 中。只需要把 BooksController.php 里的 actionIndex 改成下面这样就可以了。
use yii\web\Response;

public function actionIndex()
{
    $searchModel = new BooksSearch();
    $dataProvider = $searchModel->search(Yii::$app->request->queryParams);

    // return $this->render('index', [
    //     'searchModel' => $searchModel,
    //     'dataProvider' => $dataProvider,
    // ]);

    YII::$app->response->format = Response::FORMAT_JSON;
    return $dataProvider->getModels();
}
2
3
4
5
6
7
8
9
10
11
12
13
14
15
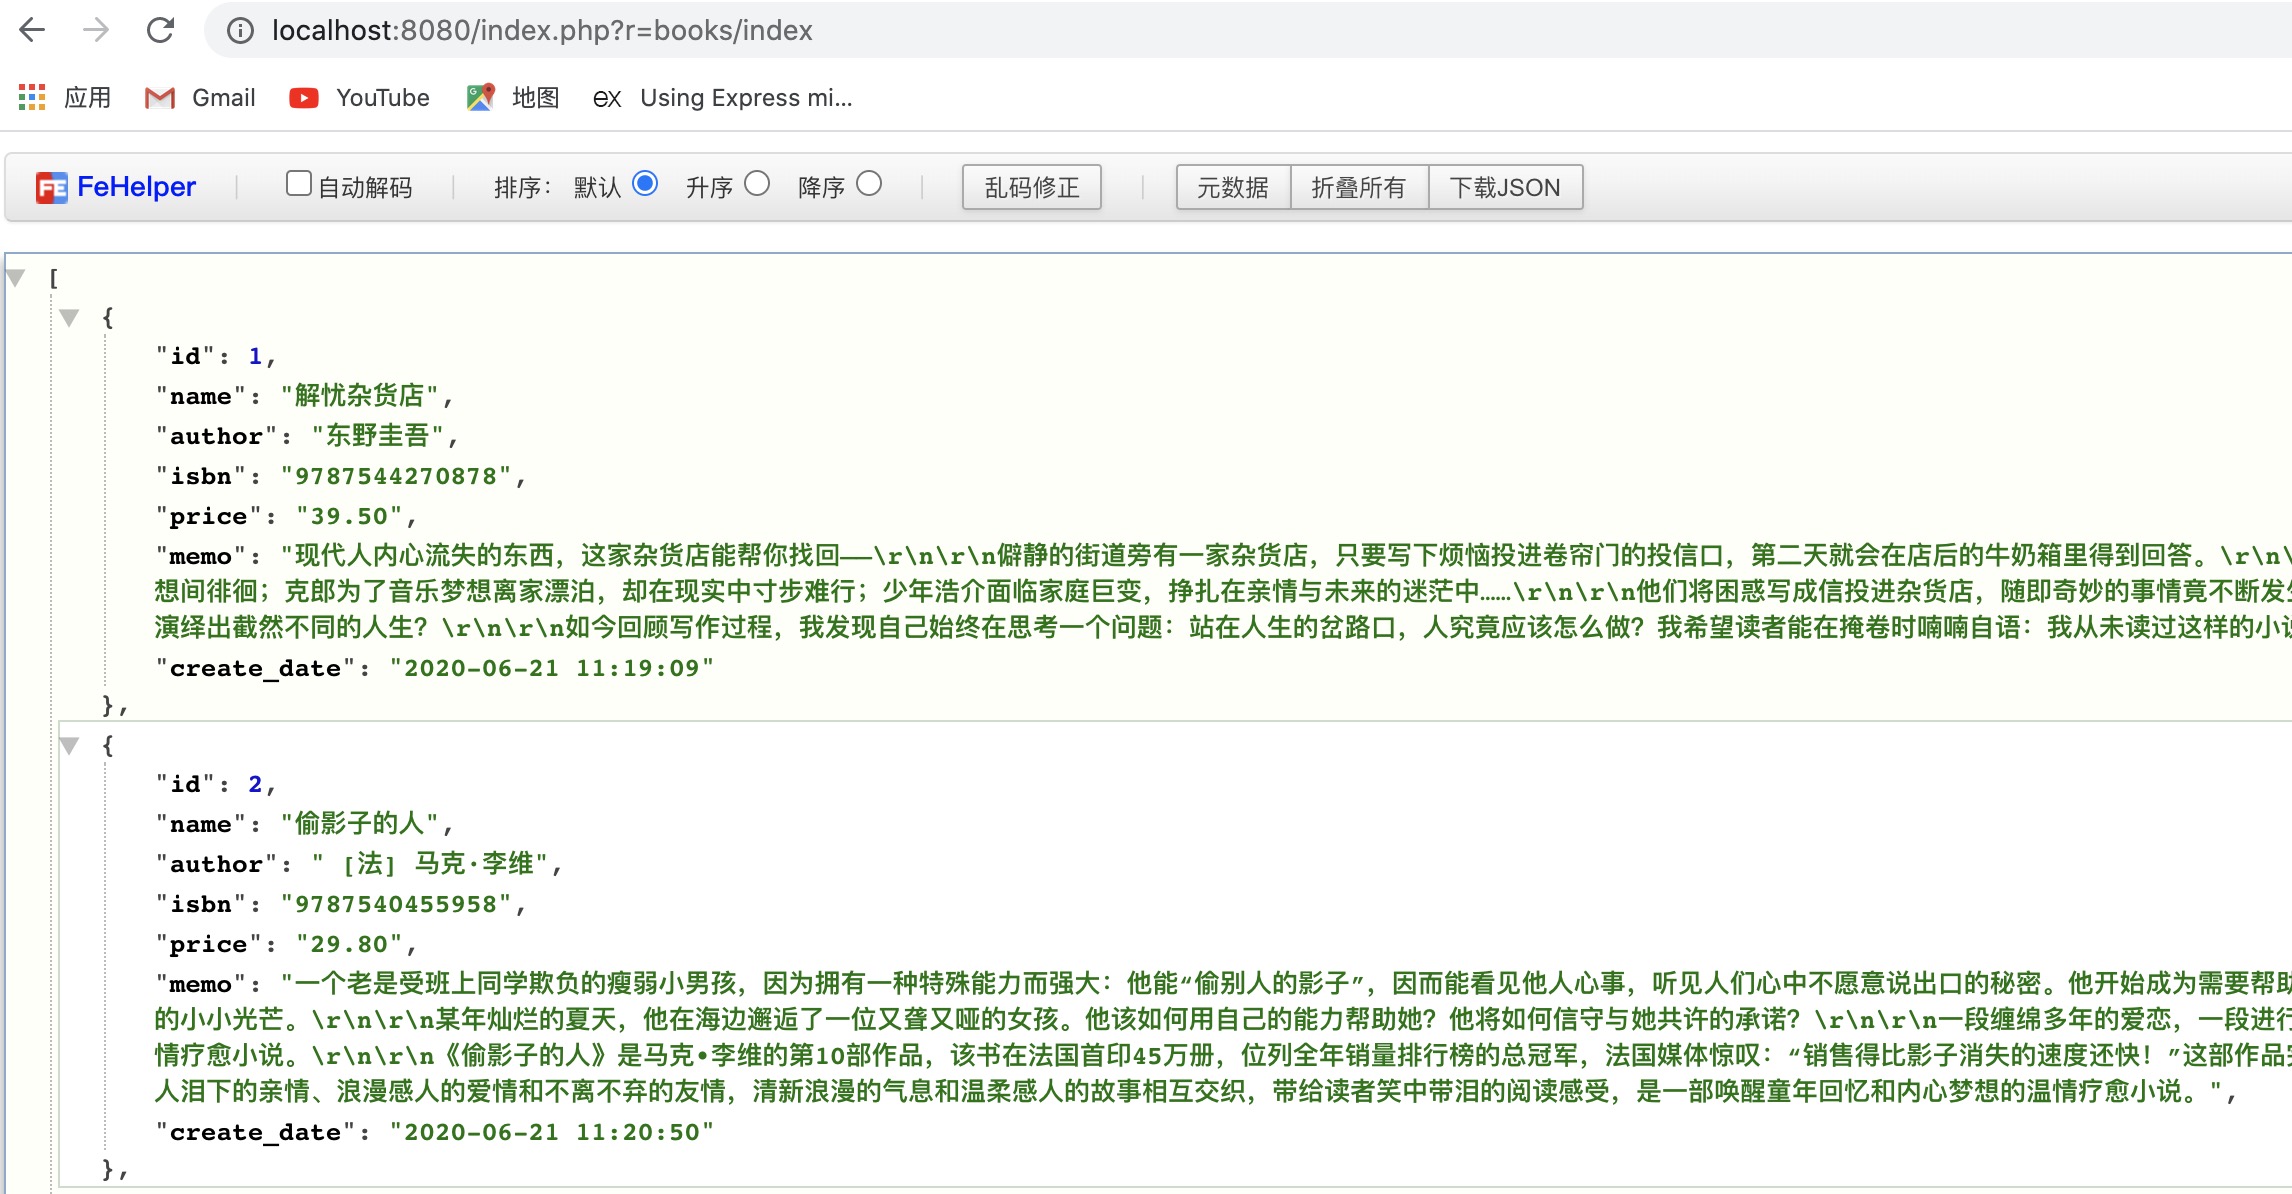
启动项目 php yii serve,然后浏览器中访问 http://localhost:8080/index.php?r=books/index。就可以看到数据以 JSON 格式返回了。
- 既然已经有返回 JSON 数据了,那么项目就可以使用了。
// models/Books.js
const axios = require('axios');

class Books {
    getData() {
        return axios.get('http://localhost:8080/index.php?r=books/index');
    }
}

module.exports = Books;
2
3
4
5
6
7
8
9
10
// controllers/ApiController.js
const Controller = require('./Controller');
const Book = require('../models/Books');
class ApiController extends Controller {
    constructor() {
        super();
    }
    async actionIndex(ctx, next) {
        const book = new Book();
        const { data } = await book.getData();
        ctx.body = {
            data
        }
    }
    async actionCreate() {}
}
module.exports = ApiController;
2
3
4
5
6
7
8
9
10
11
12
13
14
15
16
17
页面上访问 http://localhost:8081/api/list,这样就可以把接口的数据取到了。但是访问之后却出现了问题,拒绝访问:
- 介绍一个可以创建目录别名的插件 module-alias (opens new window)。
在 app.js 文件中最上面加上这段代码。
const moduleAlias = require('module-alias');
moduleAlias.addAliases({
    '@root'  : __dirname,
    '@models': __dirname + '/models',
    '@controllers': __dirname + '/controllers'
});
2
3
4
5
6
之后我们引用文件时就不需要写像下面这样的相对路径了。
const Book = require('../models/Books');
可以写成:
const Book = require('@models/Books');
- 上面拿到了接口数据之后,就可以使用 swig 模版在页面上渲染出来。
- 新建一个 list.html。
<!DOCTYPE html>
<html lang="en">
<head>
    <meta charset="UTF-8">
    <meta name="viewport" content="width=device-width, initial-scale=1.0">
    <title>图书展示</title>
</head>
<body>
    <ul>
        {% for key, val in data %}
        <li>[[val.author]]</li>
        {% endfor %}
    </ul>
</body>
</html>
2
3
4
5
6
7
8
9
10
11
12
13
14
15
- 然后补充 ApiController.js 文件的 actionCreate 函数。
const Controller = require('./Controller');
const Book = require('@models/Books');
class ApiController extends Controller {
    constructor() {
        super();
    }
    async actionIndex(ctx, next) {
        const book = new Book();
        const { data } = await book.getData();
        ctx.body = {
            data
        }
    }
    async actionCreate(ctx, next) {
        const book = new Book();
        const { data } = await book.getData();
        ctx.body = await ctx.render('list', { data });
    }
}
module.exports = ApiController;
2
3
4
5
6
7
8
9
10
11
12
13
14
15
16
17
18
19
20
# 生成 tree 目录
- 完成项目之后,需要对我们的项目目录有一个说明,可以安装 tree:
brew install tree
- 安装完成后执行以下命令,就可以在 README.md 文件中看到生成的目录结构。
tree -L 1 > README.md
← Node.js Koa SSR 相关知识 →