内存泄漏
# 内存泄漏
# 什么是内存泄漏
程序的运行需要内存。只要程序提出要求,操作系统或者运行时(runtime)就必须供给内存。
对于持续运行的服务进程(daemon),必须及时释放不再用到的内存。否则,内存占用越来越高,轻则影响系统性能,重则导致进程崩溃。
不再用到的内存,没有及时释放,就叫做内存泄漏(memory leak)。
有些语言(比如 C 语言)必须手动释放内存,程序员负责内存管理。
# 内存泄漏的具体表现
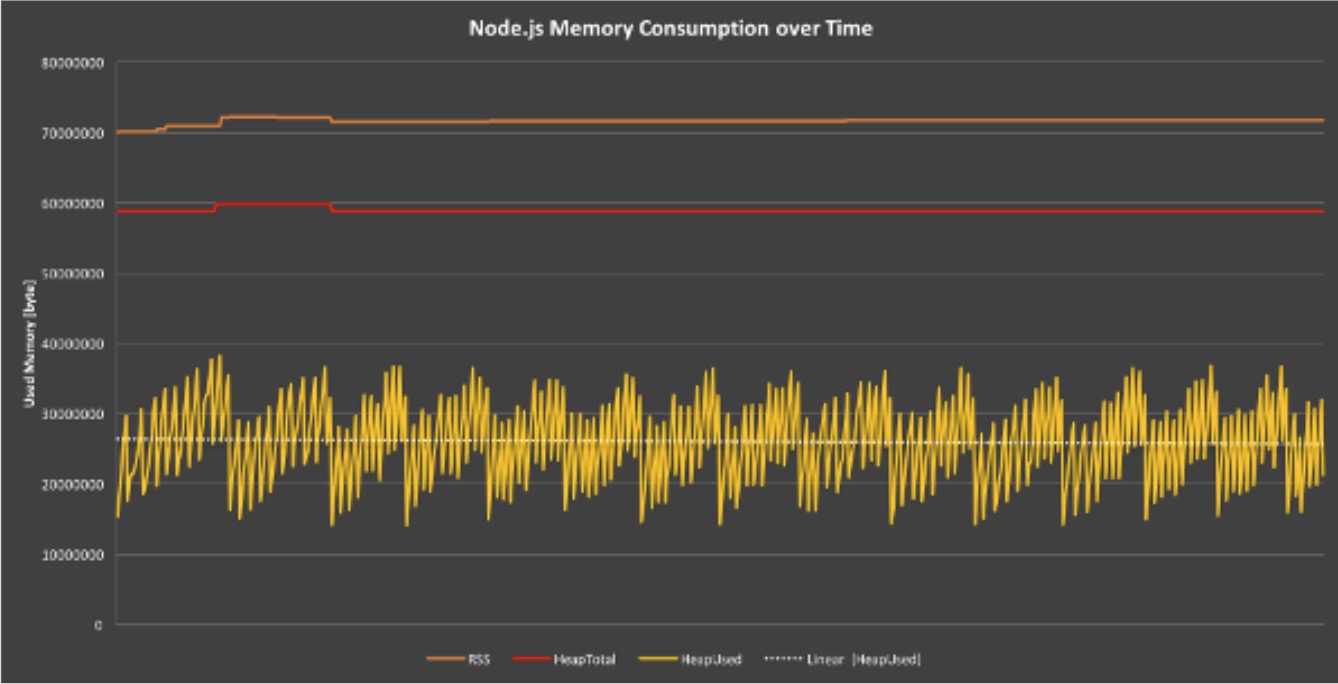
- 比较平稳,没有内存泄漏
- 逐步上升,说明有内存泄漏
# 浏览器中分析内存泄漏
1. 使⽤ Chrome 开发者⼯具
打开 Chrome 开发者⼯具(DevTools),切换到 “Memory” 选项卡。
使⽤ “Heap snapshot” 功能捕获堆内存的快照。⽐较连续快照可以帮助识别内存泄漏。
“Allocation timeline” 和 “Allocation instrumentation on timeline” ⼯具可以⽤来实时监控内存分配情况。
2. 分析 JavaScript 对象和 DOM 节点
通过堆快照,可以分析哪些对象被保留在内存中。
查找意外的⼤量 DOM 节点或未被释放的闭包。
实际操作:在浏览器中查看内存泄漏
# 浏览器中分析 GPU 占⽤
1. 使⽤ Chrome 的 “Performance” 选项卡
在 Chrome DevTools 中的 “Performance” 选项卡,记录⼀段时间的⻚⾯性能。
在结果中检查 GPU 相关活动,如绘制(Painting)和合成(Compositing)。
2. 硬件加速和 CSS 动画
注意 CSS 动画和过渡的使⽤,确保它们不会过度占⽤ GPU 资源。
理解哪些 CSS 属性会触发 GPU 加速。
# Node.js 中分析内存泄露
1. 使⽤内置的检测⼯具
Node.js 提供了内置的⼯具,如 process.memoryUsage() (opens new window),来报告进程的内存使⽤情况。
process.memoryUsage() 会返回一个对象,包含了 Node.js 进程的内存占用信息。该对象包含四个字段,单位是字节。
| 字段 | 含义 |
|---|---|
| rss(resident set size) | 所有内存占用,包括指令区和堆栈 |
| heapTotal | “堆”占用的内存,包括用到的和没用到的 |
| heapUsed | 用到的堆的部分 |
| external | V8 引擎内部的 C++ 对象占用的内存 |
🔔 判断内存泄漏,以 heapUsed 字段为准。
2. 使⽤堆快照
利⽤ Node.js 的 v8 模块或 Chrome DevTools 对 Node.js 应⽤⽣成堆快照。
可以使⽤像 heapdump (opens new window) 这样的 npm 包来获取和分析堆快照。
3. 使⽤性能分析⼯具
使⽤像 clinc (opens new window) 或 node-memwatch (opens new window) 这样的⼯具来分析内存使⽤情况和潜在的内存泄漏。
# Node.js 中分析 GPU 占⽤
Node.js 通常不直接处理 GPU 相关的任务。如果你的 Node.js 应⽤涉及 GPU(例如,使⽤ GPU 进⾏数据处理或机器学习),则可能需要特定于库的⼯具或⽅法来分析 GPU 的使⽤情况。
# 如何搭建 Node.js 内存泄露监控平台
有⼀个开源的企业级 Node.js 应用性能监控与线上故障定位解决方案,叫 easy-monitor (opens new window)。
如果⾃⼰搭建⼀个 Node.js 内存泄露监控平台,会涉及到多个步骤,包括数据收集、分析和报警。以下是⼀个基本的搭建流程:
# 1. 内存使⽤情况数据收集
- 使⽤内置模块
Node.js 的 process 模块提供了 memoryUsage() (opens new window) ⽅法,可以⽤来获取进程的内存使⽤情况。
- 定期采样
在应⽤中定期(例如,每分钟)调⽤ memoryUsage() ⽅法,并将结果记录下来。
# 2. 堆快照和分析
⽣成堆快照
使⽤ Node.js 的内置模块 v8 ⽣成堆快照(Heap Snapshot)。
也可以使⽤像 heapdump (opens new window) 这样的 npm 包来简化堆快照的⽣成和分析。
分析⼯具
使⽤如 Chrome 开发者⼯具中的内存分析⼯具来分析堆快照。
# 3. 性能监控⼯具
- 使⽤现有⼯具
集成现有的性能监控⼯具,如 New Relic (opens new window)、Datadog (opens new window)、Prometheus (opens new window) 等,它们通常提供内存监控和分析功能。
# 4. ⽇志和监控
- ⽇志记录
记录内存使⽤情况的⽇志,以便于后续分析。
- 可视化
使⽤ Grafana (opens new window)、Kibana (opens new window) 等⼯具,结合 Elasticsearch (opens new window) 或 Prometheus (opens new window) 等时序数据库进⾏数据可视化。
# 5. 阈值设置和报警
- 阈值设置
根据应⽤的内存使⽤模式,设置内存使⽤的阈值。
- 报警机制
当内存使⽤超过阈值时,触发报警。报警可以通过邮件、短信或集成到现有的监控系统中。
# 6. ⾃动化和集成
- ⾃动化监控
将监控脚本和⼯具集成到应⽤的启动脚本中,确保监控随应⽤⾃动启动。
- CI/CD 集成
将内存泄露检测作为持续集成/持续部署(CI/CD)流程的⼀部分。
# 7. 分析和优化
- 问题分析
定期分析内存使⽤情况和堆快照,识别潜在的内存泄露。
- 代码优化
根据分析结果,对代码进⾏优化,修复可能的内存泄露问题。
搭建⼀个 Node.js 内存泄露监控平台需要结合⽇志记录、性能监控⼯具、数据可视化和⾃动化报警。通过这样的平台,可以有效地监控和分析 Node.js 应⽤的内存使⽤情况,及时发现并解决内存泄露问题。
# 性能分析工具
# 内置内存监控工具
Node.js 自带了一个内置的内存监控工具,可以在启动 Node.js 应用程序时,使用 --inspect 标志,并通过 Chrome DevTools 连接到调试器。
node --inspect your-app.js
然后在 Chrome 浏览器中输入 chrome://inspect 打开 DevTools。在 Memory 面板中可以进行内存分析。
# perf_hooks
perf_hooks (opens new window) 是 Node.js 的性能监控 API,可以通过调用 mark() 和 measure() API,监控 Node.js 事件执行时间。
// 及时统计代码运行 AB 比较
// 避免代码执行逻辑过于复杂,无 GC 机会
const { performance } = require("perf_hooks");
performance.mark("A");
setTimeout(() => {
  performance.mark("B");
  performance.measure("A to B", "A", "B");
  const entry = performance.getEntriesByName("A to B", "measure");
  console.log(entry.duration);
}, 10000);
2
3
4
5
6
7
8
9
10
# node-mtrace
node-mtrace (opens new window) 使用了 GCC 的 mtrace 工具来分析堆的使用。
# node-heap-dump
node-heap-dump (opens new window) 对 V8 的堆抓取了一张快照并把所有的东西序列化成一个巨大的 JSON 文件,还包含了一些分析研究快照结果的 JavaScript 工具。
# v8-profiler
v8-profiler (opens new window) 和 node-inspector (opens new window) 提供了绑定在 Node.js 中的 V8 分析器和一个基于 WebKit Web Inspector 的 debug 界面。
Node.js 内存泄漏指导(Node Memory Leak Tutorial) (opens new window) 是一个又短又酷的 v8-profiler 和 node-debugger 使用教程,同时也是目前最先进的 Node.js 内存泄漏调试技术指南。
# memeye
memeye (opens new window) 是轻量级的 NodeJS 进程监视工具,可提供进程内存、V8 堆空间内存和操作系统内存的数据可视化。这个工具挺好用的,适用于常规业务和日常学习。
# memwatch + heapdump
memwatch (opens new window) 可以帮助我们检测和查找 Node.JS 代码中的内存泄漏,heapdump (opens new window) 可用于存储 V8 的堆内存快照记录。
这两者适用于大型业务,因为只有在 CPU 压力达到一定比率时,才会跳出来 memwatch leak,而且近似随机。heapdump 文件随着时间增加,文件容量不断扩大。
// 一个 “泄漏” 事件发射器
// 如果经过连续五次 GC,内存仍被持续分配而没有得到释放
memwatch.on("leak", function(info) {
  var file = "./tmp.heapsnapshot";
  heapdump.writeSnapshot(file, function(err) {
    if (err) {
      console.error(err);
    } else {
      console.error("Wrote snapshot:", file);
    }
  });
});
2
3
4
5
6
7
8
9
10
11
12
// 通过 diff 的方式查找真正的元凶
var hd = new memwatch.HeapDiff();
// your code here
var diff = hd.end();
2
3
4
// 一个“状态”事件发射器
memwatch.on("stats", function(stats) {
  usage_trend; // 使用趋势
  current_base; // 当前基数
  estimated_base; // 预期基数
  num_full_gc; // 完整的垃圾回收次数
  num_inc_gc; // 增长的垃圾回收次数
  heap_compactions; // 内存压缩次数
  min; // 最小
  max; // 最大
});
2
3
4
5
6
7
8
9
10
11
# SmartOS
Joyent 的 SmartOS (opens new window) 平台,它提供了大量用于调试 Node.js 内存泄漏的工具。
# clinic
Clinic.js (opens new window) 是目前最好用、最专业的 Node.js 性能监测工具。如果想深入研究或者公司有项目对 Node.js 涉及比较深的,可以尝试使用。
# 压力测试
# 性能指标
PV 是指页面访问人次,UV 是指页面访问人数。PV 每天几十万甚至上百万就需要考虑压力测试。换算公式是:
QPS = PV / t,比如服务器在 10 个小时内处理了 100 万个请求,那么它的 QPS 就是 1000000 / 10 _ 60 _ 60 = 27.7,每秒处理 27.7 个请求。QPS(Queries Per Second)的意思是每秒查询率,是对一个特定的查询,服务器在规定时间内所处理流量多少的衡量标准。
QPS = 并发量 / 平均响应时间TPS(Transactions Per Second)的意思是事务数/秒,它是软件测试结果的测量单位。一个事务是指一个客户机向服务器发送请求然后服务器做出反应的过程。客户机在发送请求时开始计时,收到服务器响应后结束计时,以此来计算使用的时间和完成的事务个数。
# wrk
wrk (opens new window) 是一款轻量级性能测试工具,安装和使用都比较简单,使用教程可以看这里 (opens new window)。
wrk 的子命令参数的含义
子命令 含义 -c, --connections 跟服务器建立并保持的 TCP 连接数量 -d, --duration 压测时间 -t, --threads 使用多少个线程进行压测 -s, --script 指定 Lua 脚本路径 -H, --header 为每一个 HTTP 请求添加 HTTP 头 --latency 在压测结束后,打印延迟统计信息 --timeout 超时时间 -v, --version 版本号信息 wrk 生成的报告中的字段含义
字段名 含义 Avg(平均值) 每次测试的平均值 Stdev(标准差) 结果的离散程度,越大说明越不稳定 Max(最大值) 最大的一次结果 +/- Stdev(正负一个标准差占比) 结果的离散程度,越大说明越不稳定 Latency(延迟) 可以理解为响应时间 Req / Sec(每秒请求数) 每个线程每秒完成的请求数 一般来说,模拟的线程数不宜太多,设置成压测机器 CPU 核心数的 2 倍到 4 倍就够了。我们主要关注平均值和最大值。标准差如果太大说明样本本身离散程度比较高,有可能系统性能波动很大。
# ab
ab (opens new window) 是 apache 自带的压力测试工具。它非常实用,不仅可以对 http 服务器进行网站访问压力测试,也可以对或其它类型的服务器进行压力测试。比如 nginx、tomcat、IIS 等。
下载 ab 工具直接进入 apache 官网 (opens new window)下载 apache 即可。
在服务器中安装 ab 工具可以使用以下命令:
yum install httpd-tools1
# Apache JMeter
Apache JMeter (opens new window) 是纯 Java 编写的应用程序,主要用来做功能测试和性能测试(压力测试/负载测试)。
# webbench
webbench (opens new window) 是一个在 linux 下使用的非常简单的网站压测工具。它使用 fork() 模拟多个客户端同时访问我们设定的 url,测试网站在压力下工作的性能,最多可以模拟 3 万个并发连接去测试网站的负载能力。
# 编码漏洞
# 不必要的计算
多余的计算量会降低代码性能,因此在编写代码时,我们需要时刻思考,在用户能感知到的时间里,这个计算是不是必要的?我们能不能把这个计算提前?
# 全局变量
函数内的变量是可以随着函数执行被回收的,但是全局不行。如果是在业务需求里应避免使用对象作为缓存,可使用 Redis 等专门处理缓存的技术。
// demo.js
const http = require("http");
const memeye = require("memeye");
memeye();
let leakArray = [];
const server = http.createServer((req, res) => {
  if (req.url == "/") {
    leakArray.push(Math.random());
    console.log(leakArray);
    res.end("hello world");
  }
});
2
3
4
5
6
7
8
9
10
11
12
执行 node demo,通过 memeye (opens new window) 这个工具我们可以在浏览器中看到关于内存使用的一些情况。
解决方法就是可以使用弱引用 WeakMap 来解决。
// demo.js
const http = require("http");
const memeye = require("memeye");
memeye();
let leakArray = [];
const server = http.createServer((req, res) => {
  if (req.url == "/") {
    const wm = new WeakMap();
    leakArray.push(Math.random());
    wm.set(leakArray, leakArray);
    console.log(wm.get(leakArray));
    leakArray = null;
    res.end("hello world");
  }
});
2
3
4
5
6
7
8
9
10
11
12
13
14
15
相似例子
// demo.js
global.gc();
console.log("第一次", process.memoryUsage()); // 返回当前 Node.js 使用情况

let map = new Map();
let key = new Array(5 * 1024 * 1024);
map.set(key, 1);
global.gc();
console.log("第二次", process.memoryUsage());
2
3
4
5
6
7
8
9
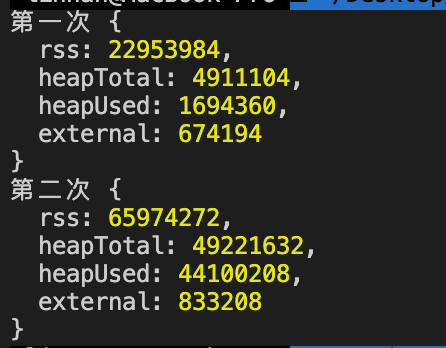
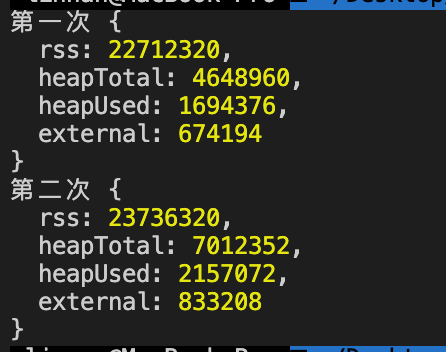
执行命令 node --expose-gc demo,可以看到输出了以下结果。
第二次的 heapUsed 值明显比第一次的大了很多。说明发生了内存泄漏。
如何解决这个问题呢?
🔔 直接将 key 置为 null
// demo.js
global.gc();
console.log("第一次", process.memoryUsage()); // 返回当前 Node.js 使用情况

let map = new Map();
let key = new Array(5 * 1024 * 1024);
map.set(key, 1);
global.gc();
console.log("第二次", process.memoryUsage());

key = null; // 直接将 key 置为 null 是没用的
console.log("第三次", process.memoryUsage());
2
3
4
5
6
7
8
9
10
11
12
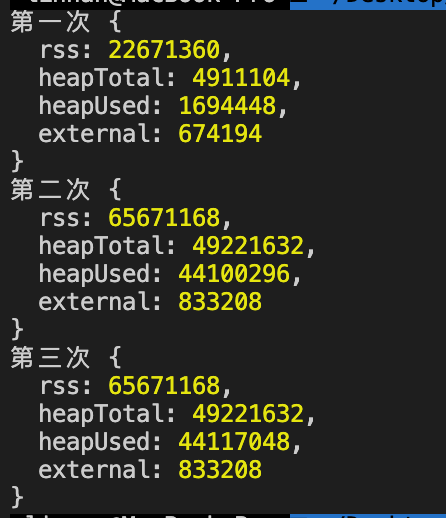
可以看到,就算我们把 key 置为空,使用的堆内存还是那么多,并没有减少,说明这种方法不可行。
🔔 先将 map 和 key 之间的关系清掉,再把 key 置为 null
// demo.js
global.gc();
console.log("第一次", process.memoryUsage()); // 返回当前 Node.js 使用情况

let map = new Map();
let key = new Array(5 * 1024 * 1024);
map.set(key, 1);
global.gc();
console.log("第二次", process.memoryUsage());

map.delete(key); // 要先将 map 和 key 的关系清掉,再把 key 置为 null,才有效
key = null;
global.gc();
console.log("第三次", process.memoryUsage());
2
3
4
5
6
7
8
9
10
11
12
13
14
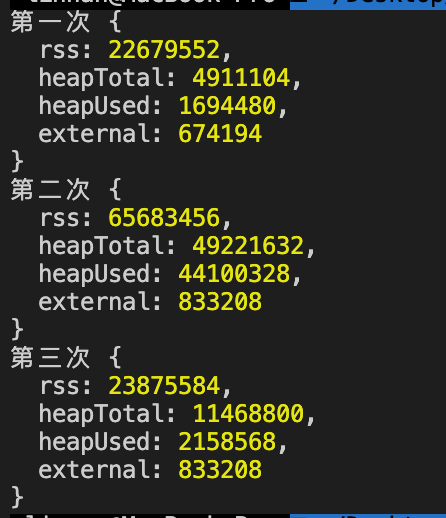
可以看到,这种方法是可行的。第三次的时候堆内存的减少了,不过并没有回到最开始的值,这是因为代码也会占用部分内存。不过,这种方法有点麻烦,还有更简便的解决方法。
🔔 使用弱引用 WeakMap 解决
// demo.js
global.gc();
console.log("第一次", process.memoryUsage()); // 返回当前 Node.js 使用情况

const wm = new WeakMap();
let key = new Array(5 * 1024 * 1024);
wm.set(key, 1);
key = null; // 用弱引用 WeakMap 的话,直接将 key 置为 null 就可以了
global.gc();
console.log("第二次", process.memoryUsage());
2
3
4
5
6
7
8
9
10
可以看到,这种方法也是完全可行的。
# 消费队列不及时
这也是一个不经意间产生的内存泄漏。队列一般在消费者-生产者模型中充当中间人的角色,当消费大于生产时没问题,但是当生产大于消费时,会产生堆积,就容易发生内存泄漏。
比如收集日志,如果日志产生的速度大于文件写入的速度,就容易产生内存泄漏(Jmeter 接收到全部返回后,服务器 log4js 日志还在不停写),表层的解决方法是换用消费速度更高的技术,但是这不治本。根本的解决方案应该是监控队列的长度一旦堆积就报警或拒绝新的请求,还有一种是所有的异步调用都有超时回调,一旦达到时间调用未得到结果就报警。
# 闭包内的大对象
闭包一定会造成内存泄漏,但是闭包并不可怕,可怕的是在闭包里引用了一个大对象。所以我们在写闭包的时候,不要传整个大的对象,而是需要哪个属性就传那个属性就行了,这是写闭包时的一个小技巧。比如:
function foo() {
  var temp_object = {
    x: 1,
    y: 2,
    array: new Array(200000)
  };
  let closure = temp_object.x;
  return function() {
    console.log(closure);
  };
}
2
3
4
5
6
7
8
9
10
11
解决闭包造成的内存泄漏其实很简单,除了上面说的,还可以将对象置为 null 或者使用 WeakMap 来解决。
# 频繁的垃圾回收
频繁的垃圾回收会让 GC 无机会工作
# Node.js C++ 插件
有时候,我们还可以通过编写 Node.js C++ 插件来提升代码的执行速度,优化 Node.js 服务。
主要就是想将计算量转移到 C++ 中进行,不过这个过程中既有收益也有成本,收益是 C++ 运算比 JavaScript 更快的部分,成本是 C++ 变量和 v8 变量的转换。因此,实际开发时需要考虑如果使用 C++ 插件,是否会涉及到有大量 C++ 变量需要转成 v8 变量的情况,收益是否抵得过成本。
# Node.js 子进程与线程
1. 进程
操作系统挂载运行程序的单元;
拥有一些独立的资源,如内存等。
2. 线程
进行运算调度的单元;
进程内的线程共享进程内的资源。
3. Node.js 的事件循环
主线程运行 v8 与 JavaScript;
多个子线程通过事件循环被调度。
在编写 Node.js 代码时,使用子进程或线程可以利用更多的 CPU 资源。
NodeJS 子进程:Child process (opens new window)
NodeJS 线程:Worker threads (opens new window)
# Node.js Cluster
主进程启动多个子进程,由主进程轮流分发请求,子进程代为处理。
# Node.js 进程守护
进行心跳监控,防止僵尸进程
死亡重启
数据监控
/**
 * 简单的进程守护器
 */
const cluster = require("cluster");

if (cluster.isMaster) {
  for (let i = 0; i < require("os").cpus().length / 2; i++) {
    createWorker();
  }

  cluster.on("exit", function() {
    setTimeout(() => {
      createWorker();
    }, 5000);
  });

  function createWorker() {
    // 创建子进程并进行心跳监控
    var worker = cluster.fork();

    var missed = 0; // 没有回应的 ping 次数

    // 心跳
    var timer = setInterval(function() {
      // console.log(missed)
      // 三次没回应,杀之
      if (missed == 3) {
        clearInterval(timer);
        console.log(worker.process.pid + " has become a zombie!");
        process.kill(worker.process.pid);
        return;
      }
      // 开始心跳
      missed++;
      worker.send("ping#" + worker.process.pid);
    }, 10000);

    worker.on("message", function(msg) {
      // 确认心跳回应
      if (msg == "pong#" + worker.process.pid) {
        missed--;
      }
    });

    // 挂了就没必要再进行心跳了
    worker.on("exit", function() {
      clearInterval(timer);
    });
  }
} else {
  console.log(999);
  // 当进程出现会崩溃的错误
  process.on("uncaughtException", function(err) {
    // 这里可以做写日志的操作
    console.log(err);
    // 退出进程
    process.exit(1);
  });

  // 回应心跳信息
  process.on("message", function(msg) {
    if (msg == "ping#" + process.pid) {
      process.send("pong#" + process.pid);
    }
  });

  // 对内存进行监控,如果内存使用过多,说明可能出现内存泄漏,自己退出进程
  if (process.memoryUsage().rss > 734003200) {
    process.exit(1);
  }

  require("./app");
}
2
3
4
5
6
7
8
9
10
11
12
13
14
15
16
17
18
19
20
21
22
23
24
25
26
27
28
29
30
31
32
33
34
35
36
37
38
39
40
41
42
43
44
45
46
47
48
49
50
51
52
53
54
55
56
57
58
59
60
61
62
63
64
65
66
67
68
69
70
71
72
73
const http = require("http");

module.exports = http
  .createServer((req, res) => {
    res.writeHead(200, {
      "Content-Type": "text/plain"
    });
    res.end("hello world");
    while (true) {}
  })
  .listen(3000, () => {
    console.log("listened 3000");
  });
2
3
4
5
6
7
8
9
10
11
12
13
# 动静分离
# 静态内容优化
基本不会变动,也不会因为请求参数不同而变化。
cdn 分发,http 缓存等。
将静态页面内容使用 nginx 进行输出,会比使用 node.js 输出更高效。
const http = require("http");
const fs = require("fs");

const htmlBuffer = fs.readFileSync(__dirname + "/index.html");
http.createServer(function(req, res) {
  res.writeHead(200, { 'content-type': 'text/html' });
  res.end(htmlBuffer);
}).listen(3000);
2
3
4
5
6
7
8
使用 ab 工具进行压测就可以看到两者的显著区别。
ab -c 400 -n800 http://xx.xx.xx.xx:xxxx/
# 动态内容优化
各种因为请求参数不同而变动,且变种的数量几乎不可枚举。
用大量的源站机器承载,结合 Nginx 反向代理进行负载均衡。
# 反向代理配置
首先在 ~ 目录下新建 static 目录,然后创建 index.js,内容如下:
const http = require("http");

http.createServer(function(req, res) {
  res.writeHead(200, { 'content-type': 'text/plain' });
  res.end(req.url); // 将请求的 url 直接输出到页面上
}).listen(3000);
2
3
4
5
6
接着执行 node index 启动 node 服务。然后配置如下的反向代理:
server {
  # listen       80 default_server;
  # listen       [::]:80 default_server;
  listen       80;
  server_name  121.4.83.104;
  # server_name  _;
  root         /usr/share/nginx/html;

  # Load configuration files for the default server block.
  include /etc/nginx/default.d/*.conf;

  location ~ /node/(\d*) {
    proxy_pass http://127.0.0.1:3000/detail?columnid=$1;
  }

  error_page 404 /404.html;
  location = /404.html {
  }

  error_page 500 502 503 504 /50x.html;
  location = /50x.html {
  }
}
2
3
4
5
6
7
8
9
10
11
12
13
14
15
16
17
18
19
20
21
22
23
配置完成后,运行命令 nginx -s reload 重启 nginx。此时在浏览器中访问 http://121.4.83.104/node/123 时,就会看到页面上显示 /detail?columnid=123,说明此时请求的 url 已经被重定向这个地址来了。
# 负载均衡配置
先添加两个 node 服务并启动。
const http = require("http");

http.createServer(function(req, res) {
  res.writeHead(200, { 'content-type': 'text/plain' });
  res.end(3000 + req.url);
}).listen(3000);
2
3
4
5
6
const http = require("http");

http.createServer(function(req, res) {
  res.writeHead(200, { 'content-type': 'text/plain' });
  res.end(3001 + req.url);
}).listen(3001);
2
3
4
5
6
然后配置 nginx 负载均衡,并重启 nginx 服务。
upstream node.com {
  server 127.0.0.1:3000;
  server 127.0.0.1:3001;
}
server {
  # listen       80 default_server;
  # listen       [::]:80 default_server;
  listen       80;
  server_name  121.4.83.104;
  # server_name  _;
  root         /usr/share/nginx/html;

  # Load configuration files for the default server block.
  include /etc/nginx/default.d/*.conf;

  location ~ /node/(\d*) {
    proxy_pass http://node.com/detail?columnid=$1;
    # 开启缓存
    proxy_cache
  }

  error_page 404 /404.html;
  location = /404.html {
  }

  error_page 500 502 503 504 /50x.html;
  location = /50x.html {
  }
}
2
3
4
5
6
7
8
9
10
11
12
13
14
15
16
17
18
19
20
21
22
23
24
25
26
27
28
29
此时在浏览器中访问 http://121.4.83.104/node/123,就可以看到页面上会随机显示 3000/detail?columnid=123 或者 3001/detail?columnid=123,说明请求的 url 被随机重定向到这两个服务,如果我们在这里配置下每个服务的权重以及资源分配等信息,那么就可以达到负载均衡的效果。
# 缓存服务
nginx 可以通过 proxy_cache 字段来开启缓存。
node 服务还可以使用 redis 来进行缓存。
