如何生成简单动画让图形动起来
# 如何生成简单动画让图形动起来
# 动画的三种形式
动画就是将许多帧静止的画面以固定的速率连续播放出来。一般来说,动画有三种形式,分别是固定帧动画、增量动画和时序动画。
固定帧动画就是我们预先准备好要播放的静态图像,然后将这些图依次播放。这种方法实现起来最简单,但它不适合生成需要动态绘制的图像,更适合在游戏等应用场景中,生成由美术提供现成图片的动画帧图像。
增量动画是在动态绘制图像的过程中,我们修改每一帧中某个或某几个属性的值,给它们一定的增量。这种方法实现起来也相对简单,但是不好精确控制动画细节,比如动画周期、变化率、轨迹等等,所以这种方法只能用来实现简单动画。此外,增量动画定义的是状态变化。如果我们要在 shader 中使用增量动画,就只能采用后期处理通道来实现。但是后期处理通道要进行多次渲染,实现起来比较繁琐,而且性能开销也比较大。
时序动画是在动态绘制图像的过程中,我们根据时间和动画函数计算每一帧中的关键属性值,然后更新这些属性。这种方法能够非常精确地控制动画的细节,所以它能实现的动画效果更丰富,应用最广泛。
下面以 HTML/CSS 为例来介绍这三种动画的基本形式。一般来说,HTML/CSS、SVG 和 Canvas2D 实现动画的方式大同小异,而 WebGL 实现动画的方式和其他三种图形系统都有差别。
# 实现固定帧动画
第一步,就是为每一帧准备一张静态图像。比如说,我们要实现一个循环播放 3 帧的动画,就要准备 3 个如下的图像。

第二步,我们要依次播放这些图像。在 CSS 里实现的时候,我们使用图片作为背景,就可以让它们逐帧切换了。
.bird {
  position: absolute;
  left: 100px;
  top: 100px;
  width:86px;
  height:60px;
  zoom: 0.5;
  background-repeat: no-repeat;
  background-image: url(https://p.ssl.qhimg.com/t01f265b6b6479fffc4.png);
  background-position: -178px -2px;
  animation: flappy .5s step-end infinite;
}

@keyframes flappy {
  0% {background-position: -178px -2px;}
  33% {background-position: -90px -2px;}
  66% {background-position: -2px -2px;}
}
2
3
4
5
6
7
8
9
10
11
12
13
14
15
16
17
18
# 实现增量动画
比较简单的增量动画,就是每帧给属性一个增量。比如,我们可以创建一个蓝色的方块,然后给这个方块的每一帧增加一个 rotate 角度。这样就能实现蓝色方块旋转的动画。
<!DOCTYPE html>
<html lang="en">
<head>
   <meta charset="UTF-8">
  <meta name="viewport" content="width=device-width, initial-scale=1.0">
  <title>Document</title>
  <style>
    .block {
      width: 100px;
      height: 100px;
      top: 100px;
      left: 100px;
      transform-origin: 50% 50%;
      position: absolute;
      background: blue;
    }
  </style>
</head>
<body>
  <div class="block"></div>
  <script>
  const block = document.querySelector('.block');
  let rotation = 0;
  requestAnimationFrame(function update() {
    block.style.transform = `rotate(${rotation++}deg)`;
    requestAnimationFrame(update);
  });
  </script>
</body>
</html>
2
3
4
5
6
7
8
9
10
11
12
13
14
15
16
17
18
19
20
21
22
23
24
25
26
27
28
29
30
# 实现时序动画
以旋转的蓝色方块为例,可以使用时序动画的思路修改下代码实现相同的效果。最终效果看这里 (opens new window)。
在第一次调用 update 的时候,我们设置初始旋转的时间为 startTime,那么在每次调用 update 的时候,当前经过的时间就是 Date.now() - startTime。
接着,我们将它除以周期 T,就能得到旋转进度 p,那么当前角度就等于 startAngle + p * 360。然后我们将当前角度设置为元素的 rotate 值,就实现了同样的旋转动画。
总的来说,时序动画的实现可以总结为三步:首先定义初始时间和周期,然后在 update 中计算当前经过时间和进度 p,最后通过 p 来更新动画元素的属性。
const block = document.querySelector('.block');
const startAngle = 0; // 起始旋转角度
const T = 2000; // 旋转周期
let startTime = null; // 初始旋转的时间
function update() {
  startTime = startTime == null ? Date.now() : startTime;
  const p = (Date.now() - startTime) / T;
  const angle = startAngle + p * 360;
  block.style.transform = `rotate(${angle}deg)`;
  requestAnimationFrame(update);
}
update();
2
3
4
5
6
7
8
9
10
11
12
# 时序动画的标准动画模型
为了更方便使用和拓展,我们可以把实现时序动画的三个步骤抽象成标准的动画模型。
# Timing 类
首先,我们定义一个类 Timing 用来处理时间。
export class Timing {
  constructor({ duration, iterations = 1 } = {}) {
    this.startTime = Date.now();
    this.duration = duration;
    this.iterations = iterations;
  }

  get time() {
    return Date.now() - this.startTime;
  }

  get p() {
    const progress = Math.min(this.time / this.duration, this.iterations);
    return this.isFinished ? 1 : progress % 1;
  }

  get isFinished() {
    return this.time / this.duration >= this.iterations;
  }
}
2
3
4
5
6
7
8
9
10
11
12
13
14
15
16
17
18
19
20
# Animator 类
然后,我们实现一个 Animator 类,用来真正控制动画过程。
Animator 构造器接受 {duration, iterations} 作为参数,它有一个 animate 方法,会在执行时创建一个 timing 对象,然后通过执行 update({target, frameIndex, timing}) 更新动画,并且会返回一个 promise 对象。这样,在动画结束时,resolve 这个 promise,我们就能够很方便地实现连续动画了。
export class Animator {
  constructor({ duration, iterations }) {
    this.timing = {duration, iterations};
  }

  animate(target, update) {
    let frameIndex = 0;
    const timing = new Timing(this.timing);

    return new Promise((resolve) => {
      function next() {
        if (update({ target, frameIndex, timing }) !== false && !timing.isFinished) {
          requestAnimationFrame(next);
        } else {
          resolve(timing);
        }
        frameIndex++;
      }
      next();
    });
  }
}
2
3
4
5
6
7
8
9
10
11
12
13
14
15
16
17
18
19
20
21
22
接下来可以用这个标准动画模型来实现一个简单的动画效果。比如,用 Animator 实现四个方块的轮换转动,让每个方块转动的周期是 1 秒,一共旋转 1.5 个周期(即 540 度)。
<!DOCTYPE html>
<html lang="en">
<head>
  <meta charset="UTF-8">
  <meta name="viewport" content="width=device-width, initial-scale=1.0">
  <title>Document</title>
  <style>
    .container {
      display: flex;
      flex-wrap: wrap;
      justify-content: space-between;
      width: 300px;
    }
    .block {
      width: 100px;
      height: 100px;
      margin: 20px;
      flex-shrink: 0;
      transform-origin: 50% 50%;
    }
    .block:nth-child(1) {background: red;}
    .block:nth-child(2) {background: blue;}
    .block:nth-child(3) {background: green;}
    .block:nth-child(4) {background: orange;}
  </style>
</head>
<body>
  <div class="container">
    <div class="block"></div>
    <div class="block"></div>
    <div class="block"></div>
    <div class="block"></div>
  </div>
  <script type="module">
    import {Animator} from '../common/lib/animator/index.js';
    const blocks = document.querySelectorAll('.block');
    const animator = new Animator({duration: 1000, iterations: 1.5});
    (async function () {
      let i = 0;
      while(true) { // eslint-disable-next-line no-await-in-loop
        await animator.animate(blocks[i++ % 4], ({target, timing}) => {
          target.style.transform = `rotate(${timing.p * 360}deg)`;
        });
      }
    }());
  </script>
</body>
</html>
2
3
4
5
6
7
8
9
10
11
12
13
14
15
16
17
18
19
20
21
22
23
24
25
26
27
28
29
30
31
32
33
34
35
36
37
38
39
40
41
42
43
44
45
46
47
48
# 插值与缓动函数
时序动画的好处就在于,它能更容易地控制动画的细节。那标准动画模型又如何控制动画细节呢?
假设,我们已知元素的起始状态、结束状态和运动周期。如果想要让它进行不规则运动,我们可以使用插值的方式来控制每一帧的展现。比如说,我们可以先实现一个匀速运动的方块,再通过插值与缓动函数来实现变速运动。
# 实现匀速运动
首先,我们用 Animator 实现一个方块,让它从 100px 处匀速运动到 400px 处。这里使用了一个线性插值的方法:left = start * (1 - p) + end * p;,线性插值可以很方便地实现属性的均匀变化,所以用它来让方块做匀速运动是非常简单的。
import {Animator} from '../common/lib/animator/index.js';
const block = document.querySelector('.block');
const animator = new Animator({duration: 3000});
document.addEventListener('click', () => {
  animator.animate({el: block, start: 100, end: 400}, ({target: {el, start, end}, timing: {p}}) => {
    const left = start * (1 - p) + end * p;
    el.style.left = `${left}px`;
  });
});
2
3
4
5
6
7
8
9
# 实现匀加速运动
如果要让方块做初速度为 0 的匀加速运动,我们可以将 p 映射为 p^2。
p = p ** 2;
const left = start * (1 - p) + end * p;
2
匀加速运动的映射原理
假设,某个物体在做初速度为 0 的匀加速运动,运动的总时间为 T,总位移为 S。那么,它在 t 时刻的位移和加速度的计算公式如下:
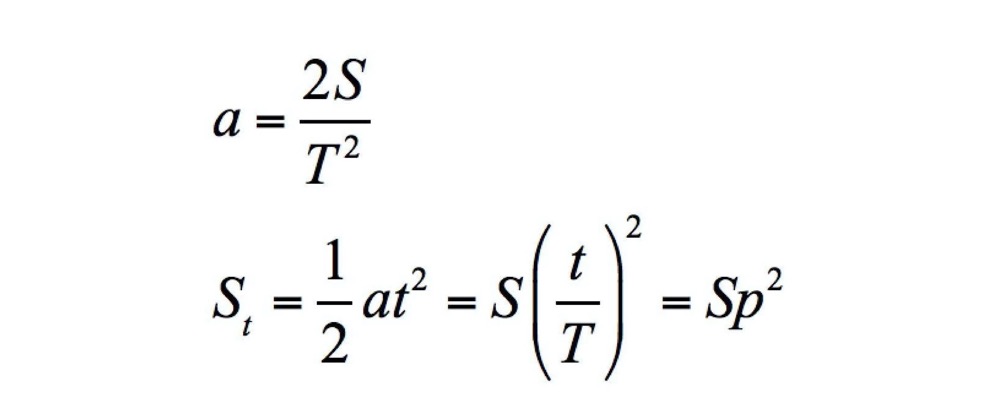
所以我们把 p 映射为 p 的平方。
# 实现匀减速运动
如果要让方块做末速度为 0 的匀减速运动,我们可以将 p 映射为 p * (2 - p)。
p = p * (2 - p);
const left = start * (1 - p) + end * p;
2
匀减速运动的映射原理
如果物体在做匀减速运动,那么,它在 t 时刻的位移和加速度的计算公式如下:
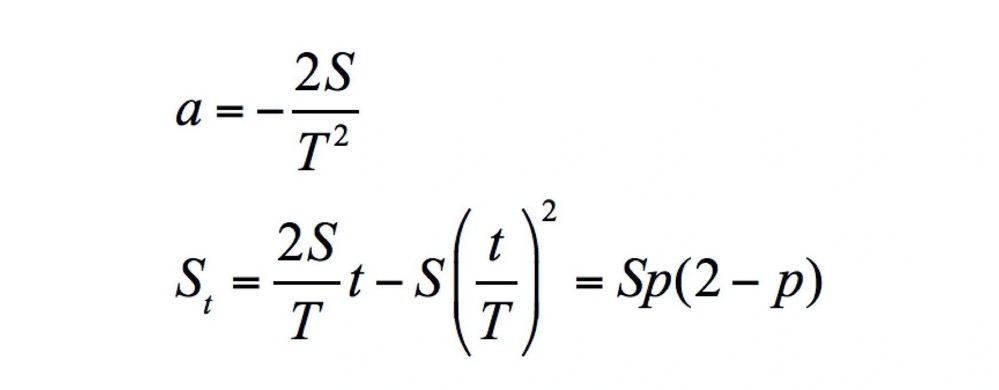
所以我们把 p 映射为 p(2-p)。
除此以外,我们还可以将 p 映射为三次曲线 p * p * (3.0 - 2.0 * p) ,来实现 smoothstep 的插值效果等等。
为了方便使用以及实现更多的效果,我们可以抽象出一个映射函数专门处理 p 的映射,这个函数叫做缓动函数(Easing Function)。
# 增加了缓动函数的 Timing 类
我们可以在前面实现过的 Timing 类中,直接增加一个缓动函数 easing。这样在获取 p 值的时候,我们直接用 this.easing(progress) 取代之前的 progress,就可以让动画变速运动了。
export class Timing {
  constructor({ duration, iterations = 1, easing = p => p } = {}) {
    this.startTime = Date.now();
    this.duration = duration;
    this.iterations = iterations;
    this.easing = easing;
  }

  get time() {
    return Date.now() - this.startTime;
  }

  get p() {
    const progress = Math.min(this.time / this.duration, this.iterations);
    return this.isFinished ? 1 : this.easing(progress % 1);
  }

  get isFinished() {
    return this.time / this.duration >= this.iterations;
  }
}
2
3
4
5
6
7
8
9
10
11
12
13
14
15
16
17
18
19
20
21
在匀加速例子中,只要多给 animator 传一个 easing 参数,就可以让一开始匀速运动的小方块变成匀加速运动了。
import {Animator} from '../common/lib/animator/index.js';
const block = document.querySelector('.block');
const animator = new Animator({duration: 3000, easing: p => p ** 2});
document.addEventListener('click', () => {
  animator.animate({el: block, start: 100, end: 400}, ({target: {el, start, end}, timing: {p}}) => {
    const left = start * (1 - p) + end * p;
    el.style.left = `${left}px`;
  });
});
2
3
4
5
6
7
8
9
# 贝塞尔曲线缓动
缓动函数有很多种,其中比较常用的是贝塞尔曲线缓动(Bezier-easing),准确地说,是三次贝塞尔曲线缓动函数。
三次贝塞尔曲线的参数方程如下:

对于贝塞尔曲线图形来说,t 是参数,P 是坐标。而贝塞尔曲线缓动函数,则是把 Px 作为时间参数 p,把 Py 作为 p 的映射。这样,我们就知道了参数方程和缓动函数之间映射关系了。
要想把三次贝塞尔曲线参数方程变换成贝塞尔曲线缓动函数,我们可以使用一种数学方法,叫做牛顿迭代法 (opens new window)(Newton’s method)。
# JS 实现贝塞尔
可以使用现成的 JavaScript 库 bezier-easing (opens new window) 来生成贝塞尔缓动函数。最终效果看这里 (opens new window)。
import {Animator} from '../common/lib/animator/index.js';
const block = document.querySelector('.block');
const animator = new Animator({duration: 3000, easing: BezierEasing(0.5, -1.5, 0.5, 2.5)});
document.addEventListener('click', () => {
  animator.animate({el: block, start: 100, end: 400}, ({target: {el, start, end}, timing: {p}}) => {
    const left = start * (1 - p) + end * p;
    el.style.left = `${left}px`;
  });
});
2
3
4
5
6
7
8
9
# CSS 实现贝塞尔
CSS3 动画原生支持 bezier-easing。最终效果看这里 (opens new window)。
.container {
  display: flex;
  flex-wrap: wrap;
  justify-content: space-between;
  width: 300px;
}
.block {
  width: 100px;
  height: 100px;
  position: absolute;
  top: 100px;
  left: 100px;
  background: blue;
  flex-shrink: 0;
  transform-origin: 50% 50%;
}
.animate {
  animation: mymove 3s cubic-bezier(0.5, -1.5, 0.5, 2.5) forwards;
}
@keyframes mymove {
  from {left: 100px}
  to {left: 400px}
}
2
3
4
5
6
7
8
9
10
11
12
13
14
15
16
17
18
19
20
21
22
23
# 更多贝塞尔缓动函数:easing.net
贝塞尔缓动函数还有很多种,你可以去 easing.net (opens new window) 这个网站里看一看。
# 如何用着色器实现像素动画
# 实现固定帧动画
我们完全可以使用在片元着色器中替换纹理坐标的方式,来非常简单地实现固定帧动画。
以上面会飞的小鸟为例,片元着色器的代码实现如下:
#ifdef GL_ES
precision highp float;
#endif

varying vec2 vUv;
uniform sampler2D tMap;
uniform float fWidth;
uniform vec2 vFrames[3];
uniform int frameIndex;

void main() {
  vec2 uv = vUv;
  for (int i = 0; i < 3; i++) {
    uv.x = mix(vFrames[i].x, vFrames[i].y, vUv.x) / fWidth;
    if(float(i) == mod(float(frameIndex), 3.0)) break;
  }
  vec4 color = texture2D(tMap, uv);
  gl_FragColor = color;
}
2
3
4
5
6
7
8
9
10
11
12
13
14
15
16
17
18
19
利用片元着色器实现固定帧动画的关键部分,是 main 函数中的 for 循环。因为我们的动画只有 3 帧,所以最多只需要循环 3 次。
此外,还需要一个重要的参数,vFrames。它是每一帧动画的图片起始 x 和结束 x 坐标,我们用这两个坐标和 vUv.x 计算插值,最后除以图片的总宽度 fWidth,就能得到对应的纹理 x 坐标。替换纹理坐标之后,我们就能实现一个会飞的小鸟了。最终效果看这里 (opens new window)。
对应的 JS 代码如下:
const canvas = document.querySelector('canvas');
const renderer = new GlRenderer(canvas);
const textureURL = 'https://p.ssl.qhimg.com/t01f265b6b6479fffc4.png';
(async function () {
  const texture = await renderer.loadTexture(textureURL);
  const program = renderer.compileSync(fragment, vertex);
  renderer.useProgram(program);
  renderer.uniforms.tMap = texture;
  renderer.uniforms.fWidth = 272;
  renderer.uniforms.vFrames = [2, 88, 90, 176, 178, 264];
  renderer.uniforms.frameIndex = 0;
  setInterval(() => {
    renderer.uniforms.frameIndex++;
  }, 200);
  const x = 43 / canvas.width;
  const y = 30 / canvas.height;
  renderer.setMeshData([{
    positions: [
      [-x, -y],
      [-x, y],
      [x, y],
      [x, -y],
    ],
    attributes: {
      uv: [
        [0, 0],
        [0, 1],
        [1, 1],
        [1, 0],
      ],
    },
    cells: [[0, 1, 2], [2, 0, 3]],
  }]);
  renderer.render();
}());
2
3
4
5
6
7
8
9
10
11
12
13
14
15
16
17
18
19
20
21
22
23
24
25
26
27
28
29
30
31
32
33
34
35
可以看出,WebGL 实现固定帧动画的思路跟 CSS 的实现思路是类似的,只不过 CSS 使用是的 background-image,通过切换 background-position 就可以实现动画。而 WebGL 中需要将图片纹理 tMap 传进去,然后根据不同的 frameIndex 来计算出对应的纹理坐标,并且这个计算是在片元着色器中进行的。
# 实现非固定帧动画
在 WebGL 中,增量动画和时序动画的实现都要将与时间有关的参数传给着色器,处理过程非常相似,所以可以将它们统称为非固定帧动画,放在一起来介绍。
用 Shader 实现非固定帧动画,本质上和前面的实现方法没有太大区别。所以,我们仍然可以使用同样的方法,以及标准动画模型来实现它。只不过,用 Shader 来实现非固定帧动画更加灵活,我们可以操作更多的属性,实现更丰富的效果。
# 1. 用顶点着色器实现非固定帧动画
在顶点着色器中,我们先绘制出一个红色的正方形,然后用三维齐次矩阵实现旋转。具体来说,就是把顶点坐标进行矩阵运算,再配合相应的 JavaScript 代码,就能让这个正方形旋转了。最终效果看这里 (opens new window)。
attribute vec2 a_vertexPosition;
attribute vec2 uv;

varying vec2 vUv;
uniform float rotation;

void main() {
  gl_PointSize = 1.0;
  vUv = uv;
  float c = cos(rotation);
  float s = sin(rotation);
  mat3 transformMatrix = mat3(
    c, s, 0,
    -s, c, 0,
    0, 0, 1
  );
  vec3 pos = transformMatrix * vec3(a_vertexPosition, 1);
  gl_Position = vec4(pos, 1);
}
2
3
4
5
6
7
8
9
10
11
12
13
14
15
16
17
18
19
renderer.uniforms.rotation = 0.0;

requestAnimationFrame(function update() {
  renderer.uniforms.rotation += 0.05;
  requestAnimationFrame(update);
});
2
3
4
5
6
也可以用标准动画模型来实现。具体就是定义一个新的 Animator 对象,然后在 Animator 对象的方法中更新 rotation 属性。使用标准模型能更加精确地控制图形的旋转效果。最终效果看这里 (opens new window)。
const animator = new Animator({duration: 2000, iterations: Infinity});
animator.animate(renderer, ({target, timing}) => {
  target.uniforms.rotation = timing.p * 2 * Math.PI;
});
2
3
4
# 2. 用片元着色器实现非固定帧动画
还是以上面的红色旋转正方形为例子。最终效果看这里 (opens new window)。
#ifdef GL_ES
precision highp float;
#endif

varying vec2 vUv;
uniform vec4 color;
uniform float rotation;

void main() {
  vec2 st = 2.0 * (vUv - vec2(0.5));
  float c = cos(rotation);
  float s = sin(rotation);
  mat3 transformMatrix = mat3(
    c, s, 0,
    -s, c, 0,
    0, 0, 1
  );
  vec3 pos = transformMatrix * vec3(st, 1.0);
  float d1 = 1.0 - smoothstep(0.5, 0.505, abs(pos.x));
  float d2 = 1.0 - smoothstep(0.5, 0.505, abs(pos.y));
  gl_FragColor = d1 * d2 * color;
}
2
3
4
5
6
7
8
9
10
11
12
13
14
15
16
17
18
19
20
21
22
执行代码后会发现,顶点着色器和片元着色器实现的旋转动画方向正好相反。
这是因为在顶点着色器中,我们直接改变了顶点坐标,所以这样实现的旋转动画和 WebGL 坐标系(右手系)的方向一致,角度增大呈逆时针方向旋转。而在片元着色器中,我们的绘制原理是通过距离场着色来实现的,所以这里的旋转实际上改变的是距离场的角度而不是图形角度,最终绘制的图形也是相对于距离场的。又因为距离场逆时针旋转,所以图形就顺时针旋转了。
# 两种着色器实现非固定帧动画的优势
一般来说,动画如果能使用顶点着色器实现,我们会尽量在顶点着色器中实现。因为在绘制一帧画面的时候,顶点着色器的运算量会大大少于片元着色器,所以使用顶点着色器消耗的性能更少。
不过,在片元着色器中实现非固定帧动画也有优势。我们可以使用片元着色器的技巧,如重复、随机、噪声等等来绘制更加复杂的效果。
比如,只要把上面的代码稍微修改一下,使用取小数和取整数的函数,再用之前网格化的思路,来利用网格实现了大量的重复动画。最终效果看这里 (opens new window)。
这个做法充分利用了 GPU 的并行效率,比用其他方式把图形一个一个地绘制出来性能要高得多。
#ifdef GL_ES
precision highp float;
#endif

varying vec2 vUv;
uniform float rotation;

float random (vec2 st) {
  return fract(sin(dot(st.xy, vec2(12.9898,78.233))) * 43758.5453123);
}

vec3 hsb2rgb(vec3 c){
  vec3 rgb = clamp(abs(mod(c.x*6.0+vec3(0.0,4.0,2.0), 6.0)-3.0)-1.0, 0.0, 1.0);
  rgb = rgb * rgb * (3.0 - 2.0 * rgb);
  return c.z * mix(vec3(1.0), rgb, c.y);
}

void main() {
  vec2 f_uv = fract(vUv * 10.0);
  vec2 i_uv = floor(vUv * 10.0);
  vec2 st = 2.0 * (f_uv - vec2(0.5));
  float c = 0.7 * cos(rotation);
  float s = 0.7 * sin(rotation);
  mat3 transformMatrix = mat3(
    c, s, 0,
    -s, c, 0,
    0, 0, 1
  );
  vec3 pos = transformMatrix * vec3(st, 1.0);
  float d1 = 1.0 - smoothstep(0.5, 0.505, abs(pos.x));
  float d2 = 1.0 - smoothstep(0.5, 0.505, abs(pos.y));
  gl_FragColor = d1 * d2 * vec4(hsb2rgb(vec3(random(i_uv), 1.0, 1.0)), 1.0);
}
2
3
4
5
6
7
8
9
10
11
12
13
14
15
16
17
18
19
20
21
22
23
24
25
26
27
28
29
30
31
32
33
# 实现缓动函数与非线性插值
使用 Shader 的矩阵运算不仅可以实现旋转动画,还可以实现轨迹动画。
# 实现匀速运动
比如,我们要在画布上绘制一个红色的方块,利用它实现轨迹动画。首先,我们要实现一个顶点着色器,它通过设置 translation 来改变图形位置。
attribute vec2 a_vertexPosition;
attribute vec2 uv;

varying vec2 vUv;
uniform vec2 translation;

void main() {
  gl_PointSize = 1.0;
  vUv = uv;
  mat3 transformMatrix = mat3(
    1, 0, 0,
    0, 1, 0,
    translation, 1
  );
  vec3 pos = transformMatrix * vec3(a_vertexPosition, 1);
  gl_Position = vec4(pos, 1);
}
2
3
4
5
6
7
8
9
10
11
12
13
14
15
16
17
然后,在 JavaScript 中,我们将 translation 依照时间变化传给上面的顶点着色器,就可以让方块移动。利用下面的代码,我们就可以让方块沿水平方向向右匀速运动一段距离。最终效果看这里 (opens new window)。
const canvas = document.querySelector('canvas');
const renderer = new GlRenderer(canvas);
const program = renderer.compileSync(fragment, vertex);
renderer.useProgram(program);
renderer.uniforms.color = [1, 0, 0, 1];
renderer.uniforms.translation = [-0.5, 0];

const animator = new Animator({duration: 2000});
animator.animate(renderer, ({target, timing}) => {
  target.uniforms.translation = [-0.5 * (1 - timing.p) + 0.5 * timing.p, 0];
});

renderer.setMeshData([{
  positions: [
    [-0.25, -0.25],
    [-0.25, 0.25],
    [0.25, 0.25],
    [0.25, -0.25],
  ],
  attributes: {
    uv: [
      [0, 0],
      [0, 1],
      [1, 1],
      [1, 0],
    ],
  },
  cells: [[0, 1, 2], [2, 0, 3]],
}]);
renderer.render();
2
3
4
5
6
7
8
9
10
11
12
13
14
15
16
17
18
19
20
21
22
23
24
25
26
27
28
29
30
# 实现匀变速运动
此外,我们还可以通过缓动函数来实现非匀速运动。而且我们既可以将缓动函数用 JavaScript 计算,也可以直接将缓动函数放在 Shader 中。
如果将缓动函数用 JavaScript 计算,那么方法和之前的完全一样,也就是给 Animator 传一个 easing 函数进去就可以了。
下面介绍下将缓动函数写在 Shader 中的方法。
以前面顶点着色器实现非固定帧动画的代码为例,这次,我们不使用 Animator,而是直接将时间 uTime 参数传入 Shader,然后在 Shader 中加入缓动函数。
在这里,我们用 smooth(0.0, 1.0, p) 来让方块做平滑加速、减速运动。除此之外,也可以替换缓动函数,比如 clamp(p * p, 0.0, 1.0) 或者 clamp(p * (2 - p) * 0.0, 1.0) 来实现匀加速、匀减速的运动效果。最终效果看这里 (opens new window)。
attribute vec2 a_vertexPosition;
attribute vec2 uv;

varying vec2 vUv;
uniform vec4 uFromTo;
uniform float uTime;

float easing(in float p) {
  return smoothstep(0.0, 1.0, p);
  // return clamp(p * p, 0.0, 1.0);
  // return clamp(p * (2 - p) * 0.0, 1.0);
}

void main() {
  gl_PointSize = 1.0;
  vUv = uv;
  vec2 from = uFromTo.xy;
  vec2 to = uFromTo.zw;
  float p = easing(uTime / 2.0);
  vec2 translation = mix(from, to, p);
  mat3 transformMatrix = mat3(
    1, 0, 0,
    0, 1, 0,
    translation, 1
  );
  vec3 pos = transformMatrix * vec3(a_vertexPosition, 1);
  gl_Position = vec4(pos, 1);
}
2
3
4
5
6
7
8
9
10
11
12
13
14
15
16
17
18
19
20
21
22
23
24
25
26
27
28
总之,因为 Shader 是在 GPU 中运算的,所以所有顶点都是被并行处理的。因此,通常情况下,我们在顶点着色器中执行缓动函数会更快。
# 非线性插值
直接用 JavaScript 计算和放在顶点着色器里计算,差别也不是很大,但如果把它放在片元着色器里计算,因为要把每个像素点都计算一遍,所以性能消耗反而更大一些。
既然这样,为什么还要在片元着色器中计算 easing 呢?
这是因为,我们不仅可以利用 easing 控制动画过程,还可以在片元着色器中用 easing 来实现非线性插值。
在正常情况下,顶点着色器定义的变量在片元着色器中,都会被线性插值。比如下面的代码执行后会得到一个长方形,它的颜色会从左到右,由红色线性地过渡到绿色。最终效果看这里 (opens new window)。
// 顶点着色器
attribute vec2 a_vertexPosition;
attribute vec2 uv;
attribute vec4 color;

varying vec2 vUv;
varying vec4 vColor;
uniform vec4 uFromTo;
uniform float uTime;

void main() {
  gl_PointSize = 1.0;
  vUv = uv;
  vColor = color;
  gl_Position = vec4(a_vertexPosition, 1, 1);
}

// 片元着色器
#ifdef GL_ES
precision highp float;
#endif

varying vec2 vUv;
varying vec4 vColor;

void main() {
  gl_FragColor = vColor;
}

// JavaScript 中的代码
renderer.setMeshData([{
  positions: [
    [-0.5, -0.25],
    [-0.5, 0.25],
    [0.5, 0.25],
    [0.5, -0.25],
  ],
  attributes: {
    uv: [
      [0, 0],
      [0, 1],
      [1, 1],
      [1, 0],
    ],
    color: [
      [1, 0, 0, 1],
      [1, 0, 0, 1],
      [0, 0.5, 0, 1],
      [0, 0.5, 0, 1],
    ],
  },
  cells: [[0, 1, 2], [2, 0, 3]],
}]);
renderer.render();
2
3
4
5
6
7
8
9
10
11
12
13
14
15
16
17
18
19
20
21
22
23
24
25
26
27
28
29
30
31
32
33
34
35
36
37
38
39
40
41
42
43
44
45
46
47
48
49
50
51
52
53
54
如果想要实现非线性的颜色过渡,就不能采用这种方式了,可以采用 uniform 的方式,通过 easing 函数来实现。最终效果看这里 (opens new window)。
#ifdef GL_ES
precision highp float;
#endif

float easing(in float p) {
  return smoothstep(0.0, 1.0, p);
  // return clamp(p * p, 0.0, 1.0);
  // return clamp(p * (2 - p) * 0.0, 1.0);
}

varying vec2 vUv;
uniform vec4 fromColor;
uniform vec4 toColor;

void main() {
  float d = easing(vUv.x);
  gl_FragColor = mix(fromColor, toColor, d);
}
2
3
4
5
6
7
8
9
10
11
12
13
14
15
16
17
18
# 实现贝塞尔曲线缓动
此外,还可以像利用 JavaScript 那样,在 Shader 里实现贝塞尔曲线缓动。最终效果看这里 (opens new window)。
// http://www.flong.com/texts/code/shapers_bez/
// Helper functions:
float slope_from_t (float t, float A, float B, float C){
  float dtdx = 1.0/(3.0*A*t*t + 2.0*B*t + C);
  return dtdx;
}

float x_from_t (float t, float A, float B, float C, float D){
  float x = A*(t*t*t) + B*(t*t) + C*t + D;
  return x;
}

float y_from_t (float t, float E, float F, float G, float H){
  float y = E*(t*t*t) + F*(t*t) + G*t + H;
  return y;
}

float cubic_bezier (float x, float a, float b, float c, float d){
  float y0a = 0.00; // initial y
  float x0a = 0.00; // initial x
  float y1a = b;    // 1st influence y
  float x1a = a;    // 1st influence x
  float y2a = d;    // 2nd influence y
  float x2a = c;    // 2nd influence x
  float y3a = 1.00; // final y
  float x3a = 1.00; // final x

  float A = x3a - 3.0 *x2a + 3.0 * x1a - x0a;
  float B = 3.0 * x2a - 6.0 * x1a + 3.0 * x0a;
  float C = 3.0 * x1a - 3.0 * x0a;
  float D = x0a;

  float E = y3a - 3.0 * y2a + 3.0 * y1a - y0a;
  float F = 3.0 * y2a - 6.0 * y1a + 3.0 * y0a;
  float G = 3.0 * y1a - 3.0 * y0a;
  float H = y0a;

  // Solve for t given x (using Newton-Raphelson), then solve for y given t.
  // Assume for the first guess that t = x.
  float currentt = x;
  const int nRefinementIterations = 5;
  for (int i=0; i < nRefinementIterations; i++){
    float currentx = x_from_t(currentt, A,B,C,D);
    float currentslope = slope_from_t(currentt, A,B,C);
    currentt -= (currentx - x)*(currentslope);
    currentt = clamp(currentt, 0.0, 1.0);
  }

  float y = y_from_t(currentt, E,F,G,H);
  return y;
}
2
3
4
5
6
7
8
9
10
11
12
13
14
15
16
17
18
19
20
21
22
23
24
25
26
27
28
29
30
31
32
33
34
35
36
37
38
39
40
41
42
43
44
45
46
47
48
49
50
51
# 实现随机粒子动画
下面的代码使用随机 + 噪声来实现一个粒子效果。首先,我们设置随机数用来生成距离场的初始值,然后设置噪声用来形成位移,最后传入 uTime 变量来实现动画。最终效果看这里 (opens new window)。
#ifdef GL_ES
precision highp float;
#endif

highp float random(vec2 co) {
  highp float a = 12.9898;
  highp float b = 78.233;
  highp float c = 43758.5453;
  highp float dt= dot(co.xy ,vec2(a,b));
  highp float sn= mod(dt,3.14);
  return fract(sin(sn) * c);
}

// Value Noise by Inigo Quilez - iq/2013
// https://www.shadertoy.com/view/lsf3WH
highp float noise(vec2 st) {
  vec2 i = floor(st);
  vec2 f = fract(st);
  vec2 u = f * f * (3.0 - 2.0 * f);
  return mix( mix( random(i + vec2(0.0,0.0)),
    random(i + vec2(1.0,0.0)), u.x),
    mix( random(i + vec2(0.0,1.0)),
    random(i + vec2(1.0,1.0)), u.x), u.y);
}

float sdf_circle(vec2 st, vec2 c, float r) {
  return 1.0 - length(st - c) / r;
}

varying vec2 vUv;
uniform float uTime;

void main() {
  vec2 st = vUv;
  float rx = mix(-0.2, 0.2, noise(vec2(7881.32, 0) + random(st) + uTime));
  float ry = mix(-0.2, 0.2, noise(vec2(0, 1433.59) + random(st) + uTime));
  float dis = distance(st, vec2(0.5));
  dis = pow((1.0 - dis), 2.0);
  float d = sdf_circle(st + vec2(rx, ry), vec2(0.5), 0.2);
  d = smoothstep(0.0, 0.1, d);
  gl_FragColor = vec4(dis * d * vec3(1.0), 1.0);
}
2
3
4
5
6
7
8
9
10
11
12
13
14
15
16
17
18
19
20
21
22
23
24
25
26
27
28
29
30
31
32
33
34
35
36
37
38
39
40
41
42
43